Setting Up AdSense Auto Ads: A Step-by-Step Guide
Explore the delicate balance of website advertising with our comprehensive guide on Google AdSense. Discover effective settings, strategies to enhance user experience, and tips for maximizing revenue without compromising content quality


Introduction
Let's first understand why there's a need to configure anything at all. After all, in the previous part (see How to launch AdSense advertising?), we put in the effort to enable ads—ads are already running. Isn’t that enough?
Auto ads often aggressively take over the pages of your website, and sometimes they even interfere with consuming content. The purpose of making adjustments to the basic settings is to ensure that the ads don't start pushing away your users/readers/consumers.
Our goal today is to find a balance between ad revenue and the number of ads. It's clear that the placement also greatly impacts user experience, so everything must work together to ensure a comfortable experience for the user.
Finances
I want to warn you right away that reducing the number of ad blocks will, of course, impact your earnings. However, if this improves the appearance and attractiveness of your pages, it may attract new users and possibly even help convert them into regular visitors.
As for how to assess these so-called losses, there are certain conditions. It's only realistic to do this when your earnings are stable over a significant period, and the fluctuations in income do not exceed 5-10%. Knowing your figures in such cases allows for a proper analysis of the following months, as well as an evaluation and prediction of profit.
Everyone knows how to calculate their money well, so I'll leave that for you to work on independently. Now, let's continue with configuring auto ads.
Ad Configuration
Before we begin, it's important to note that ads can either be automatically added to your website's pages or manually inserted via ad blocks created and embedded in your site's code. This article focuses solely on automatically added ads.
Getting Familiar with the Interface
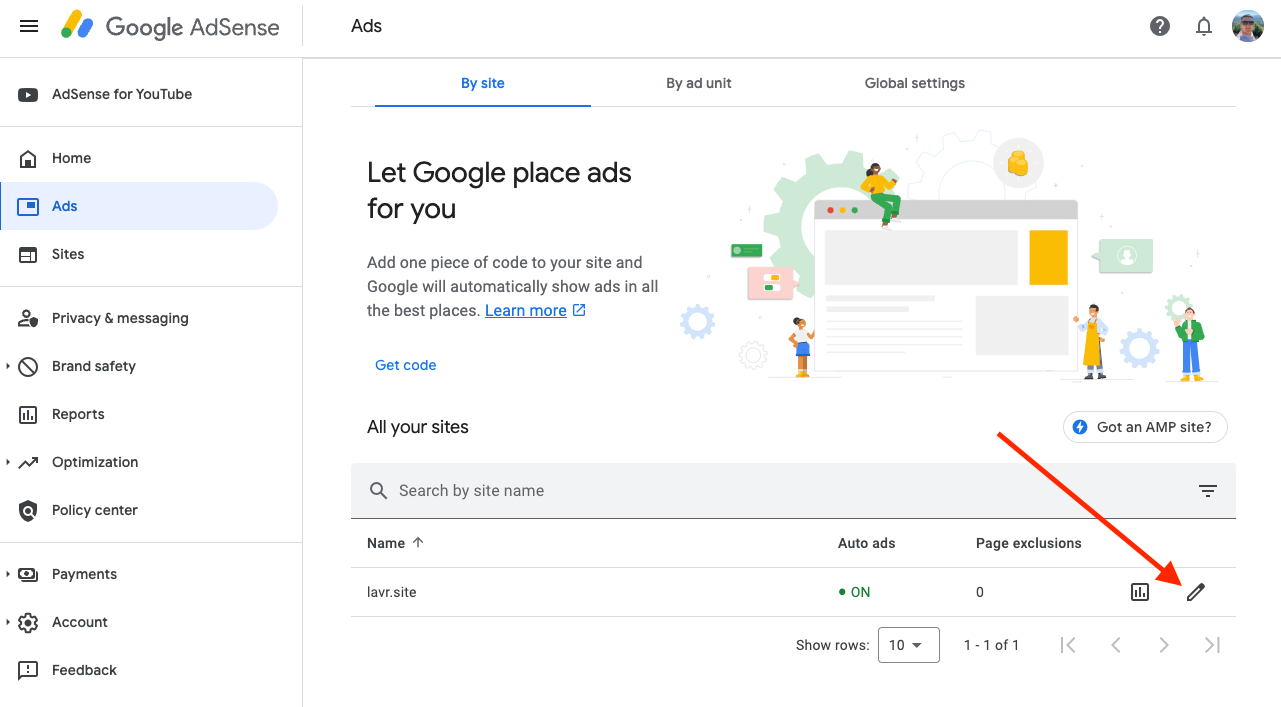
To access the settings, log in to your profile, then go to the Ads page. In the table listing your websites, click on the edit button next to the relevant site.
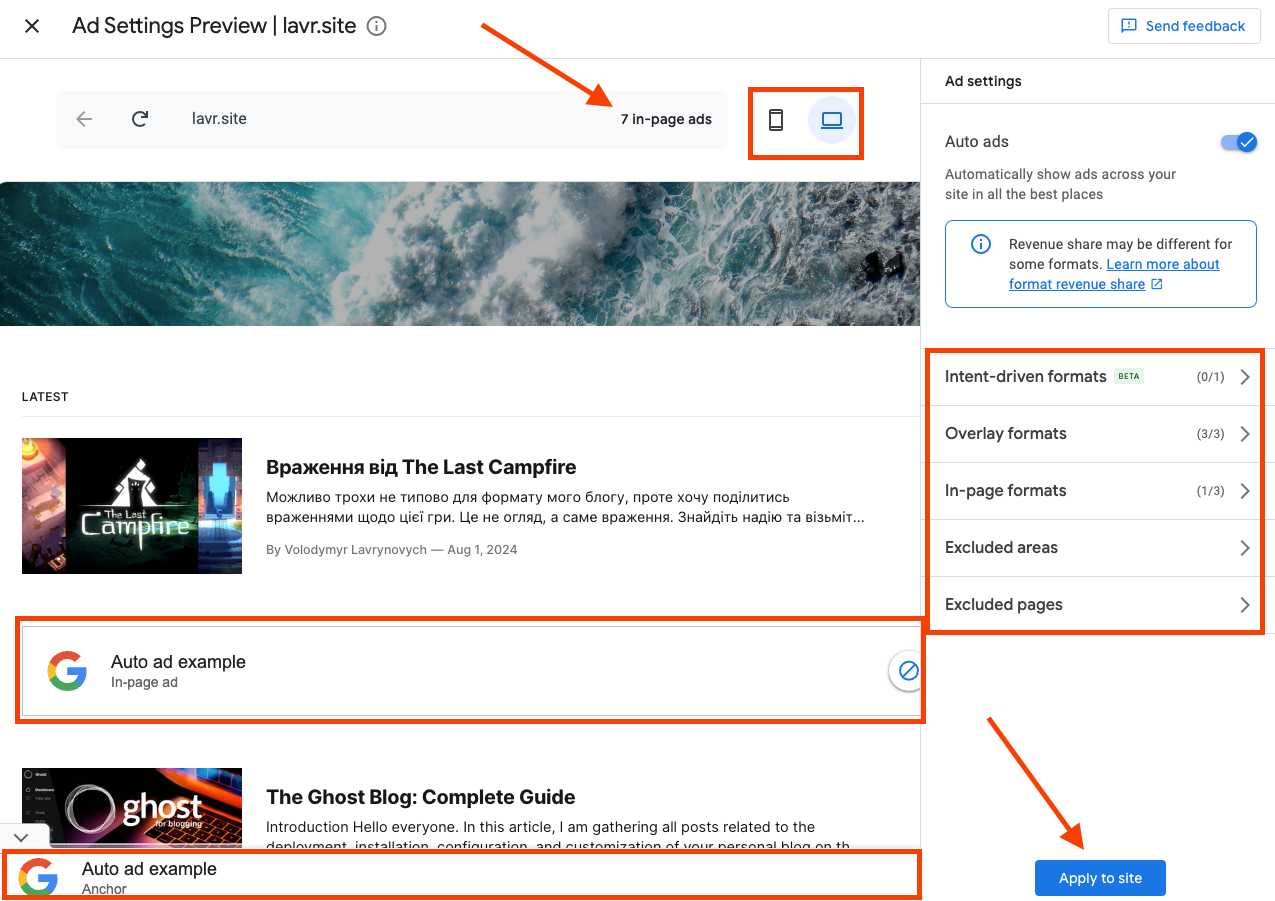
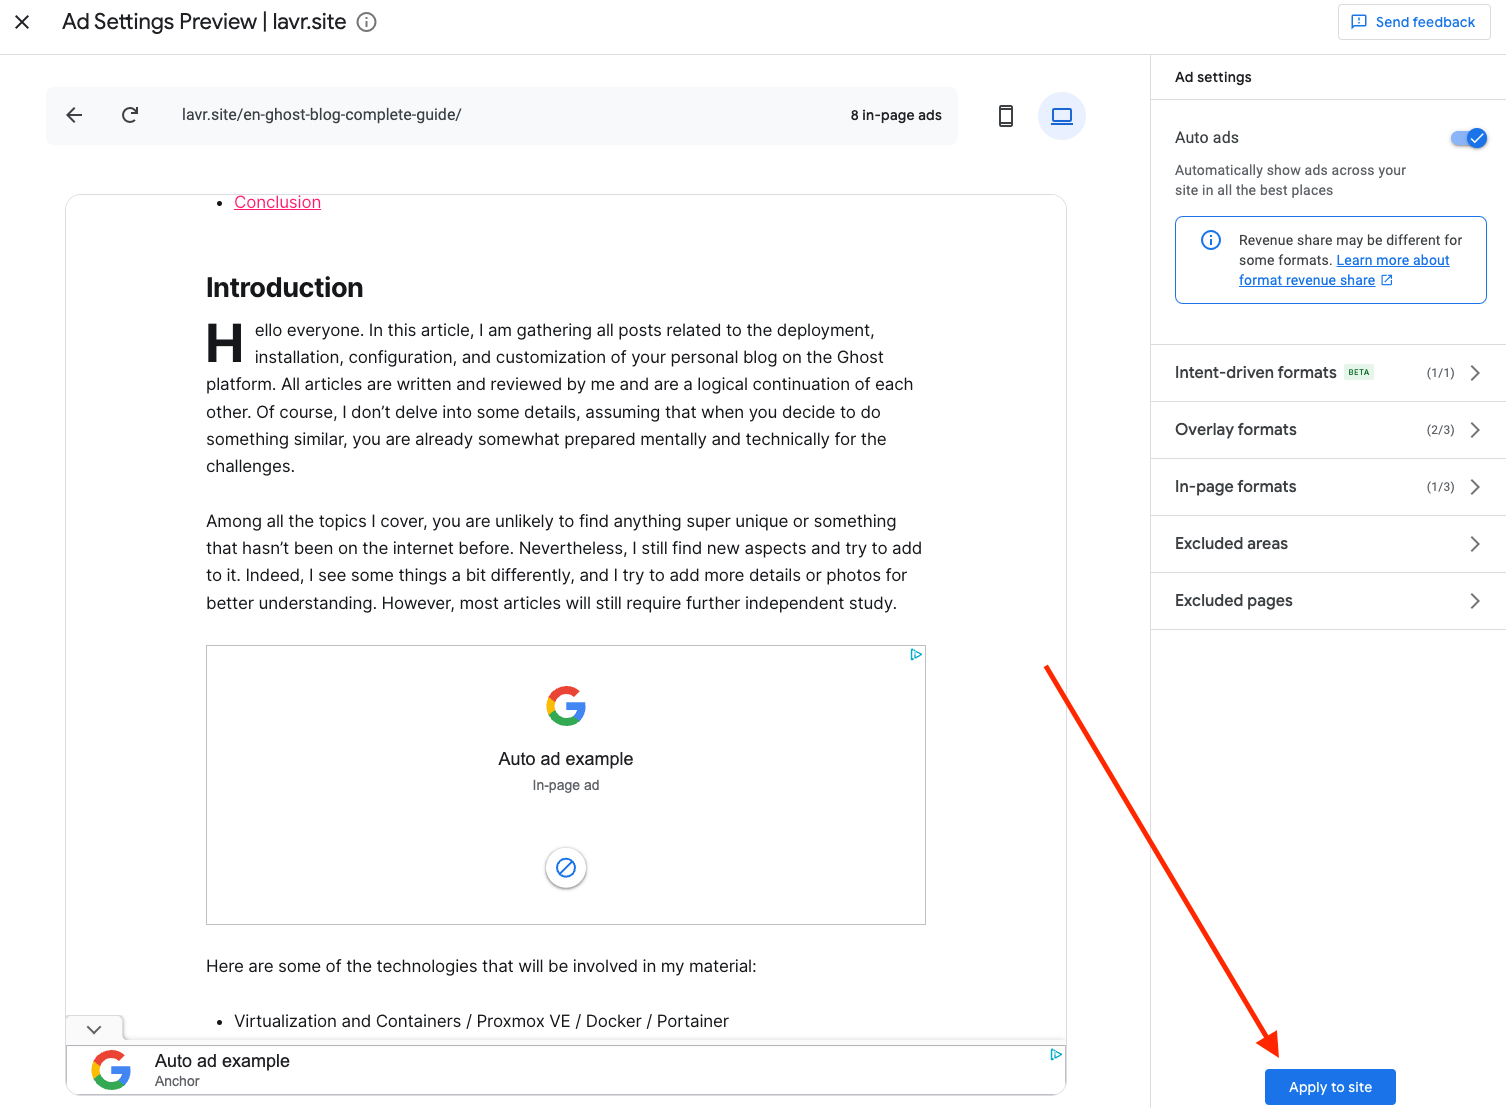
Now, let's take a look at what we'll be working with. There's quite a bit here. For convenience, I've highlighted some important components of this editor:
- At the top, you'll see the number of ad blocks on the page based on the current settings. This number will change dynamically.
- Next to it is a toggle switch for display format—either for mobile devices or desktop computers.
- On the right, there's a panel with different types of ads that can be individually configured.
- In the central part, you can see your website with examples of ad placements, complete with buttons to remove ads—this is quite handy.
Intent-Driven Formats
Intent-driven formats in AdSense are an ad targeting method that considers users' intentions and interests based on their online behavior. Instead of simply displaying ads based on the page's context, these formats use data about users' actions to determine which ads may be most relevant to them.
The core principle involves collecting data on user behavior, such as search history and website visits. For example, if a user frequently searches for travel information or browses travel agency websites, AdSense may display ads related to trips, flights, or hotels. This approach makes the ads more relevant and engaging for users.
Such targeting increases the likelihood that users will interact with ads, as they are shown in line with their current interests. This benefits not only the users, who see useful ads, but also advertisers by improving campaign effectiveness and increasing the chances of conversions.
However, this approach requires careful attention to data privacy. It's important to ensure transparency in how user data is utilized and to adhere to privacy standards to avoid issues and obtain user consent for processing their data.
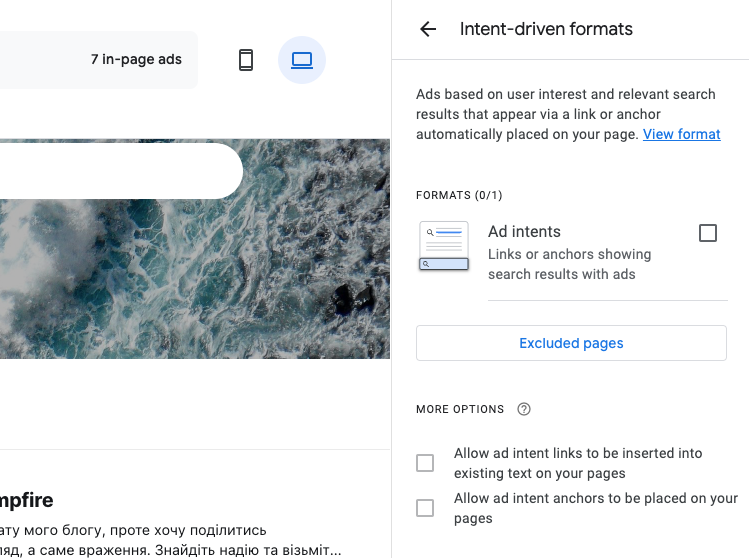
As we can see, there are two types of settings for intent-driven ad formats:
- Allow ad intent links to be inserted into existing text on your pages: This setting allows AdSense to automatically insert ad links into the text of your website. For example, if you have an article about travel, AdSense might add links to travel services or offers that match the context and users' interests.
- Allow ad intent anchors to be placed on your pages: This setting allows AdSense to place anchor links (such as buttons or banners) on your site. These links are more visible and tend to draw more attention from users because they appear as distinct elements on the page, rather than as part of the text.
Both of these settings help optimize your site's monetization by making ads more integrated into the content and more relevant to user interests.
Overlay Formats
Overlay formats are ads that appear over the page content, offering an interactive and noticeable way to display ads to users. They are designed to capture attention while users interact with the website.
By default, all overlay ads are enabled. The only adjustment I'll make is disabling Side Rail Ads.
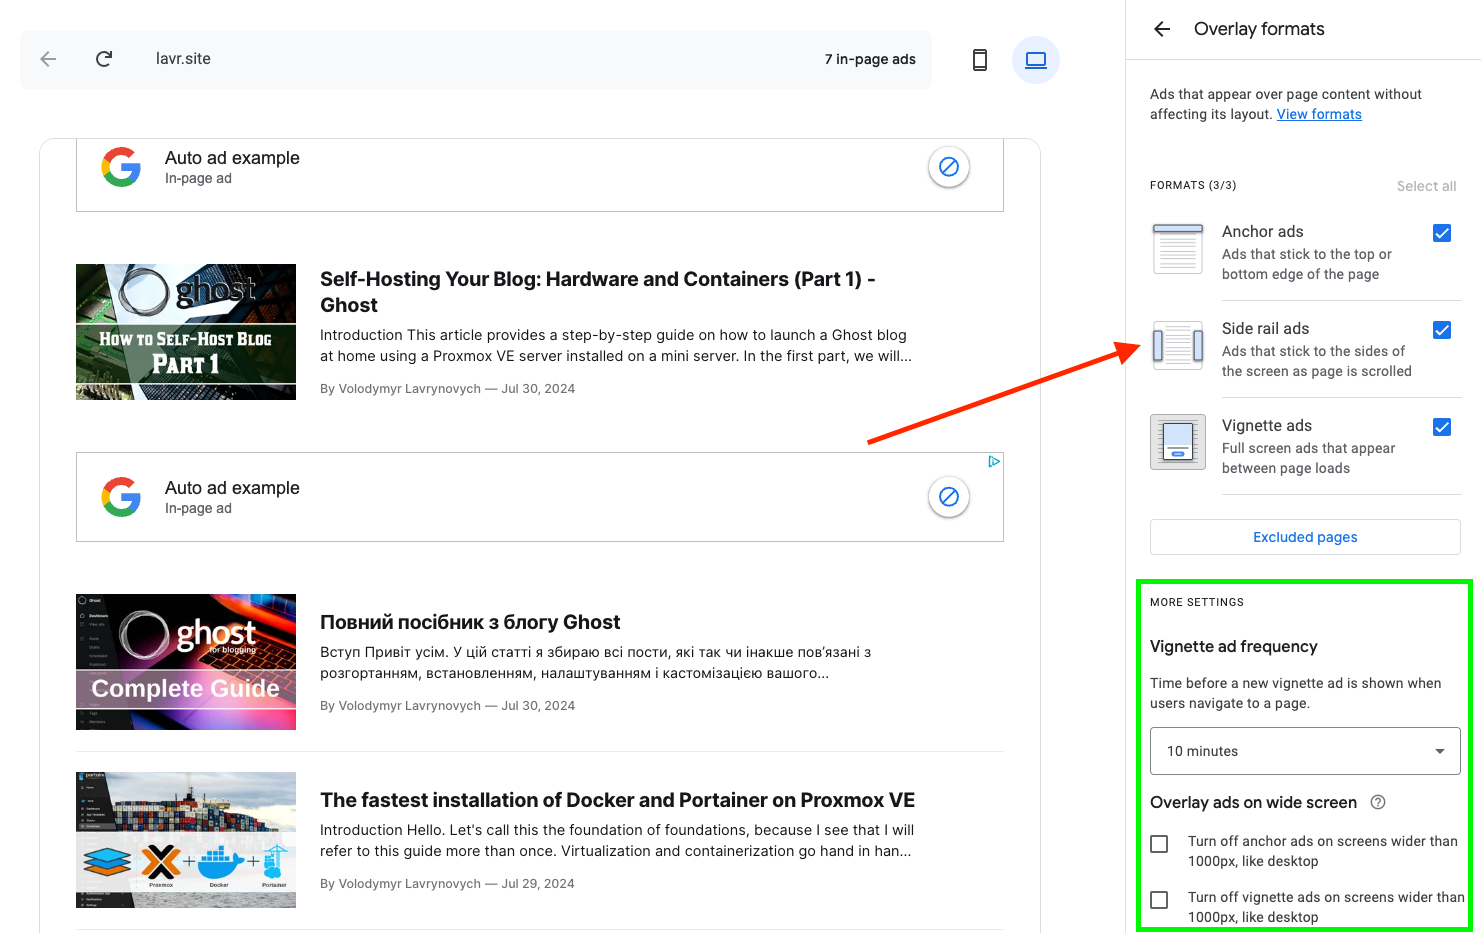
The block highlighted in green remains unchanged, and a 10-minute interval for displaying Vignette ads is satisfactory. The other checkboxes for screens over 1000px also sound reasonable, as most users have such screens. If someone has a smaller screen, why remove the ads?
The button above the green block, Excluded Pages, allows you to disable all ads of all three types entirely for specific pages. For now, I haven't found the need for that.
1. Anchor Ads
Anchor ads are displayed at the bottom or top of a web page. They remain visible while the page is being scrolled, making them constantly accessible to the user.
Features: They take up minimal space and can be easily closed by the user, ensuring a less aggressive interaction.
Advantages: Due to their constant visibility, anchor ads have a high engagement rate without obstructing users from viewing the site's content.
There are usually no complaints about this type of ad on any site, as it doesn’t cover important content, which can't be said for the next type.
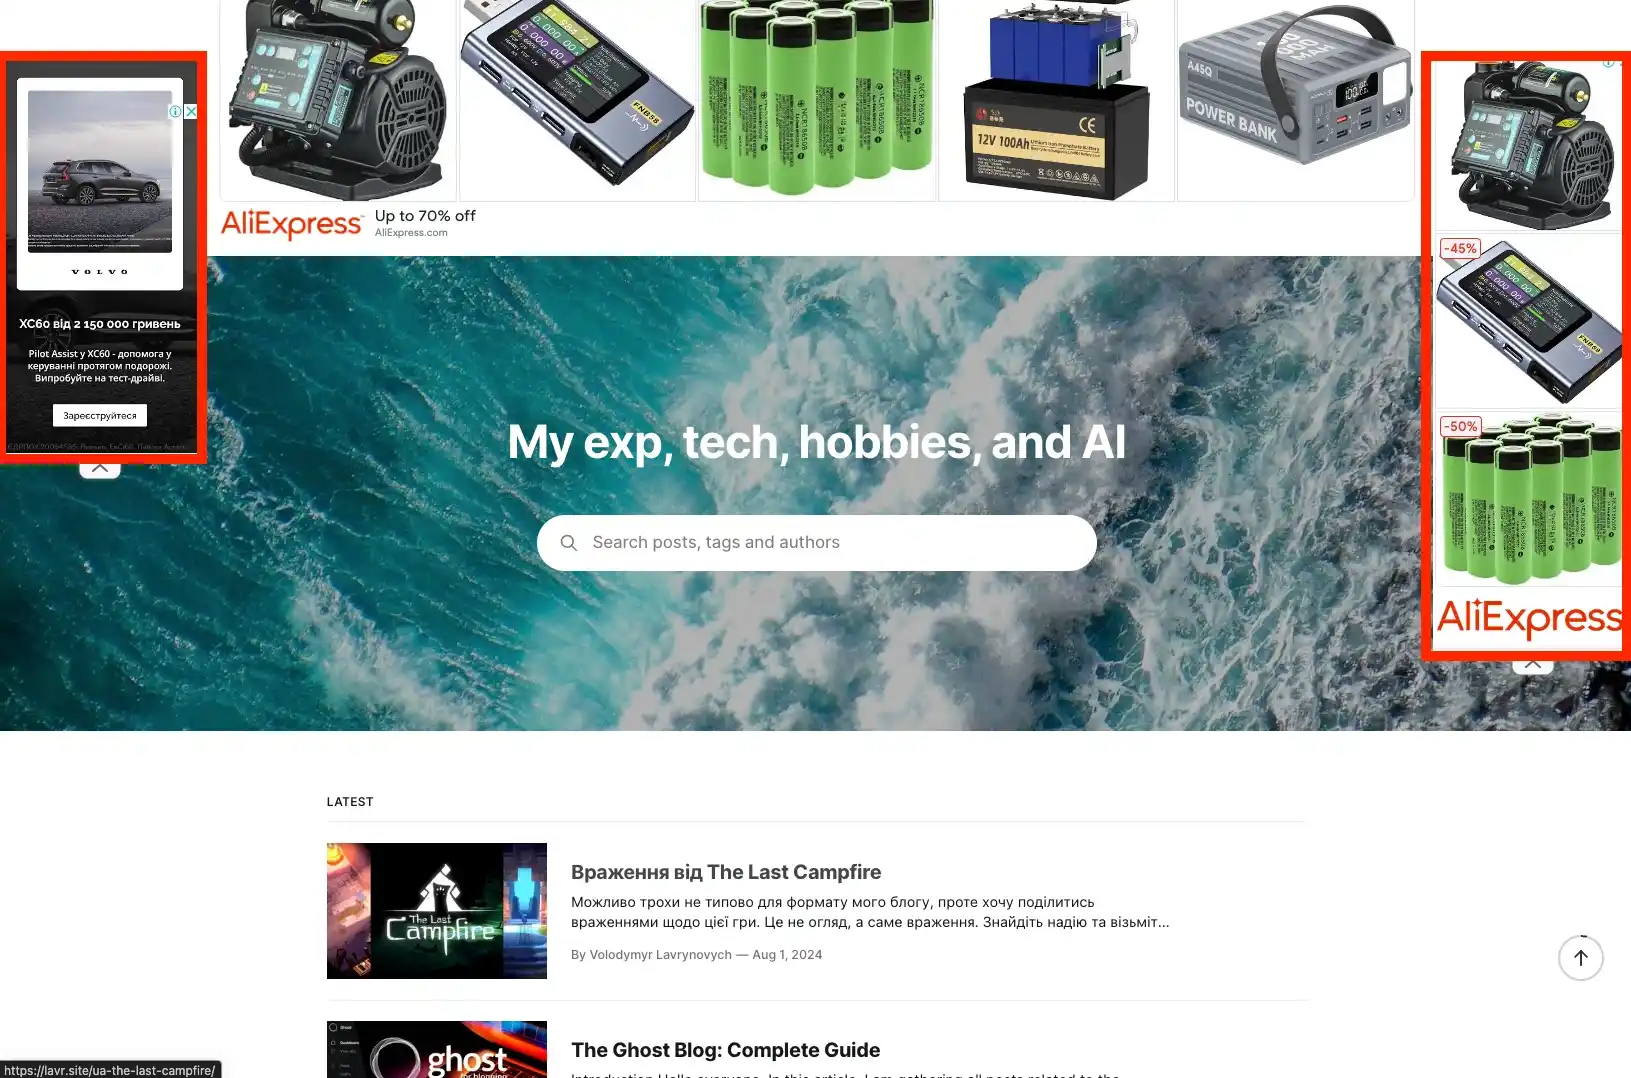
2. Side Rail Ads
Side rail ads are positioned on the sides of the screen on larger displays. They only appear on desktop computers where there is enough space for them.
Features: They don’t interfere with the main content but attract attention due to their placement.
Advantages: They are well-suited for large screens and do not disrupt users, providing additional space for advertising.
Among the three types, side rail ads bother me the most—not just on my blog but also on other websites. They draw too much attention and make the page look reminiscent of sites from the 2000s.
Here’s how my blog looks with them. It’s really unattractive. Plus, they slide down as you scroll. I’m definitely turning these off and breathing a sigh of relief!
3. Vignette Ads
Vignette ads are fullscreen ads that appear between page transitions or when leaving the site.
Features: These ads take up the entire screen and can be closed by the user after a few seconds or immediately.
Advantages: Due to their visibility, vignette ads provide a high level of reach and effectively capture attention. However, they should be used cautiously to avoid irritating users.
Vignette ads can be controversial, but personally, I’ve never found them bothersome. They’re always easy and quick to close, so they don’t create obstacles. I sometimes even view them as a brief pause between tasks.
Depending on the nature of your website, this type of ad block may not be suitable. Therefore, I’ll leave it up to your discretion. I won’t disable them on my site.
In-Page Formats
In-page formats are ads that are integrated directly into the content of a web page. They are part of the page and are typically positioned in ways that blend naturally with the overall design of the site.
1. Banner Ads
Banner ads are graphical advertisements that often include images, text, or animations. They are widely used due to their simplicity and flexibility in placement.
Placement: They can be positioned at the top of the page, at the bottom, or between content blocks. Various sizes are available, allowing for adaptation to the site’s design.
Features: They can be static or dynamic (with animation), depending on the campaign's goals.
Advantages: Due to their visibility, banner ads can effectively attract attention and enhance brand recognition.
This type of ad is enabled by default, but I really dislike when these ad blocks are placed closer to the beginning and end of the content. Ads placed directly within the text of an article look expected and don’t feel out of place. However, when such ads disrupt the navigation and browsing experience on the site, it becomes unattractive. Here’s an example from my blog.
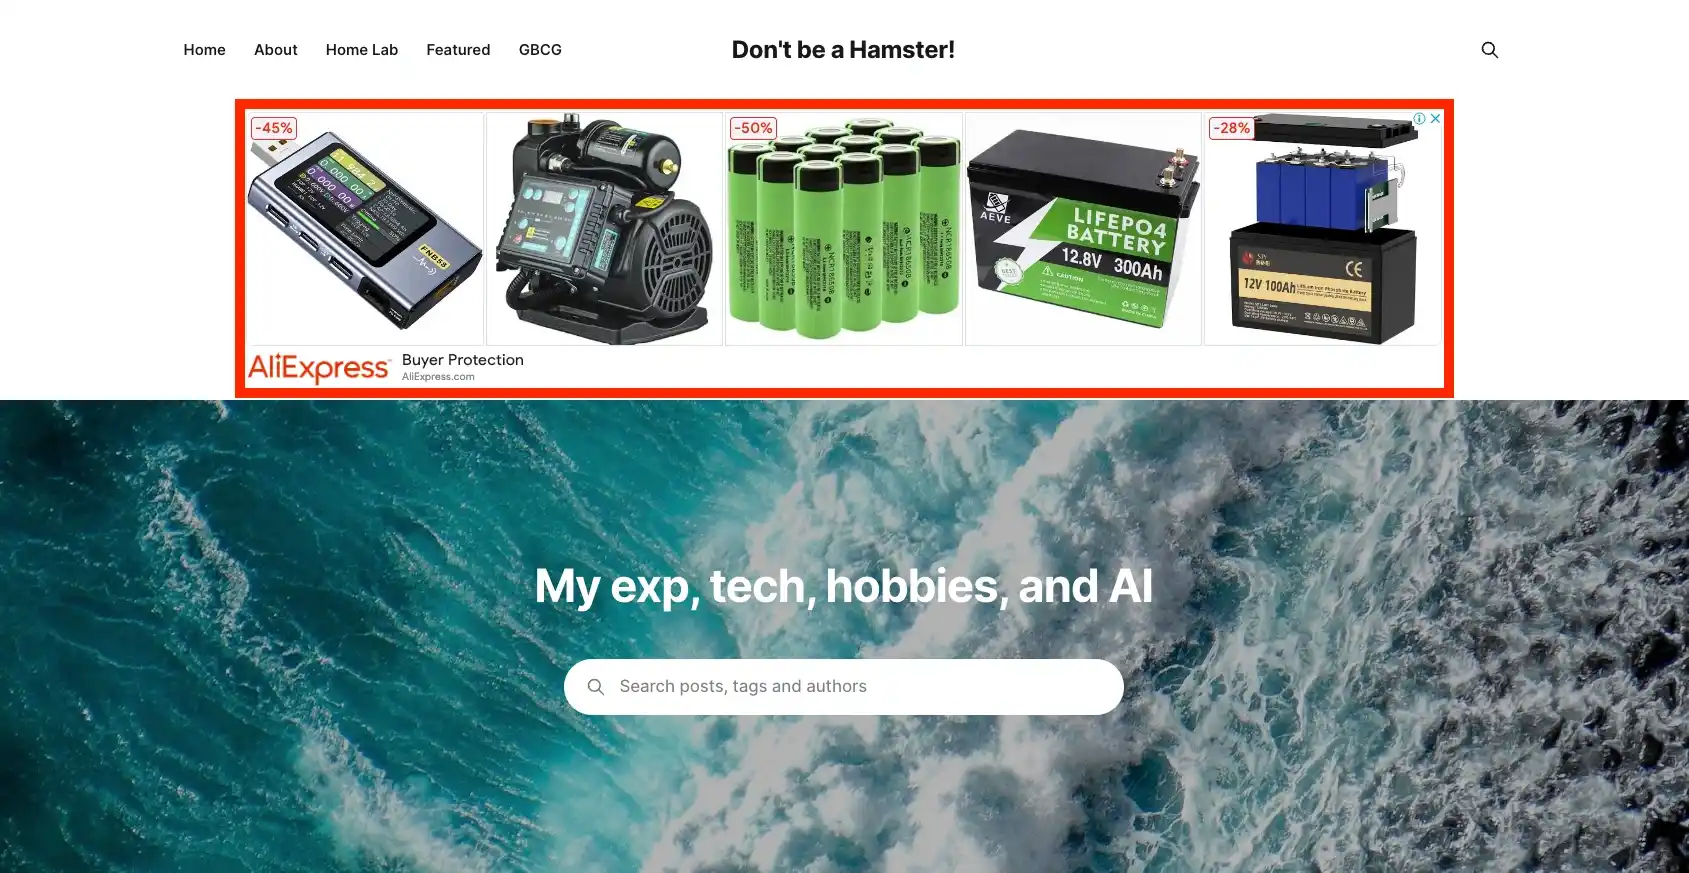
We won't completely disable this type of ad, but we will adjust the placement locations.
2. Multiplex Ads
Multiplex ads are a format similar to a content feed, featuring multiple ad blocks grouped together. They resemble cards, similar to those used in social networks.
Placement: They are inserted into content feeds or between articles on pages.
Features: Each block in a multiplex ad can contain different content, allowing users to interact with various advertising offers simultaneously.
Advantages: This format allows for more advertising content to be presented in a limited space, increasing the chances of user engagement.
You've likely seen these small blocks displaying 2 or 4 different products, creating a grid of images. Because each group of these small ads doesn't guarantee that the content will be visually cohesive, they often turn into a cluttered mess of pictures. It always looks unappealing. Is it effective? Perhaps trendy for some. But consider your site’s users—can they tolerate this?
Clearly, I’m leaving this option unchecked, and now let’s move on to the last format.
3. Related Search Ads
Related search ads are ads displayed as search queries related to the content on the page. They help users find additional information aligned with their interests.
Placement: Typically placed in side panels or at the bottom of the page.
Features: These ads mimic the appearance of search queries and can link to pages with additional content or products.
Advantages: With their interactive format, they provide utility for users by offering relevant results while also driving additional traffic.
Search for what? For what purpose? We don’t need this. Anyone who has seen these types of ads knows they are unnecessary and significantly disrupt content perception. I won’t enable them, and I don’t recommend you do either.
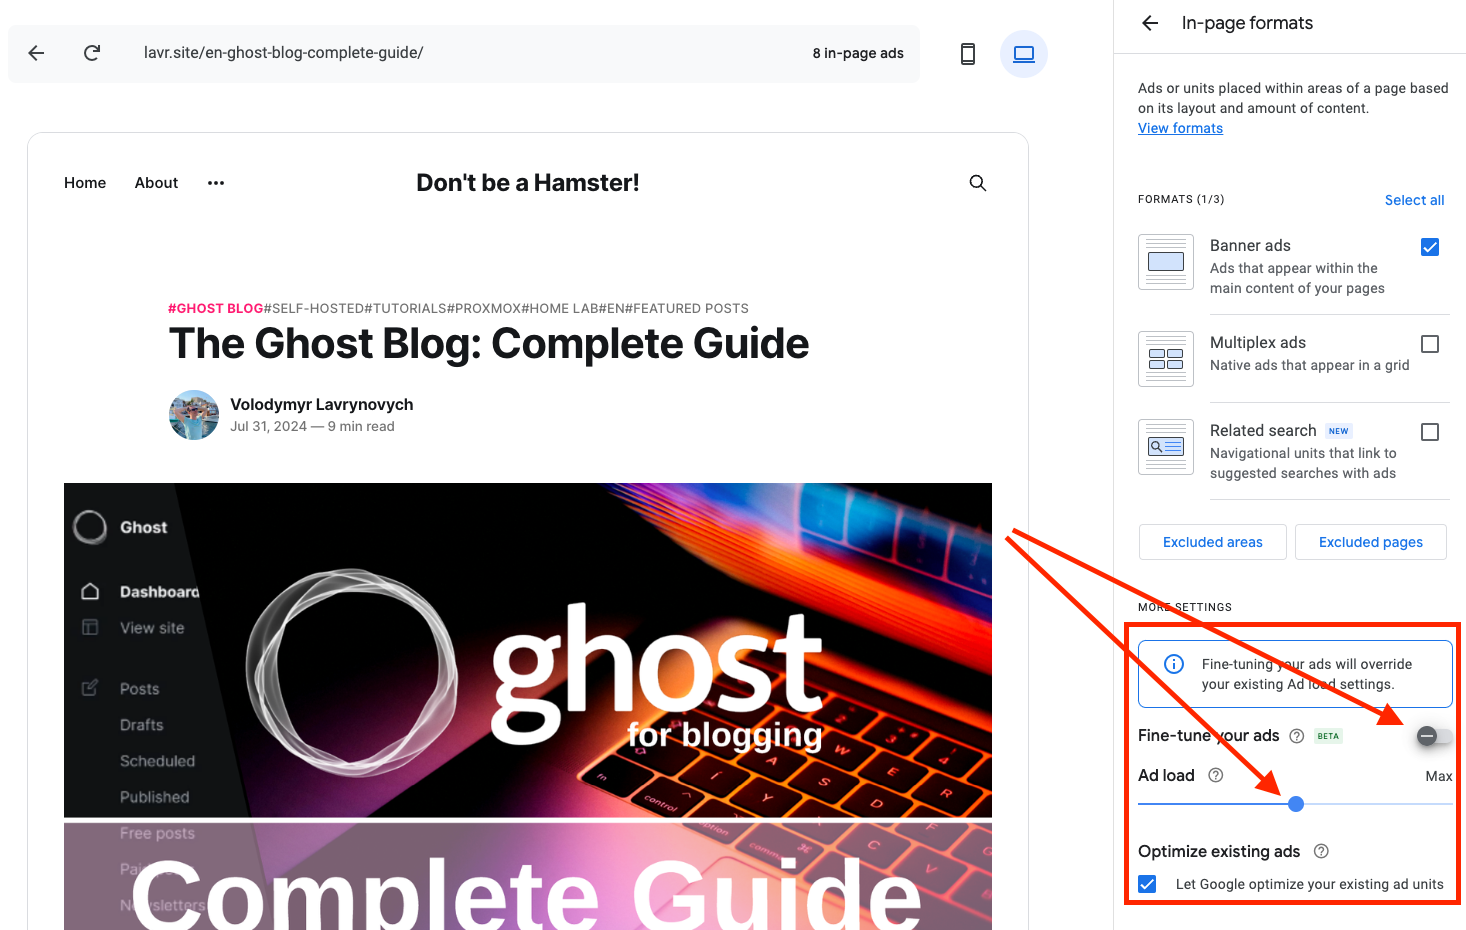
Fine-Tuning Ad Quantity
At the bottom of the right section, there’s a control for adjusting the amount of ads. It’s simplified to a slider that directly affects how many ads will be displayed.
Additionally, there’s a toggle that allows for finer adjustments of the minimum and maximum number of ads. This should be carefully tested in each specific case. I haven’t changed these parameters for myself yet, but I see that I’ll likely tweak them in the future.
Disabling Ads for Specific Areas and Pages
Excluded areas allow you to disable ads in certain zones, while Excluded pages lets you turn off ads on specific pages. This can help you remove ads from places where they don’t fit with the content or interfere with users, without disabling specific ad formats for your entire site.
Excluded Areas
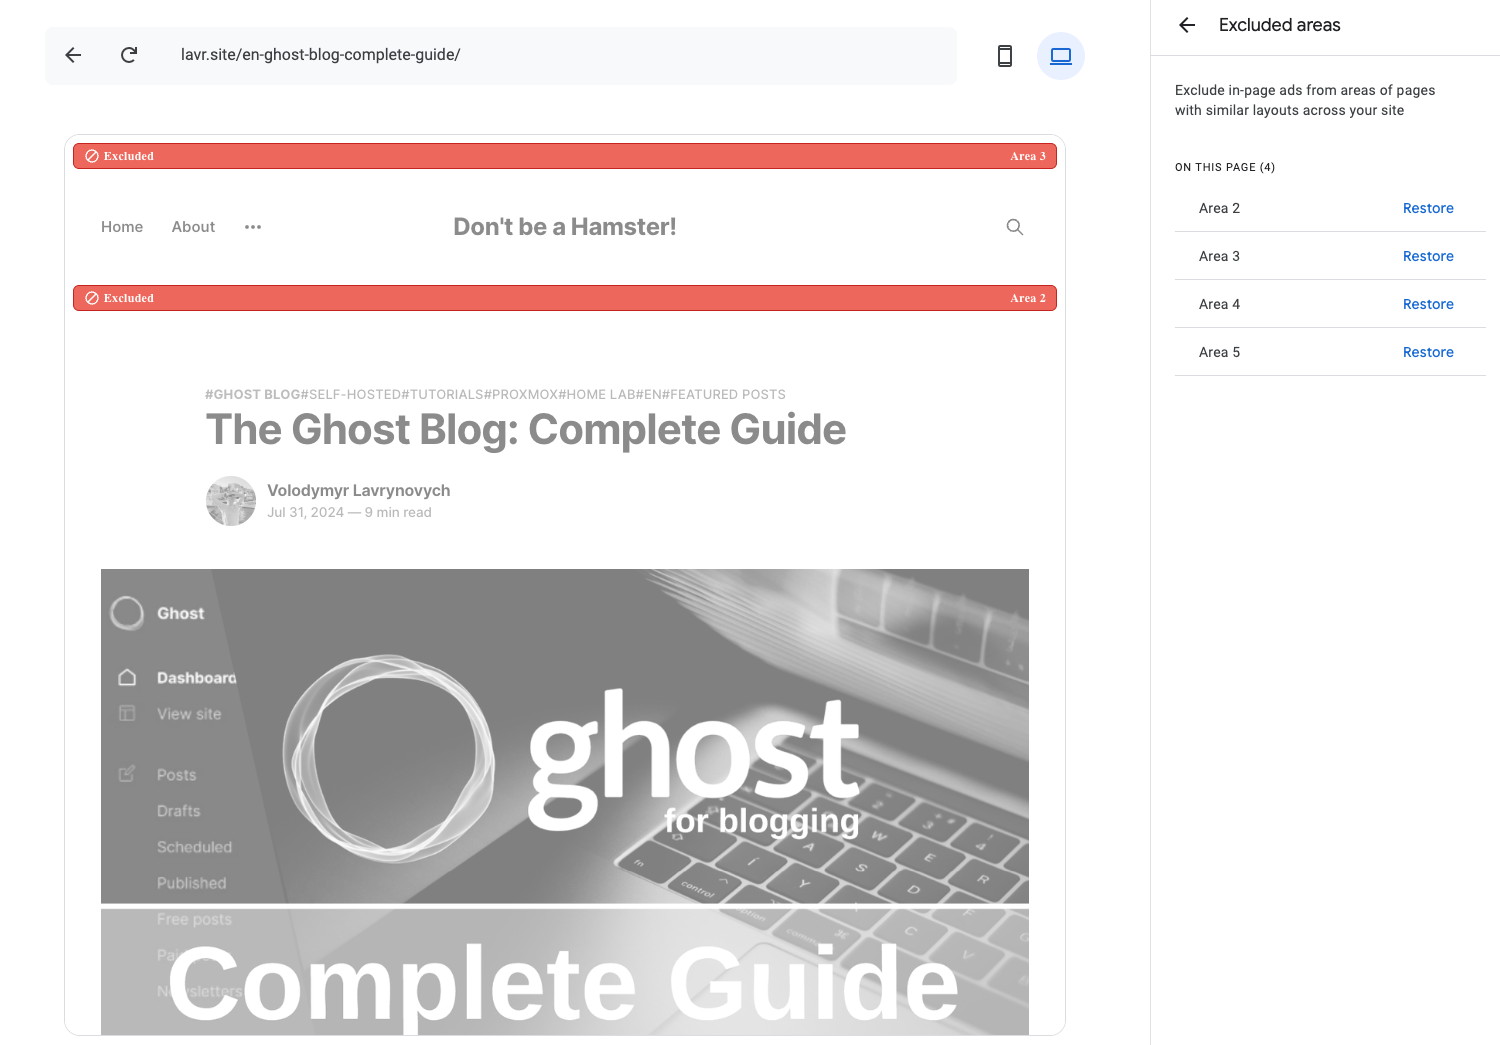
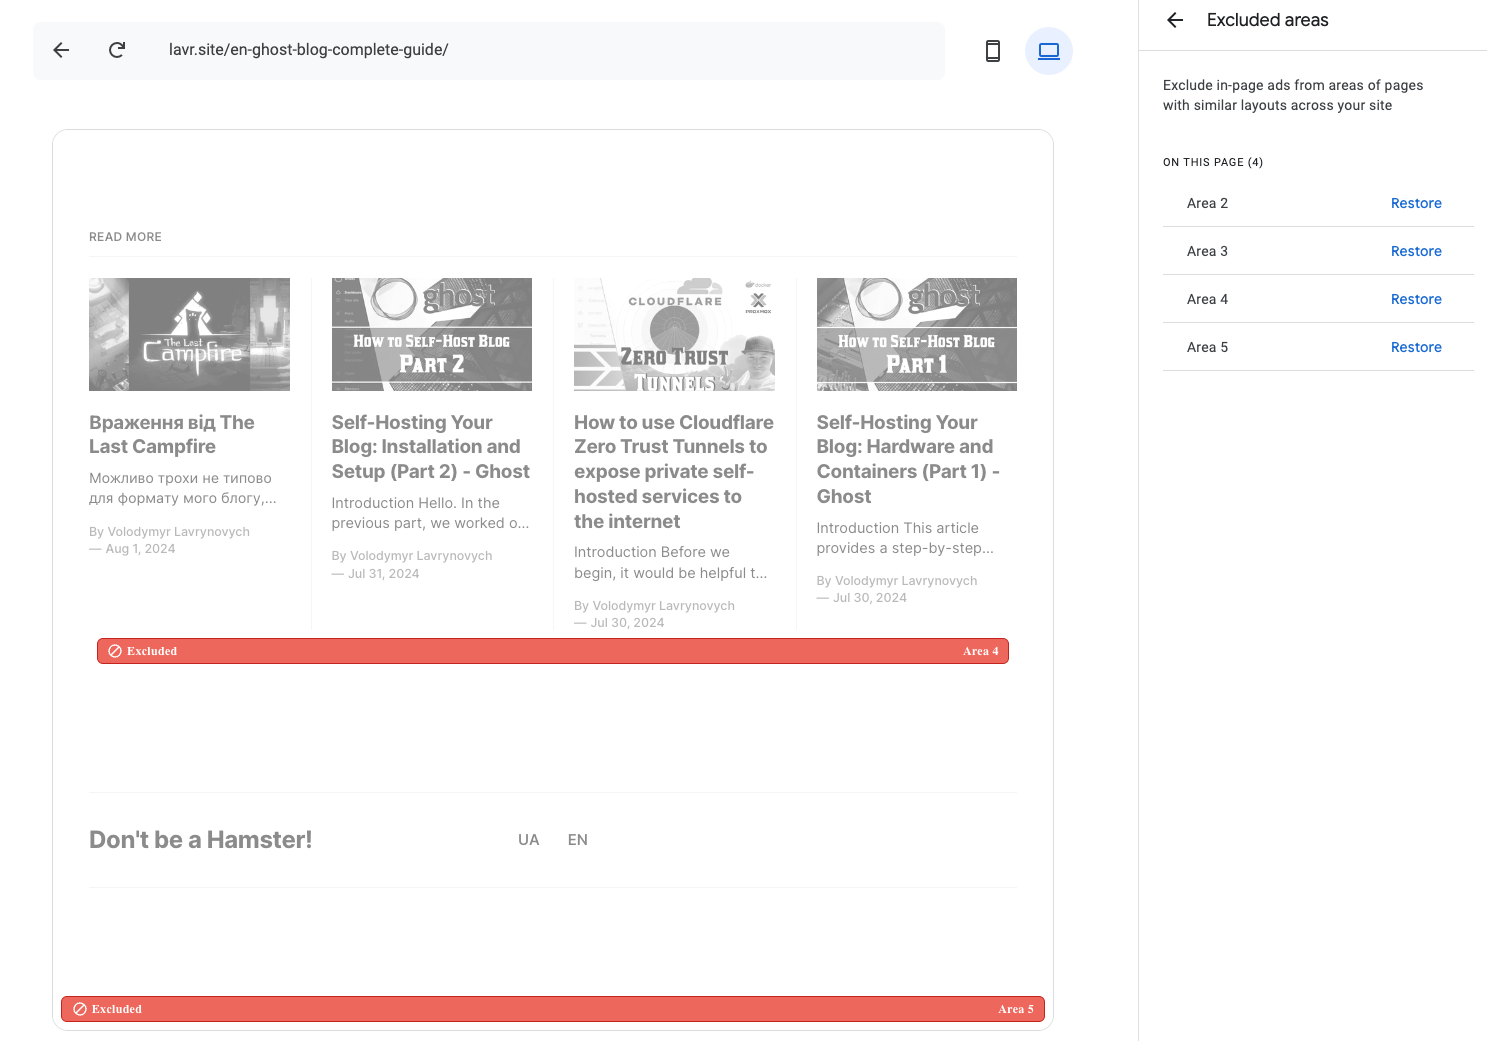
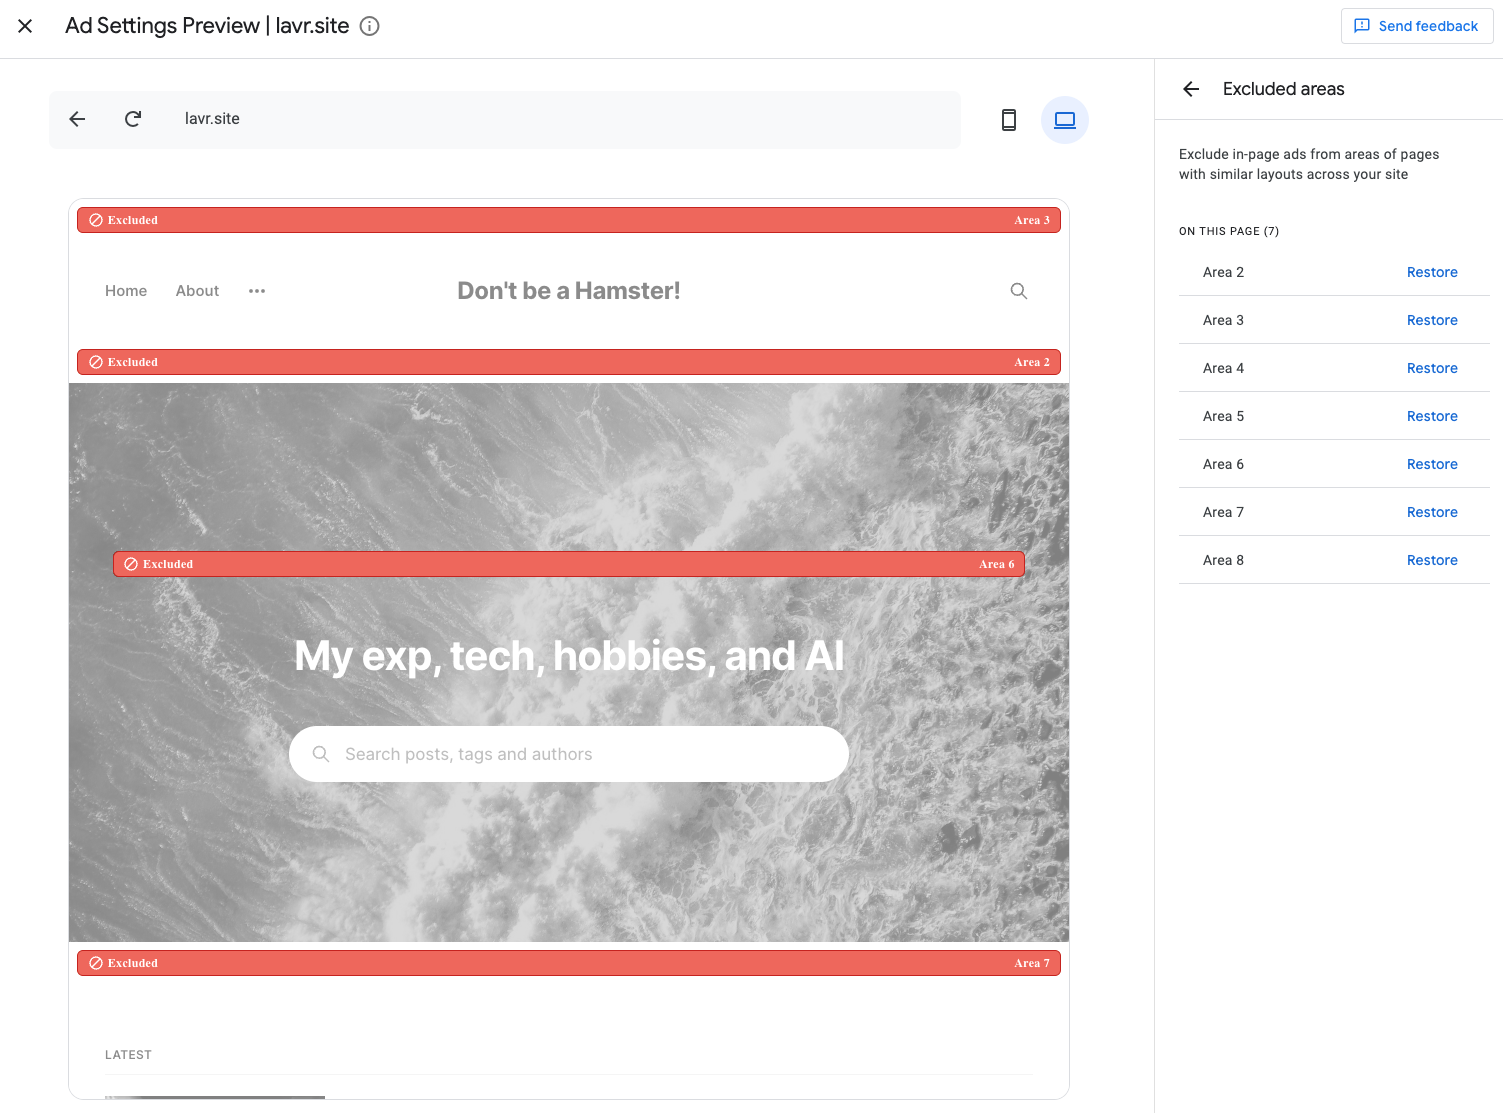
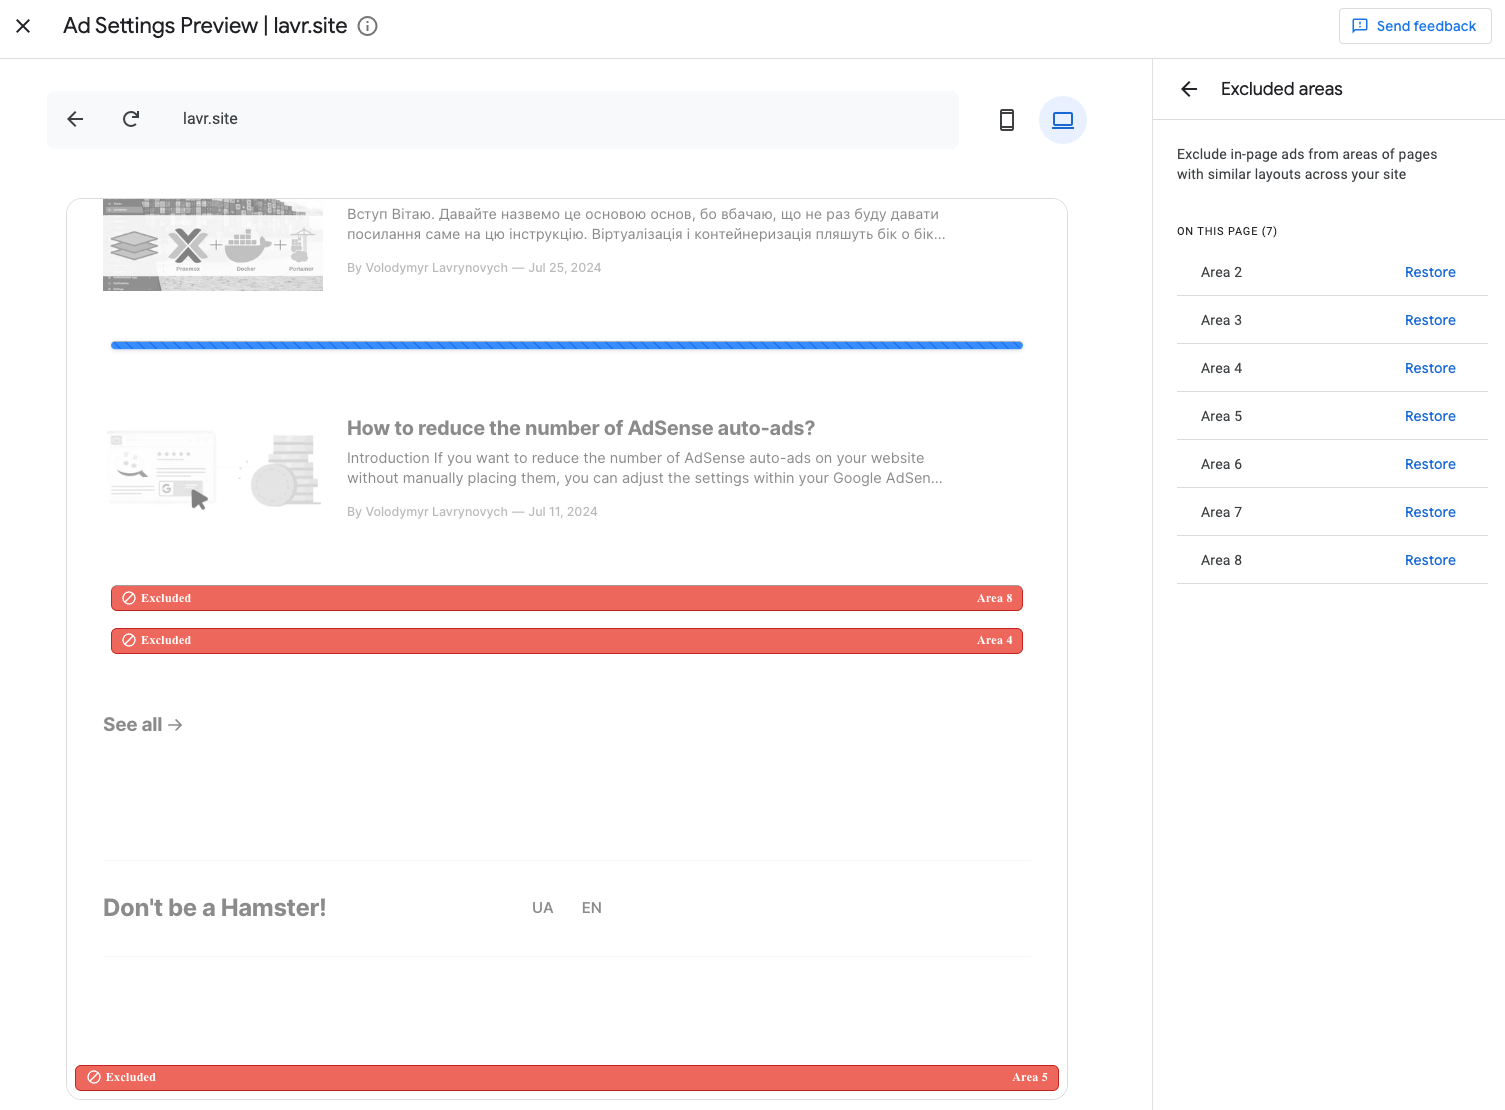
When you enter Excluded areas, you’ll see the typical zones where ads are placed. Choose the ones that are disruptive and disable them. As I mentioned earlier, ads at the top and bottom visually break the page, so I’m removing them from my site.
Also, explore pages with different content and various element arrangements, such as the search page, article list, individual article page, or your "About" page. Below are the zones where I’ve disabled ads for my blog—I found about 9 areas.
Excluded Pages
This is the simplest setting, where you need to specify the URL of the page and choose whether to exclude just that specific page or all pages within that section. This allows for targeted control over where ads are displayed on your site.
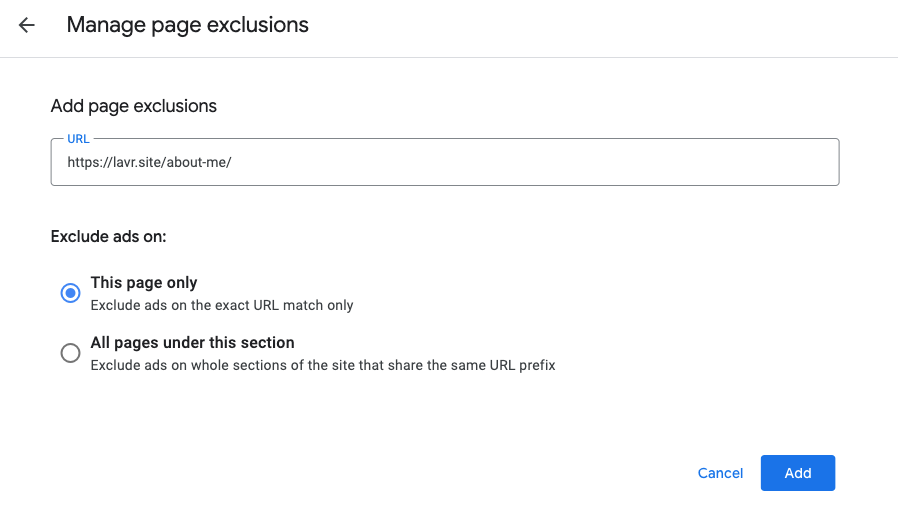
For example, when I have author pages on my site like https://lavr.site/author/lavrynovych/, I can specify just https://lavr.site/author/, and the ads will automatically be removed from each author profile page. This makes it easy to manage ads across multiple similar pages without having to exclude them individually.
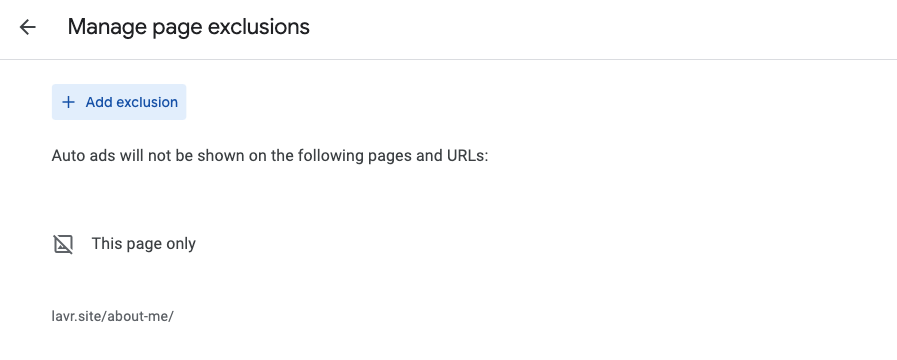
After successfully adding exclusions, a list of pages will be generated. For my blog, I’ve only excluded the page with my description, as I plan to share that link on social media. To avoid turning people away with ads, I want to keep that page ad-free. Here’s how my settings look.
Overview of Changes Made and Their Application
Let’s quickly review the changes I made:
- Enabled Intent-driven formats
- Disabled Side rail ads in Overlay formats
- Removed ads from zones at the top and bottom of pages—around 9 zones
- Added the page
https://lavr.site/about-me/to exclusions
And most importantly, don’t forget to click the Apply to site button, which is located at the bottom right. It would be very disappointing to lose my settings!
AI says

The Importance of A/B Testing for Ad Placement
While optimizing ad formats and placements can significantly enhance user experience and monetization, it’s essential to remember that every website and audience is unique. This is where A/B testing comes into play.
Why A/B Testing Matters
A/B testing allows you to experiment with different ad placements, formats, and even content around the ads to see what resonates best with your audience. By systematically testing variations, you can gather data on user engagement and click-through rates, enabling informed decisions that can maximize your ad revenue without compromising user experience.
How to Implement A/B Testing
- Select a Variable: Choose one element to test—this could be ad placement, format, or even the surrounding content.
- Create Variations: Design two versions of your webpage: one with the original ad placement (control) and one with the new placement (variant).
- Analyze Results: Use analytics tools to track performance metrics, such as engagement, bounce rates, and conversions.
Conclusion
Incorporating A/B testing into your ad strategy not only helps in fine-tuning placements for better revenue but also ensures that your site remains user-friendly. Always remember, the ultimate goal is to create a seamless experience that keeps users coming back while effectively monetizing your content.
Conclusions
As in all aspects of life, balance is key when it comes to advertising on your site. Trust your instincts regarding the types and amounts of ads you use. Always consider your users and test changes in practice. You may need to take on the role of a tester for a while.
Don’t be afraid to make mistakes! You can quickly revert any changes and start over if needed. The settings interface is highly simplified, with helpful prompts that won’t mislead you. It's user-friendly, even for those without prior experience. The real-time preview of changes on the left side of the interface makes the process even easier.
Comparing my experience with manual ad placement to automatic integration is like night and day. You don't need programming knowledge or access to a server. Once you set up the integration for the first time, as we discussed in previous articles, you can delegate ad management to someone without technical skills.
Keep an eye on your earnings statistics and track the impact of each change. This will help you identify issues promptly and correct them.
I hope you found this helpful, and that you successfully configure ads for your site. Wishing you peace and all the best! Until next time!
Don't Miss Other Articles on AdSense
Be sure to check out my other articles on AdSense for more tips and insights. They cover various aspects of ad management, optimization strategies, and best practices to enhance your site's monetization. Happy reading!
 Volodymyr Lavrynovych
 Volodymyr Lavrynovych
If you're interested in starting your own blog, check out my guide on how to set it up from scratch. It covers everything from choosing a platform to creating engaging content. Get started on your blogging journey today!
Volodymyr Lavrynovych