How to Optimize Images
Discover how to significantly reduce image file sizes for your blog or website without sacrificing quality. This guide covers essential steps, from converting to WebP to resizing and compressing images, turning a 7.1 MB file into just 95 KB, enhancing your site's performance effortlessly.

Introduction
This is a very quick guide on the basic tools and principles for optimizing images that will be used on your blog or website.
To put it briefly, every image you plan to use should go through several stages, namely:
- Conversion to WebP
- Cropping the image (where appropriate)
- It’s best to find a good balance between what you want and what is necessary. The image size should be sufficient for your needs.
- Compression
- Here too, it's important to strike a balance in minimizing the file size. The image should convey the essence without turning into a pixelated mess.
In almost all cases, we are talking about reducing the file size in megabytes, but as mentioned earlier, the image itself should remain large enough and of sufficient quality for comfortable content consumption by users. This is a delicate balance, and you have to gauge it yourself.
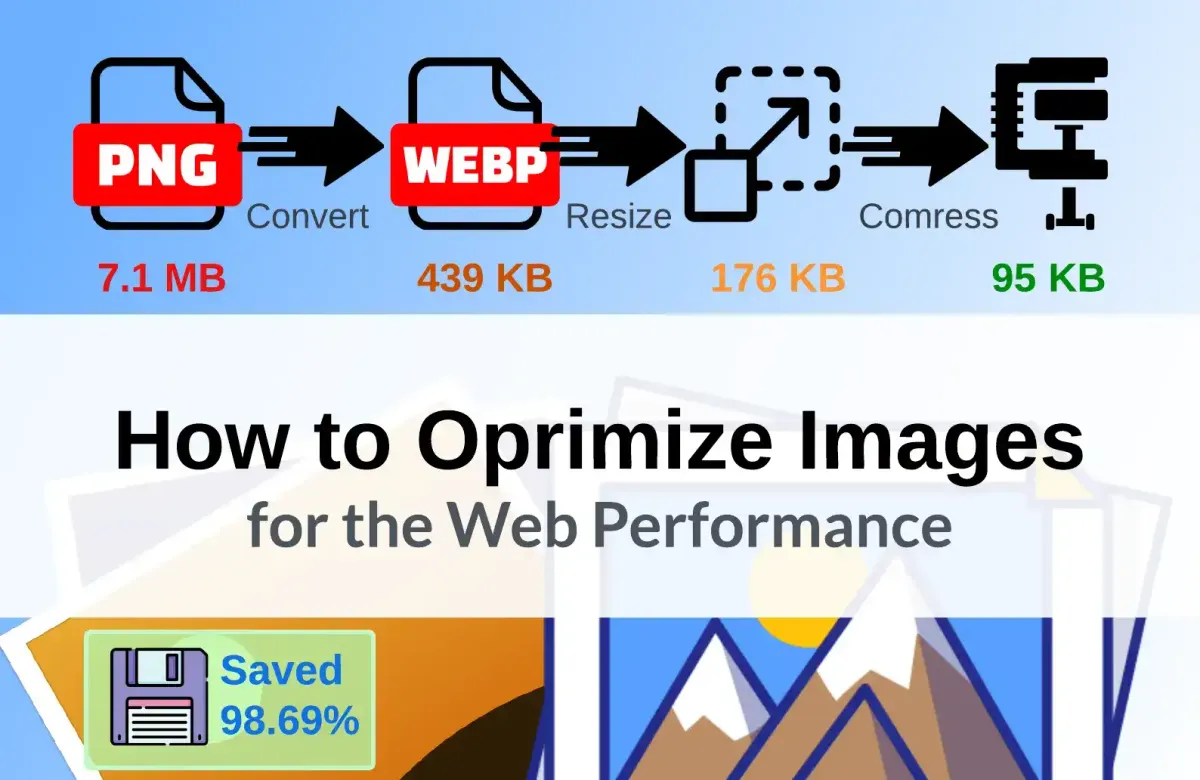
As an example, let's take this image, which originally had the following characteristics:
- File size: 7.1 MB
- Image dimensions: 3042 × 1286
- Format: PNG

7.1 MB, Carl! But I'll show you how to turn it into a reasonable 100 KB.
Step1. Conversion to WebP
First, let me explain the WebP format itself, and then we’ll move on to the conversion process.
WebP Image Format
WebP is a modern image format developed by Google. It was designed to provide high-quality images with smaller file sizes compared to traditional formats like JPEG or PNG.
Key advantages of the WebP format:
- Lossless Compression: WebP can maintain high-quality images without losing any information, similar to PNG. However, WebP files take up less space.
- Lossy Compression: WebP also supports lossy compression, like JPEG, but with smaller file sizes and better image quality at the same level of compression.
- Smaller File Sizes: The primary advantage of WebP is the reduction in image file sizes, which speeds up webpage loading and saves space on servers.
Thanks to these advantages, WebP is becoming popular in web development as it helps optimize website performance by reducing page load times and network bandwidth usage.
Converting PNG to WebP
For the conversion, we’ll use this resource: https://cloudconvert.com/png-to-webp (up to 10 conversions per day).
Alternatively, you can also use these:
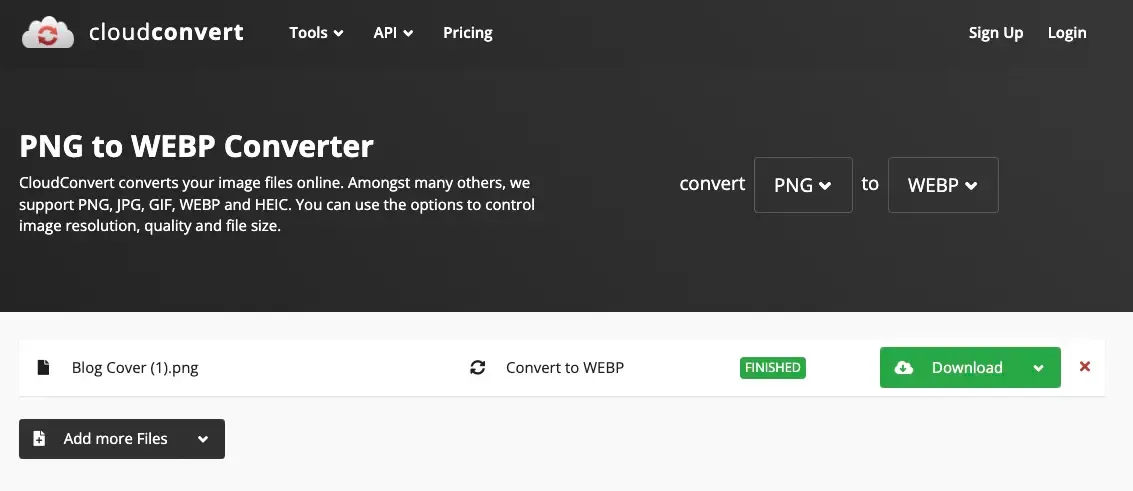
After the conversion, we end up with a WebP file size of 439 KB. This first step improves the result by 93.96%.
And by the way, in most cases, this might already be enough. But I promised 100 KB, so let’s keep going.
Step 2. Resize the Image
For this task, I found another accessible tool: https://www.simpleimageresizer.com/.
For my purposes, it was sufficient to crop the image down to 720px.
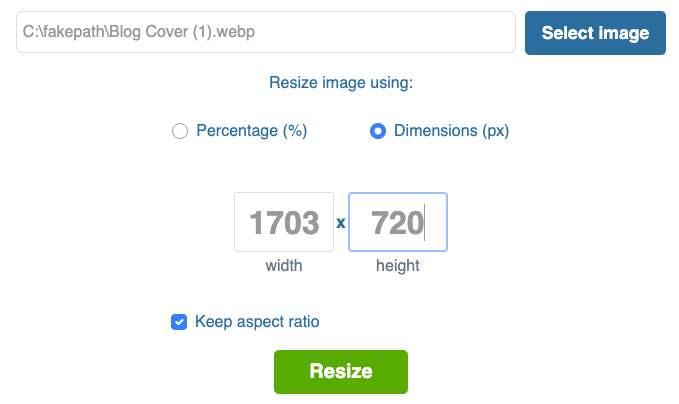
After this step, we have a file size of 176 KB with dimensions of 1703x720 px. This is also a pretty good result, as we've saved another 59.91%. Let’s keep going.
Step 3. Compression
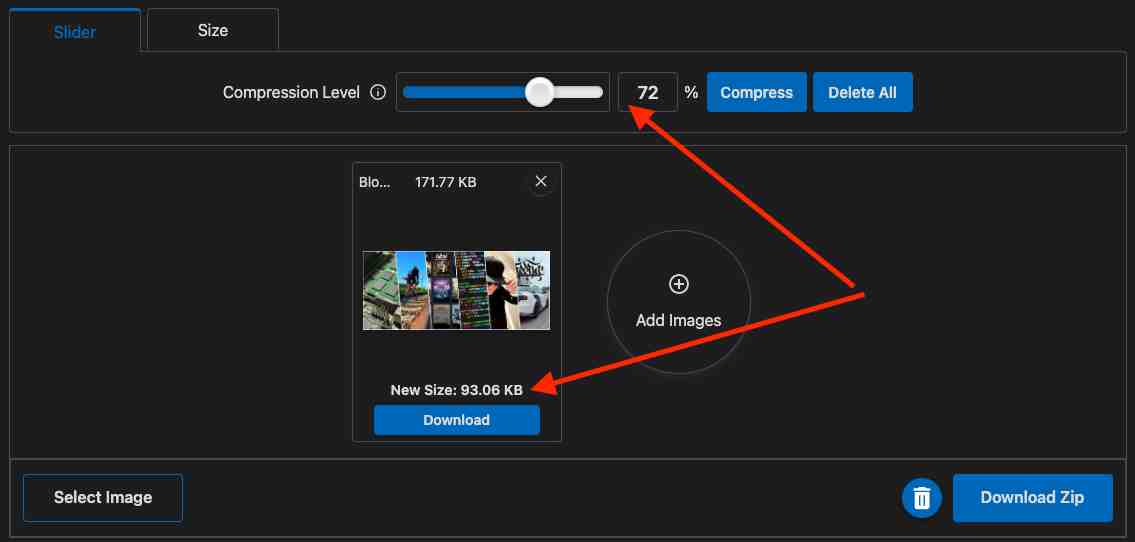
The final tool we'll use will compress the image by the specified percentage: https://imagecompressor.11zon.com/en/compress-webp/.
Here is also a good alternative: https://www.websiteplanet.com/webtools/imagecompressor/
With just a couple of clicks, I determined that to achieve a file size of less than 100 KB, I needed to compress the image by 72%. The result is a file with an actual size of 95 KB.
I also tried compressing it by a higher percentage. Through experimentation, I found that compressing more than 96% should generally be avoided, as it significantly degrades content perception, especially depending on the task at hand.
I consider compression between 50% to 75% to be the optimal choice for most tasks.
Conclusion
I’ve demonstrated that it’s possible to significantly reduce image size. From an initial 7.1 MB, we reached 95 KB, improving the size by 98.69%.
This will positively impact many metrics on your site:
- Files take up less space on the server.
- Smaller files load faster.
- Transmitting smaller files over the network is quicker.
- Rendering such images will also be faster.
Most importantly, remember to maintain adequacy and quality in how the image is perceived. Don’t crop or compress files unless absolutely necessary. Basic conversion to WebP will be more than sufficient in 90% of cases.
A web page analysis tool like PageSpeed Insights (https://pagespeed.web.dev) will provide you with more details on whether your page needs image optimization.
Know your limits and use these tools wisely!