Site-to-Site VPN with Twingate
This article covers the step-by-step process of setting up a Site-to-Site VPN using Twingate. It includes configuring clients, routing, IP forwarding, and testing connectivity between two networks, offering a reliable solution for secure resource sharing across remote locations.
Introduction
This post was somewhat forged through a week of thoughts about how much I miss having direct access to my parents' network. Since I moved my NAS and one server to their place, I've constantly felt a bit inconvenienced in accessing all the devices and services.
When it comes to accessing a specific server or connecting to my father’s laptop, there are always alternatives like VPN, Reverse Proxy, or simple TeamViewer. And for me personally, implementing any of these is pretty straightforward. But when one server at my place needs to communicate with another at my parents’ house, and it needs to happen on a continuous basis without my intervention? That's the problem we’ll try to solve today.
This will be a comprehensive guide, so grab something tasty and let’s get started!
What is a Site-to-Site VPN?
It’ll be hard to move forward without some theory, so let’s talk about what it is and how it works.
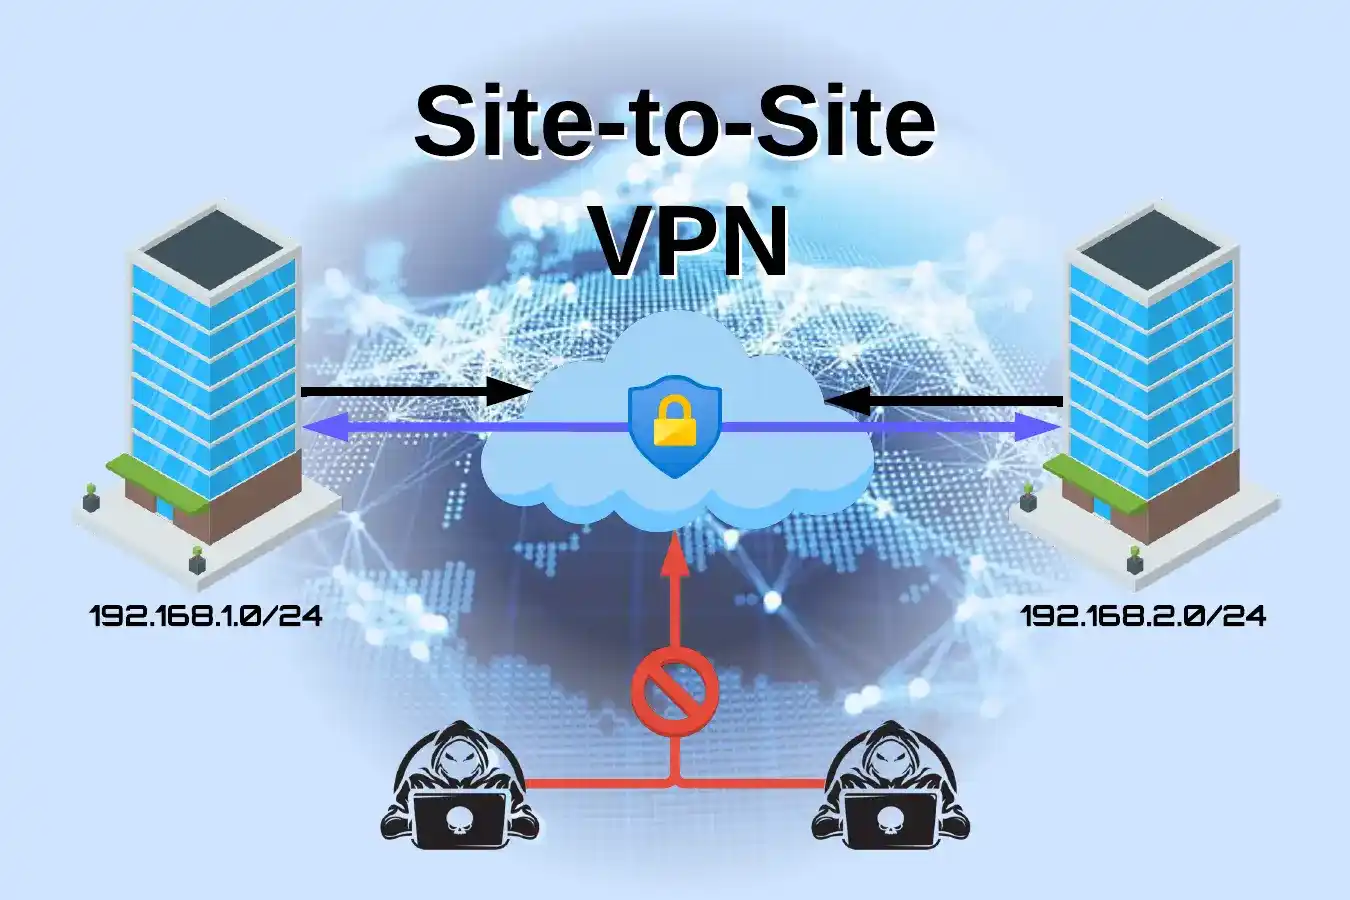
A Site-to-Site VPN (Virtual Private Network) is a type of VPN connection that enables the linking of two or more local area networks (LANs), located in different geographic locations, into a single secure network over the internet.
I've covered more details in a separate post for those who want a deeper understanding of Site-to-Site VPN, especially in comparison to other types of VPN.
Alternatives
Before diving into the details, let’s look at the alternatives many of you have likely been using for a while. I imagine that, without digging deep into the issue, some might respond with comments like: "So, why don’t you just use a reverse proxy? There’s WireGuard VPN! And you’ve already set up access to services through Cloudflare and your own domain!"
If you glanced at the theory in the previous section, you’ll already understand that Remote Access VPN and Point-to-Site VPN fundamentally differ from Site-to-Site VPN.
However, so that you can choose the right solution for your particular problem, I want to briefly go over the above-mentioned alternatives and how I see them, along with all their drawbacks.
Nginx Proxy Manager (Reverse Proxy)
- Has numerous open bugs (GitHub Issues), including some serious security issues that sometimes remain unresolved for months.
- Requires a static IP address.
- Needs a domain; Duck DNS can be used.
- Does not provide full Site-to-Site access, only opens certain services to the public.
WireGuard VPN in Site-to-Site VPN Format
- Requires open ports on the router.
- Needs a static IP.
- Complex setup (keys, configuration files).
- Well-described setup example in the article WireGuard Site-to-Site Configuration.
Cloudflare ZeroTrust (link to my article)
- Requires a domain; Duck DNS can be used.
- Does not provide full Site-to-Site access.
- Does not support UDP.
As you can tell from the title, I chose Twingate, so I’ve summarized everything in a table for better visualization:
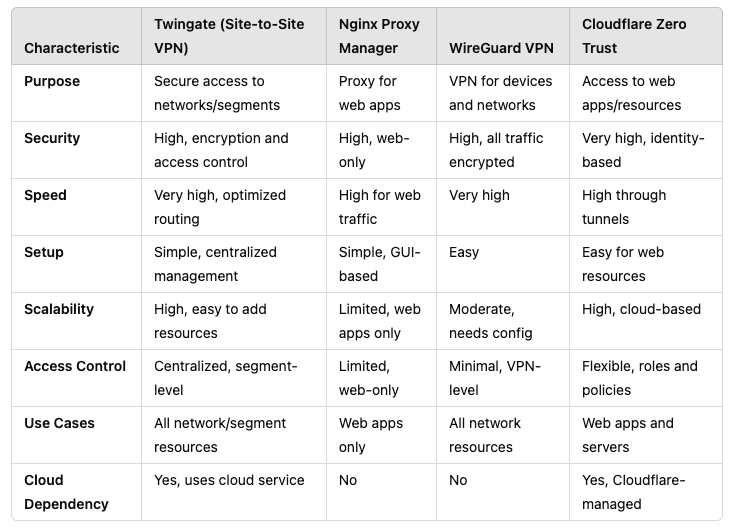
In fact, only WireGuard VPN is a full-fledged alternative for Site-to-Site VPN solutions. However, for me, it has the drawback of depending on a static IP address. Since my provider gives me a dynamic address, using dynamic DNS services is not a convenient or stable solution, as is the case for many others.
From personal experience, the dynamic DNS set up on my router frequently disconnects and causes major issues with remote connections. Here’s an example of what is probably one of the best availability graphs I have, and usually, it’s much worse. This shows my two routers—one at my home and the other at my parents' place.

But perhaps someday I’ll take the plunge and set up a Site-to-Site connection using WireGuard VPN as an alternative to what we’re going to try today.
My Use Cases
Or more simply put—my current issues. While I can personally access remote resources via the usual VPN, my Proxmox VE server currently cannot. I have many plans that will require full integration of both networks. Let’s focus on two examples for now.
Example 1: Proxmox VE and Backup Server
I have Proxmox VE servers in both networks, but the Proxmox Backup Server (PBS) is located at my parents' place. The Proxmox VE in the same network directly connects to PBS, but my Proxmox VE server has to connect to it through the public space, which is clearly inconvenient, complicates setup, and weakens security.
I covered this kind of remote connection to a PBS in my article on configuring Synology NAS and PBS.

For clarity, I have a diagram illustrating how this approach works.
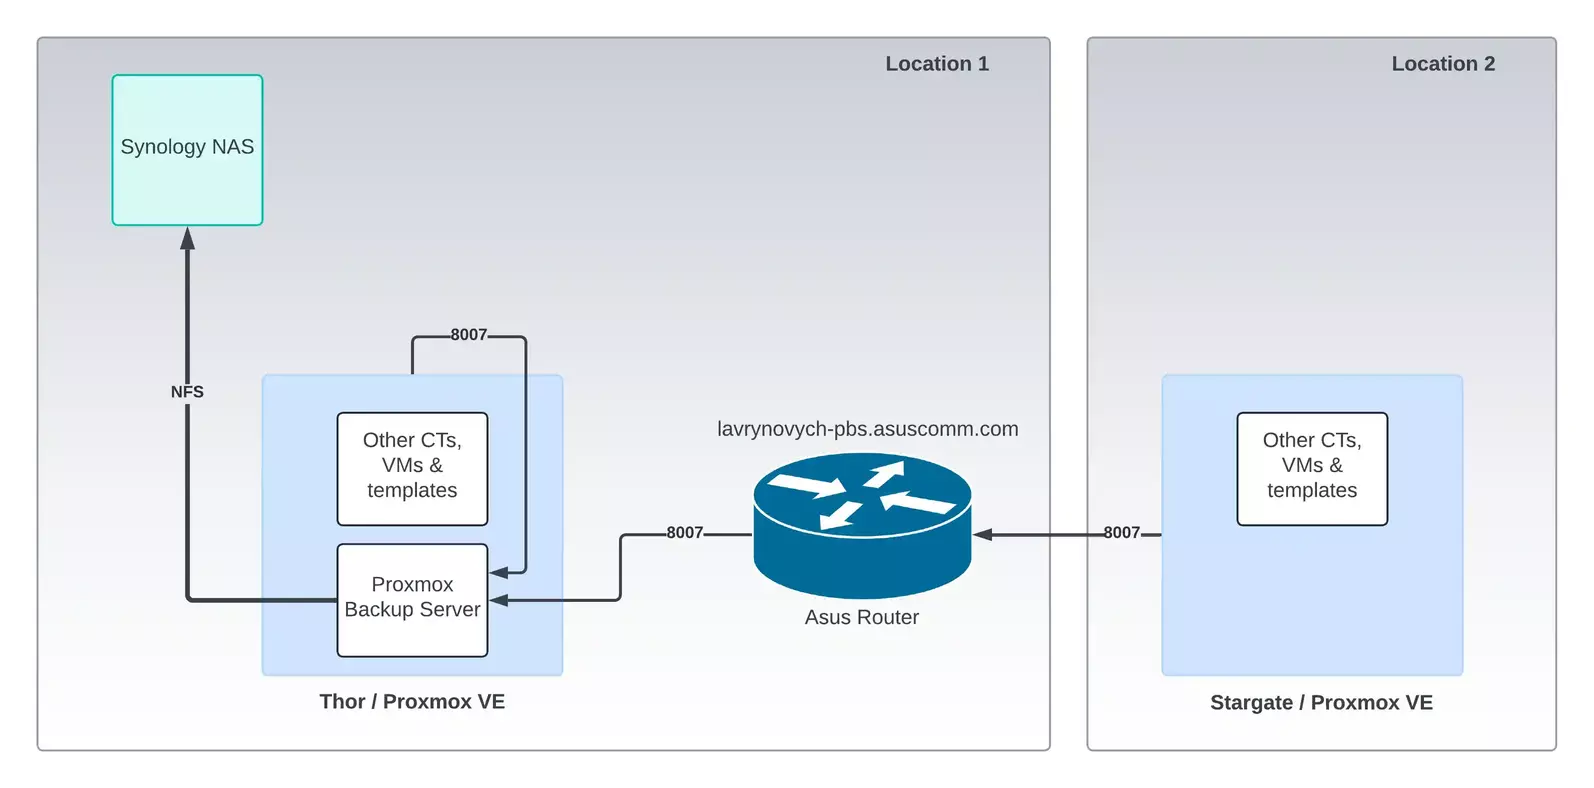
Does it work? Yes, and in fact, VPN is not necessary at all; I've already proven that. But is it secure? That's where many questions arise.
Example 2: VoIP/SIP FreePBX
I decided to set up my own FreePBX phone system to use those old landline phones, just out of curiosity. Within my apartment, it was too simple, and I quickly got bored. So, I moved FreePBX to my parents' network and tried to connect my phone in a similar manner as shown in the diagram from the first example. In that case, Proxmox VE servers acted as clients to the Proxmox Backup Server (PBS), but here the clients were VoIP gateways/phones that needed to be connected to a single FreePBX located in a different network, about 50 kilometers away.
This example may not make much sense to most people, but I want to share a bit more of my story so you can understand the consequences of this approach.
To remotely connect to the FreePBX in another network, I had to open the SIP protocol port on my parents' router. After repeatedly reconfiguring the VoIP gateways, at one point, I removed the passwords for convenience. After playing around, I decided to take a break and come back later that day. "Bad people" discovered the open SIP port 5060 and began attacking my server. I didn't notice this. After 6 hours, they figured out the combination of the number and the fact that there was no password and started making calls to all the registered numbers through my FreePBX. This happened at 10:00 PM, and it startled me and my family, especially since I was the only one experimenting with the phones. It was strange to receive a near-night call. Of course, I immediately closed the port, shut down the server, and even wiped it clean. Later, I checked the logs to see what had happened and conducted an analysis.
Concept
So, we smoothly transition to the question "How should it be?" And this has already been addressed by theory, so all I need to do is draw a simplified diagram for you of what we will be implementing today.
Initial Network State
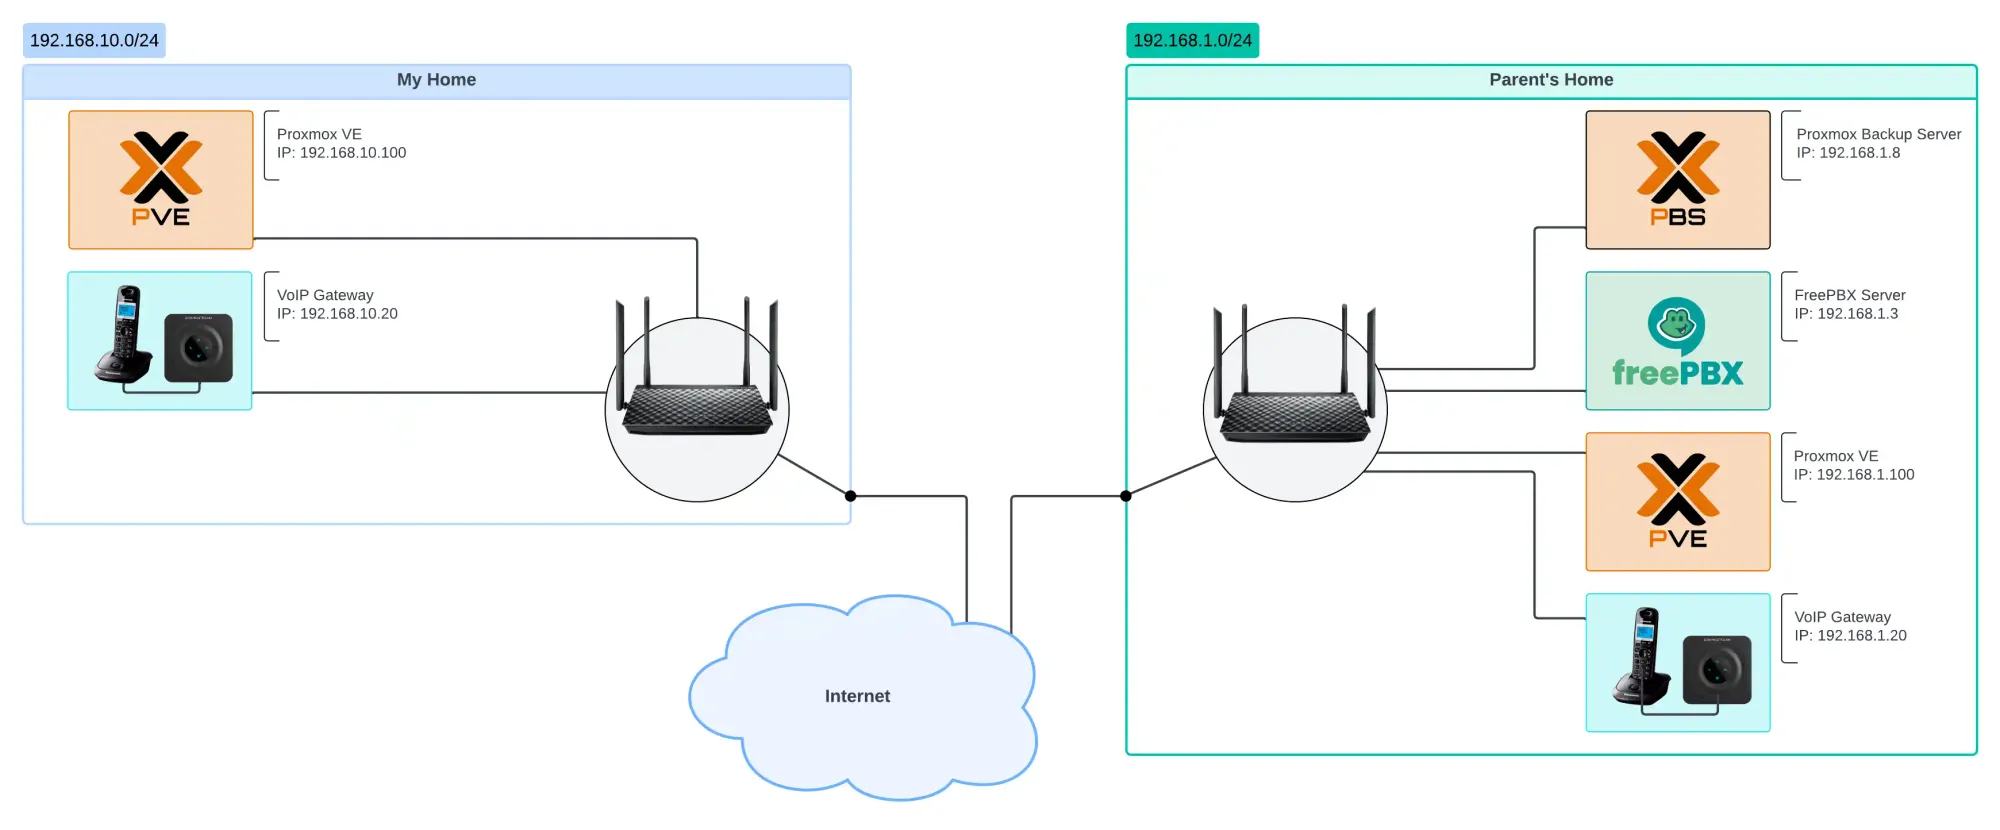
We see two networks – a home network (A) 192.168.10.0/24 and a remote network (B) 192.168.1.0/24.
In the home network, based on the examples described earlier, we have:
- Proxmox VE: 192.168.10.100
- VoIP Gateway: 192.168.10.20
- Twingate Gateway: 192.168.10.15
In the parent's network, in addition to PVE, VoIP, and Twingate, we also have:
- Proxmox Backup Server (PBS): 192.168.1.8
- FreePBX: 192.168.1.3
Updated Network
For this task, we need to ensure access to PBS and FreePBX from the home network for PVE and VoIP.
To achieve this, we will need to add a connector and client Twingate to each network, which we will reconfigure as gateways. The resulting diagram should look something like this.
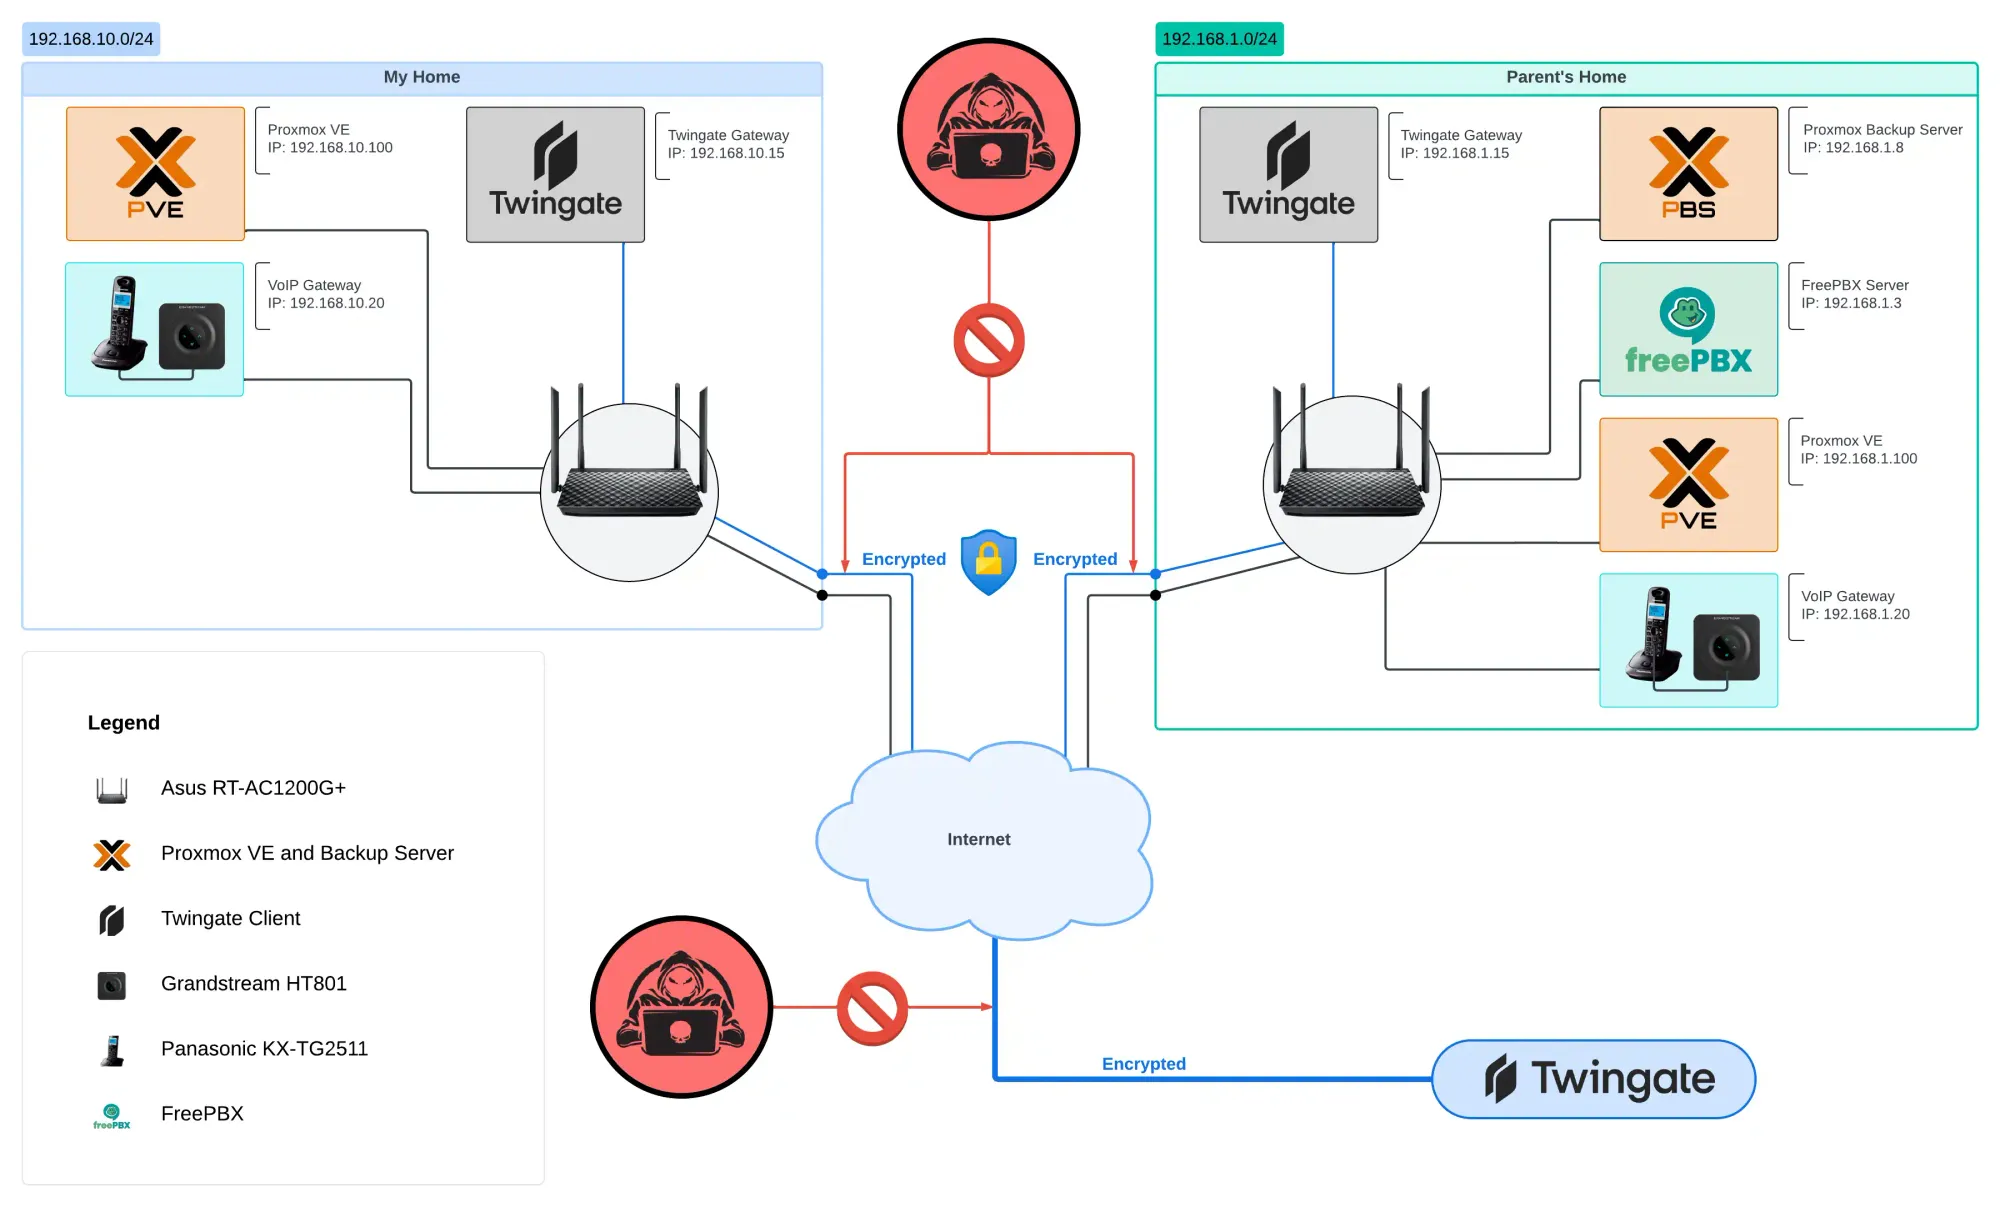
Here, I refer to the Twingate connector and client as the Twingate Gateway, because, in the end, the combination of the connector and client, if simplified, will function as a gateway.
Twingate Connector & Client
But regarding Twingate itself, everything is a bit more complicated than in the diagram above. In order for Twingate to provide access to each network, we will need the Twingate Connector, and in order for network traffic to flow from one network to another, we will need the Twingate Client in each network. Now, I will try to illustrate the topology specifically for Twingate.
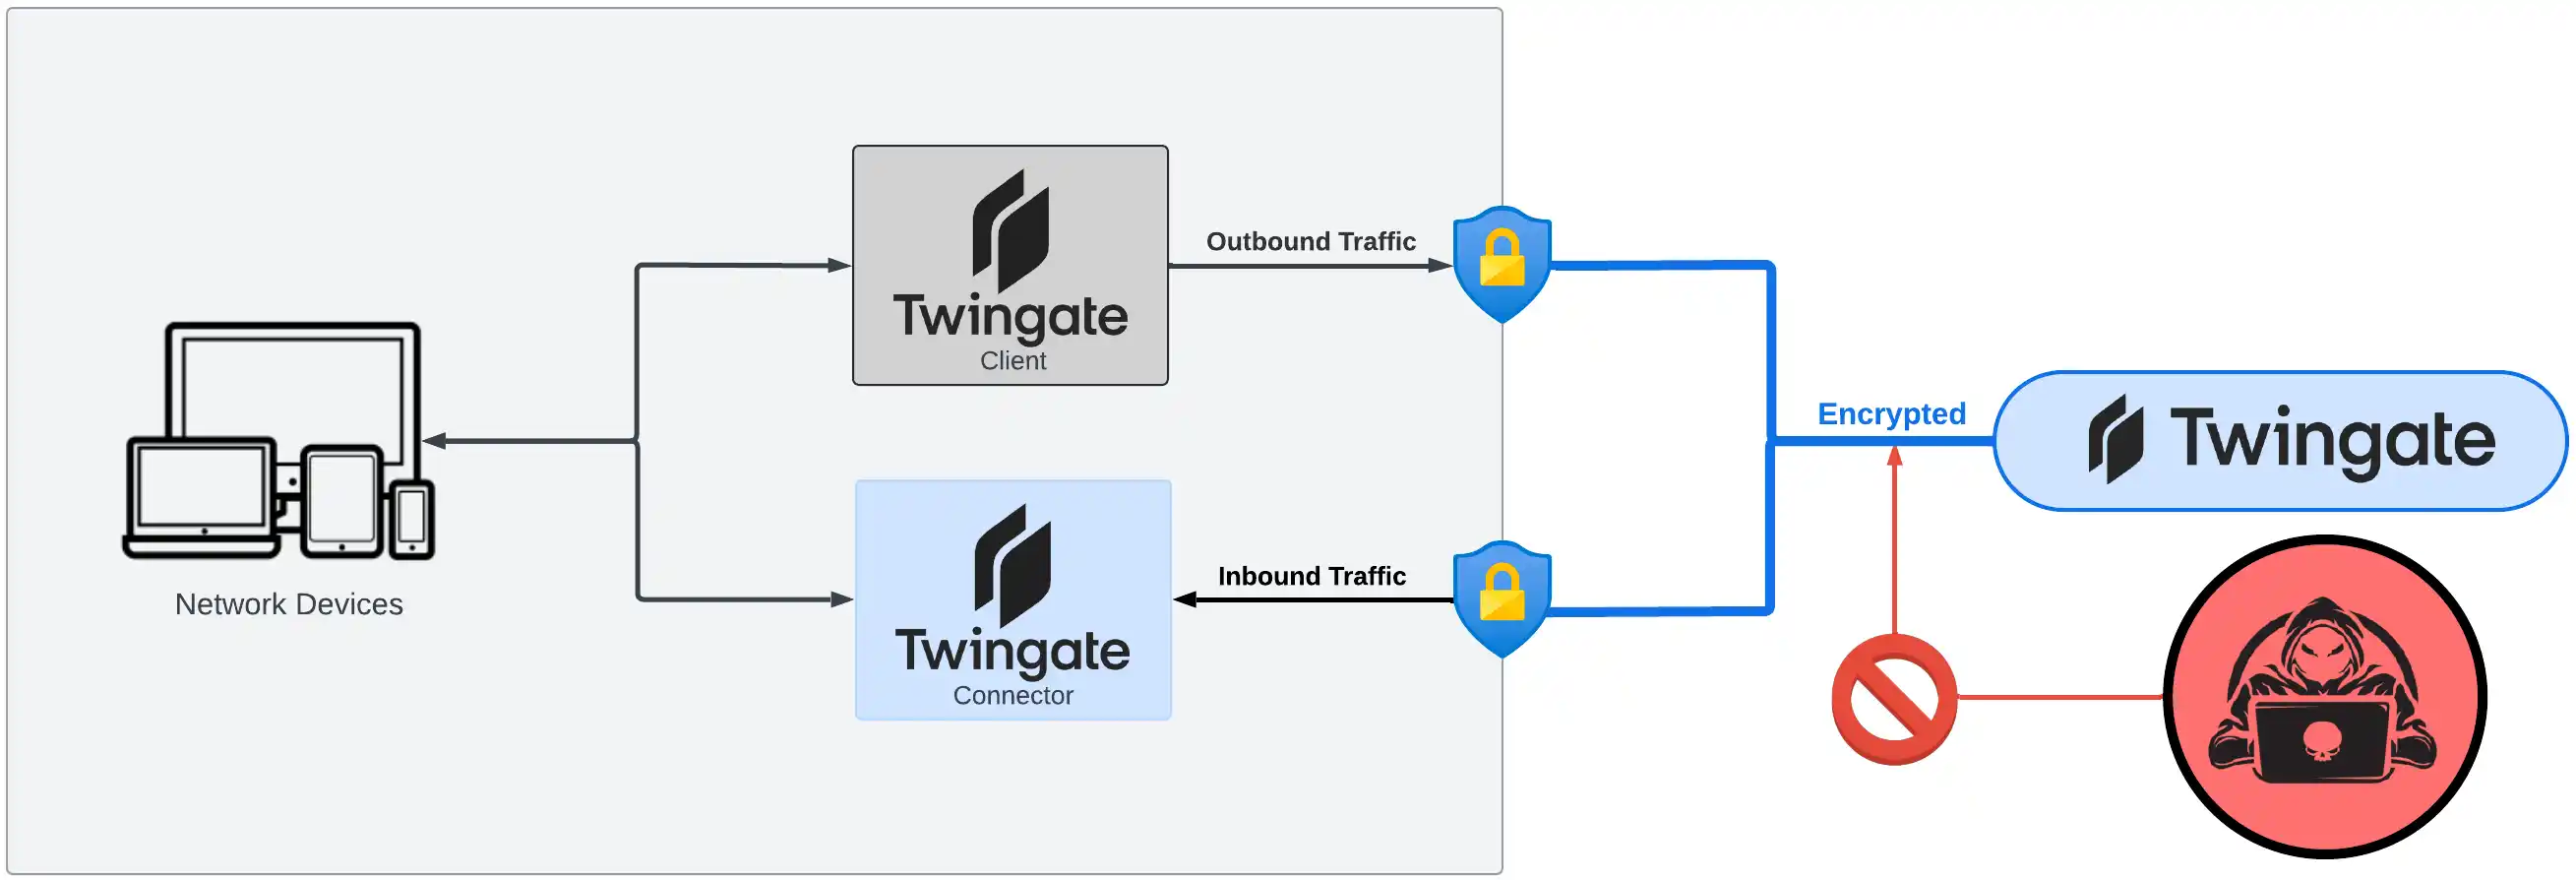
The main thing is that Twingate should be represented by both a connector and a client within each individual network. Where and how you launch them is another matter, which will be addressed in due time.
You should understand that the connector, in its basic configuration for Twingate usage, always redirects traffic inside the networks; through it, you provide access to internal resources. The main Twingate server (the one on the right in the diagram) is beyond our control, but it provides centralized management and traffic redirection. Whether it's the client or the connector, when they start, they know where the server is located and report their existence by passing basic information about where they are. When we, as users, access our resources, the main Twingate server specifies where exactly to direct the traffic, and in addition, it encrypts it.
So, the connector redirects traffic inside, while we will use the client to go outside the current network, so any requests to remote resources are forwarded accordingly. But this client will be slightly different from the Twingate clients you usually install on your devices, like on a laptop. To make it work continuously and not ask for authentication after some period, we will run it in headless mode. To allow it to forward traffic to another network, we will additionally configure IP forwarding on it. Finally, to ensure the traffic properly passes through this client and gateway, we will modify the router settings (routing table).
Requirements
This is your last chance to check if you have everything necessary for the next steps. Cross-check with the list:
- The two networks must have different IP addresses. As in our example: 192.168.10.0/24 and 192.168.1.0/24. If the addresses are the same, you won't be able to configure routing between them.
- A separate computer (server) that will operate 24/7 in each network. For a home network, a mini-PC with an x86 architecture can be used. It should preferably have low energy consumption for efficiency.
- Proxmox VE as the operating system.
- Docker. While there are other ways to install the Twingate connector, in this publication, I will deploy the connector using Docker, as it's fast and convenient. Docker itself runs inside an LXC container.
- Full access to the routers in both networks for reconfiguring routes.
Short Action Plan
General Twingate Setup
- Setting up new Remote Networks for home (A) and parents' (B) networks
- Setting up new connectors for both networks
- Setting up new service accounts and Twingate clients in headless mode for both networks
Configuring the Home (A) Network
- Create a new network
- Create network resources
- Install Twingate connector
- Create a service, generate its key, and add access to the opposite network
- Install Twingate client in headless mode
- Reconfigure the router
Configuring the parents' (B) Network
- Repeat all the steps from the home network (A) mirror-wise.
Practical Part
Finally, we begin taking action. However, before starting, it is important to note a few nuances.
Step 1. Preparing the Twingate infrastructure
Twingate is a modern alternative to traditional VPNs, which allows secure access to work resources from anywhere. It is designed to be easy to use—you simply install the app, log in using your work credentials, and then gain access to the files and programs you need.
To read more about Twingate, you can visit here: https://www.twingate.com/docs/twingate-vs-vpn
Account
If you haven't dealt with Twingate before, I suggest starting by registering on the official website: https://www.twingate.com/
In the survey, I mentioned that I plan to use it for HomeLab, and everything else should be filled out according to your needs.
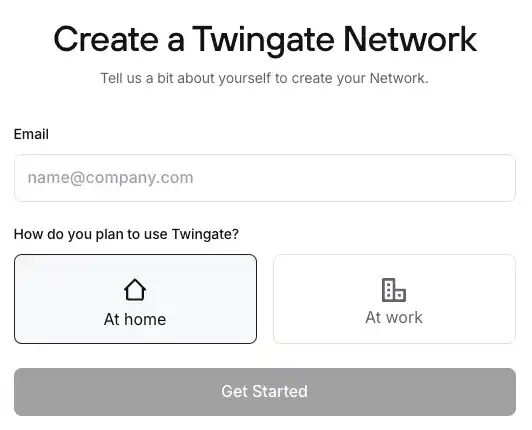
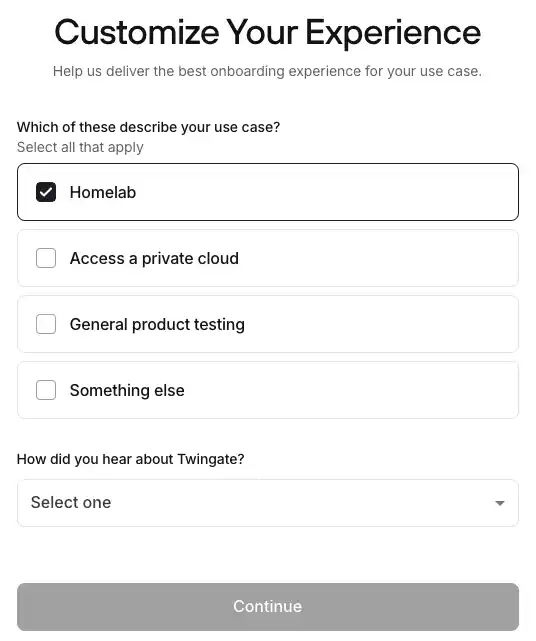
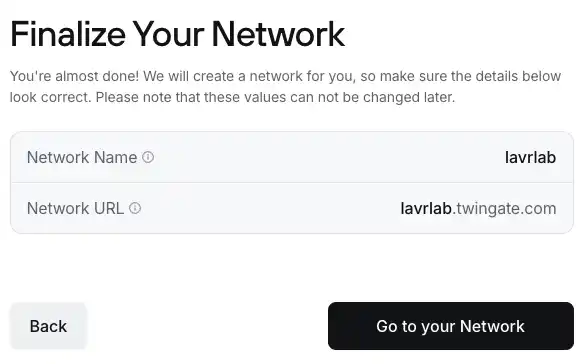
Account creation steps
Setting up new Remote Networks for the Home (A) and Parents' (B) networks
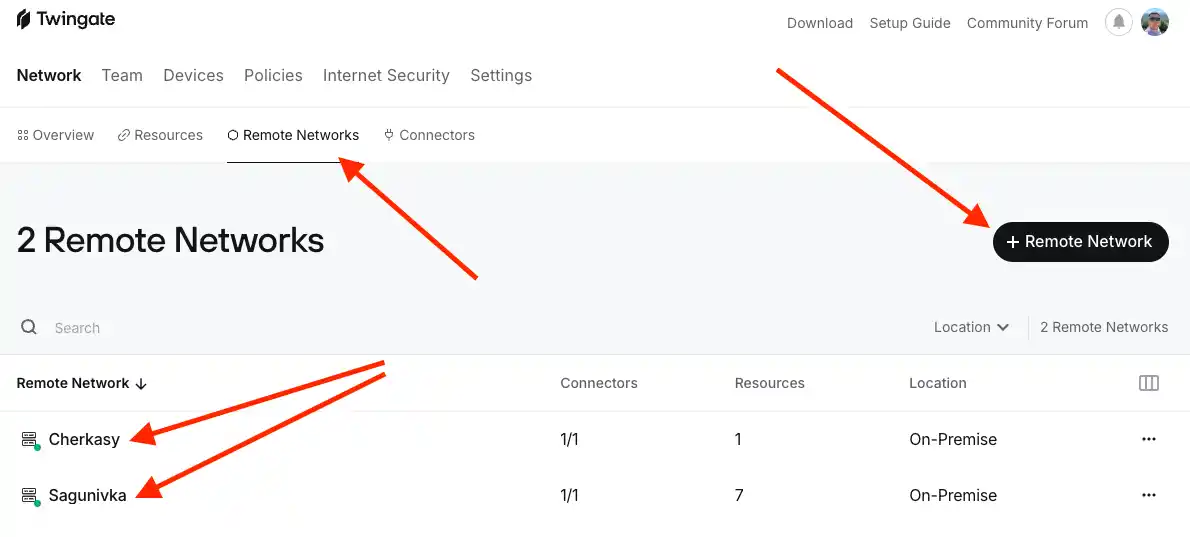
- Log in to your Twingate account.
- Go to Network -> Remote Networks.
- Add two new networks.
You should end up with something similar to my setup.
In the network creation dialog, select On-Premise and specify a name.
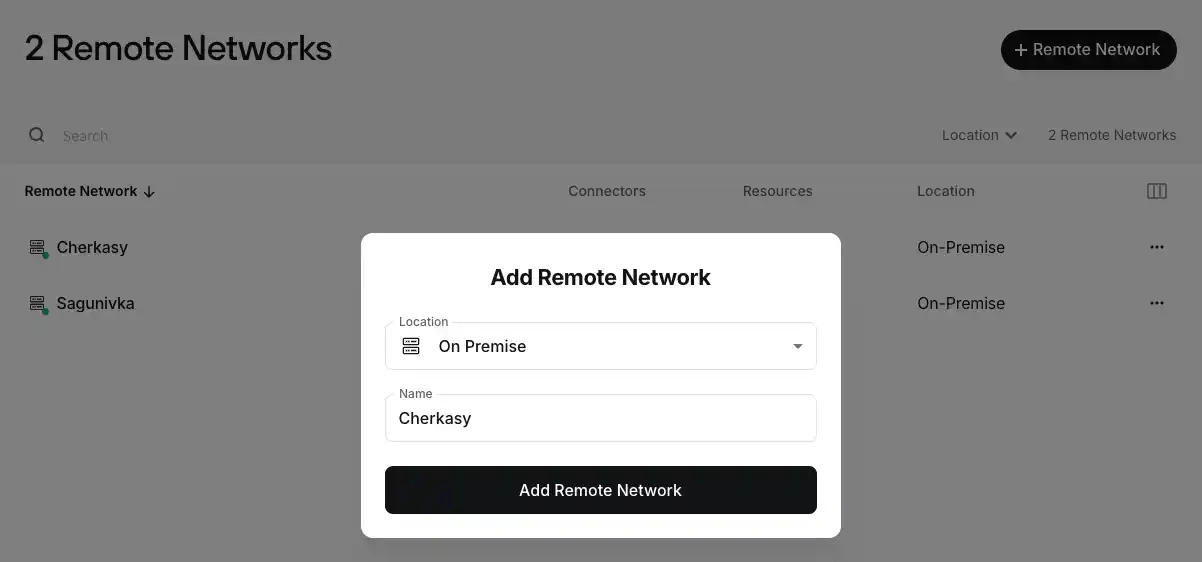
Great, we have two registered networks. Let's start configuring them.
Step 2. Deploy the connectors
This is the step that all Twingate users typically go through. For us, the only complication will be that we need to perform it twice for both of our networks.
Among the available options, I would recommend Docker or Linux in an LXC container on Proxmox VE. Personally, I opted for Docker because I already had it set up. I have written about how to quickly deploy Docker with Portainer on a Proxmox VE server in this publication:
Let's start setting up the new connectors for both networks.
Connector for the Cherkasy (A) Network
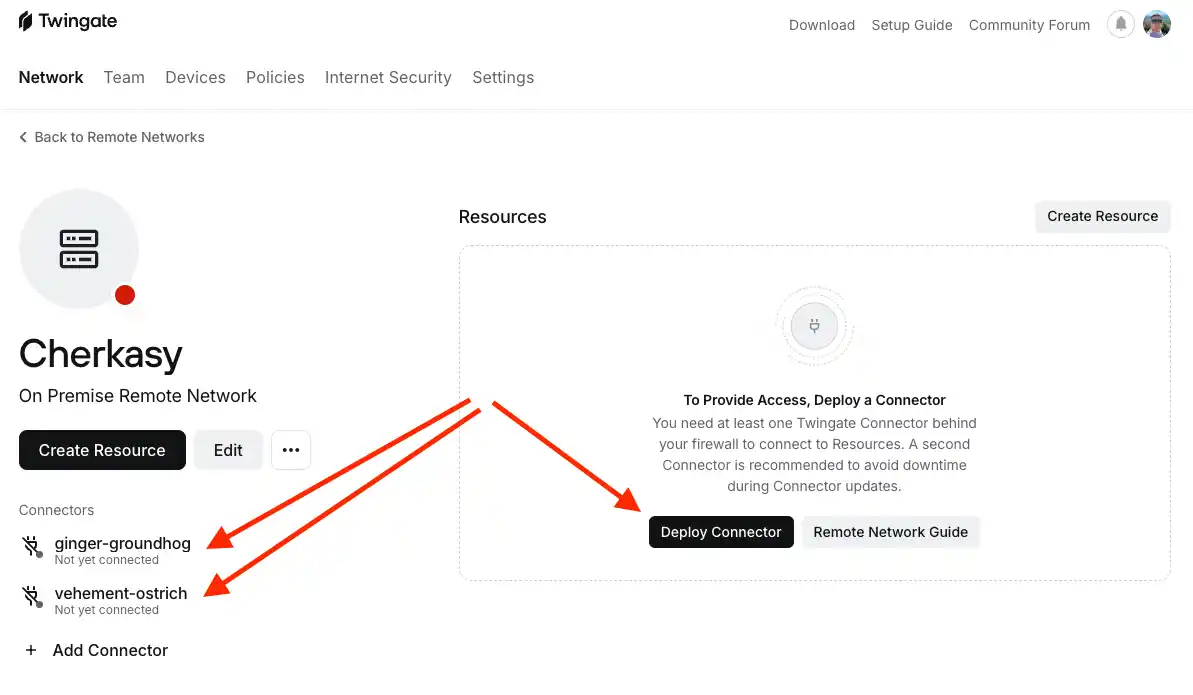
Go to the newly created remote network "Cherkasy (A)" in the Twingate admin console and click the "Deploy Connector" button.
Next, choose the method that works best for you. Since Docker was already set up in both of my networks, I chose this method as the most convenient for me.
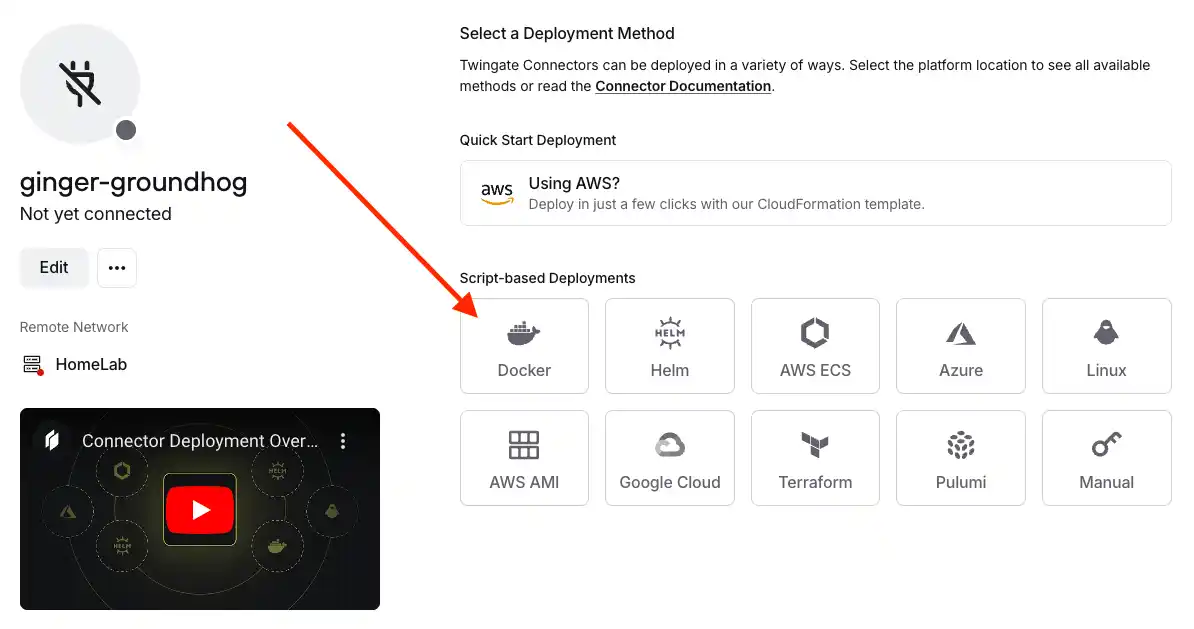
After clicking on the Docker icon, you will be provided with a simple step-by-step guide. Among these steps, you will essentially need to generate new tokens, copy the Docker command, and execute it. With Docker already prepared in advance, these steps will take no more than 5-10 minutes.
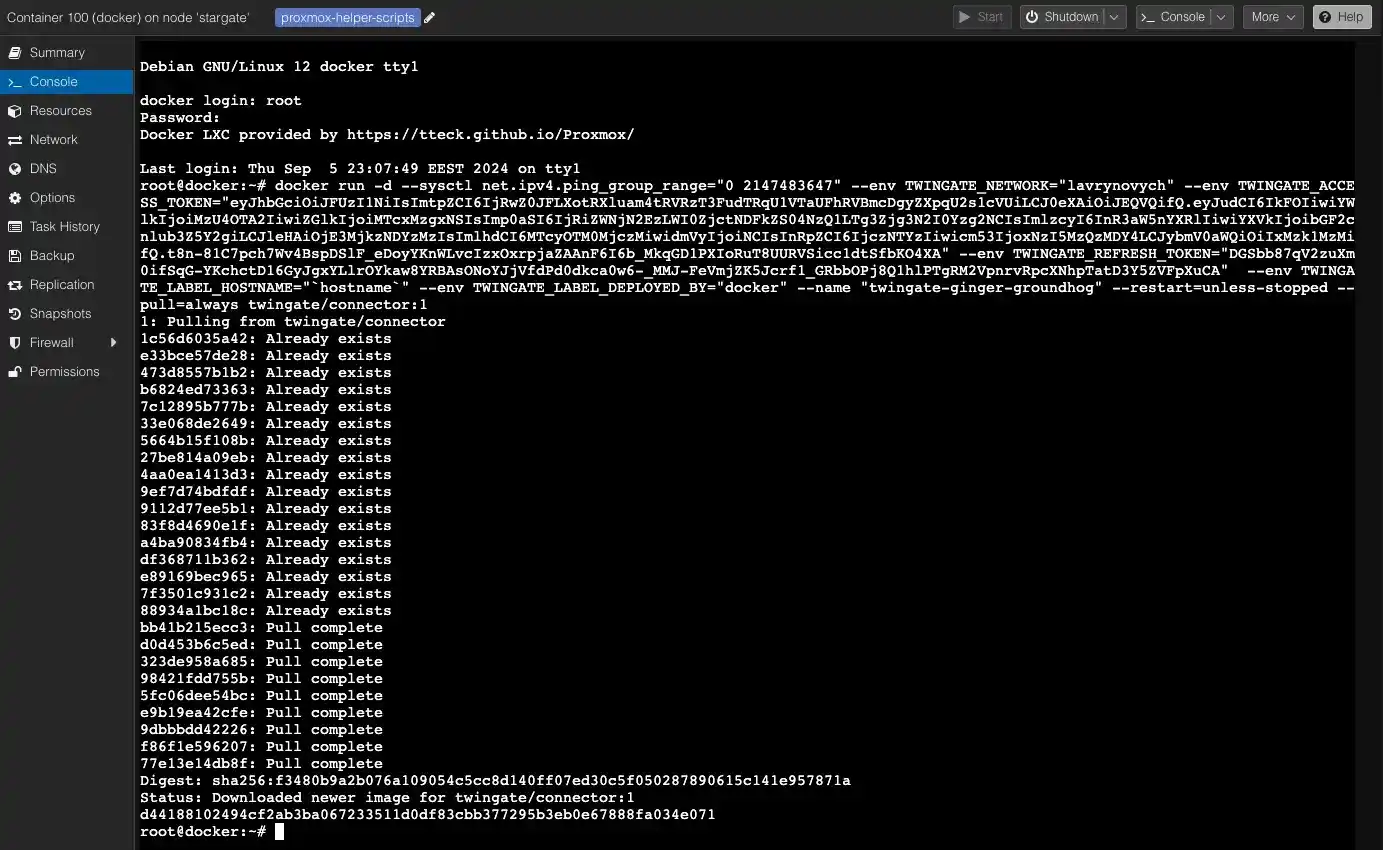
I executed the Docker command directly from the console in Proxmox VE.
And I already checked it in Portainer.

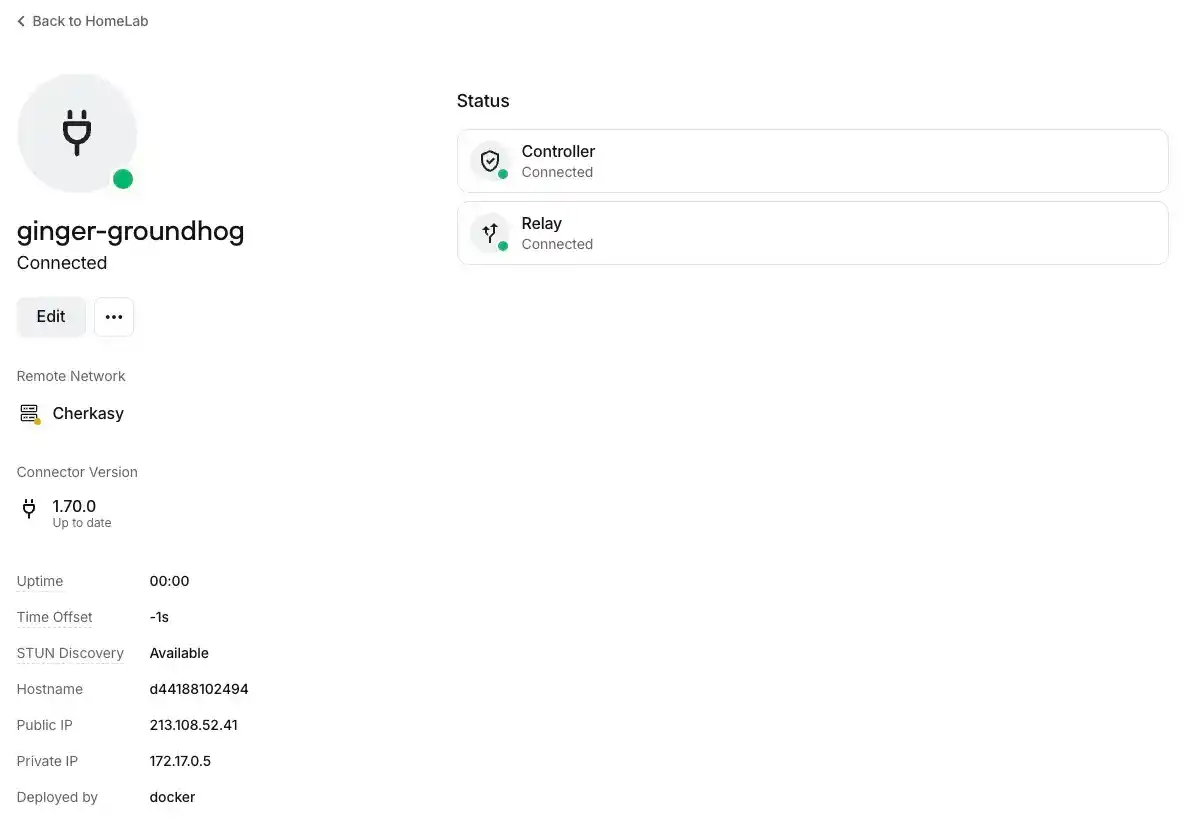
After which, the connector's status updated and turned green.
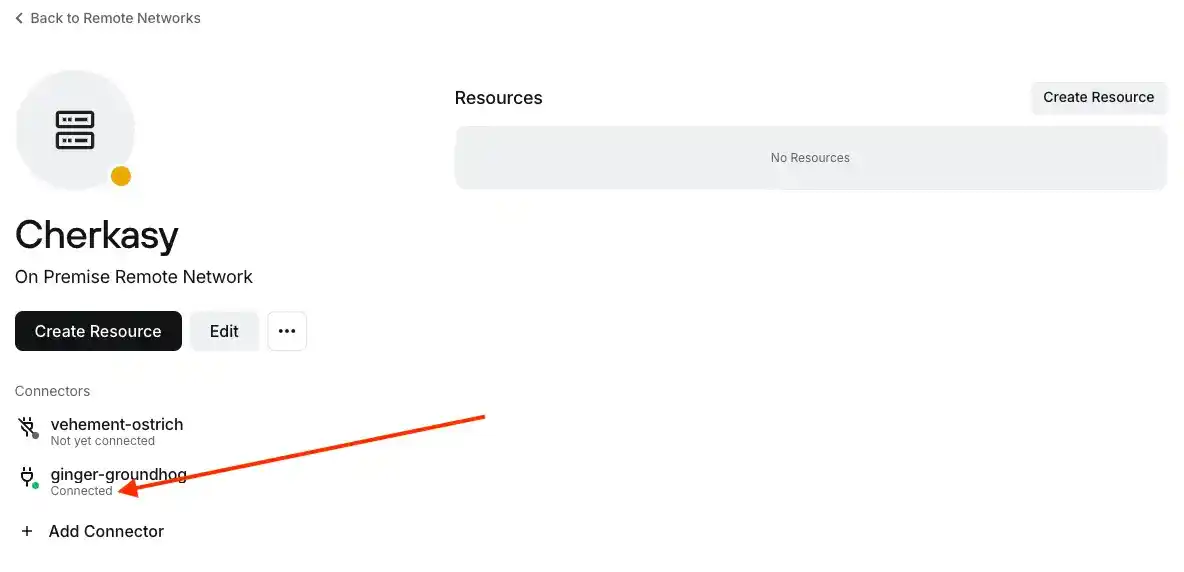
This change can also be observed on the network page. You can safely delete the second connector, or for more stable connectivity, you can deploy it on another device if you have one.
Connector for the Sagunivka (B) network
Follow all the steps described for Cherkasy (A), but for the Sagunivka (B) network. Don't forget that the connector should be deployed in the other network.
Step 3. Add Network Resources
The ready connectors should allow access to network resources. So, let's now add all of our network for full access.
To do this, on the page of the Cherkasy (A) network, click the "Create Resource" button.
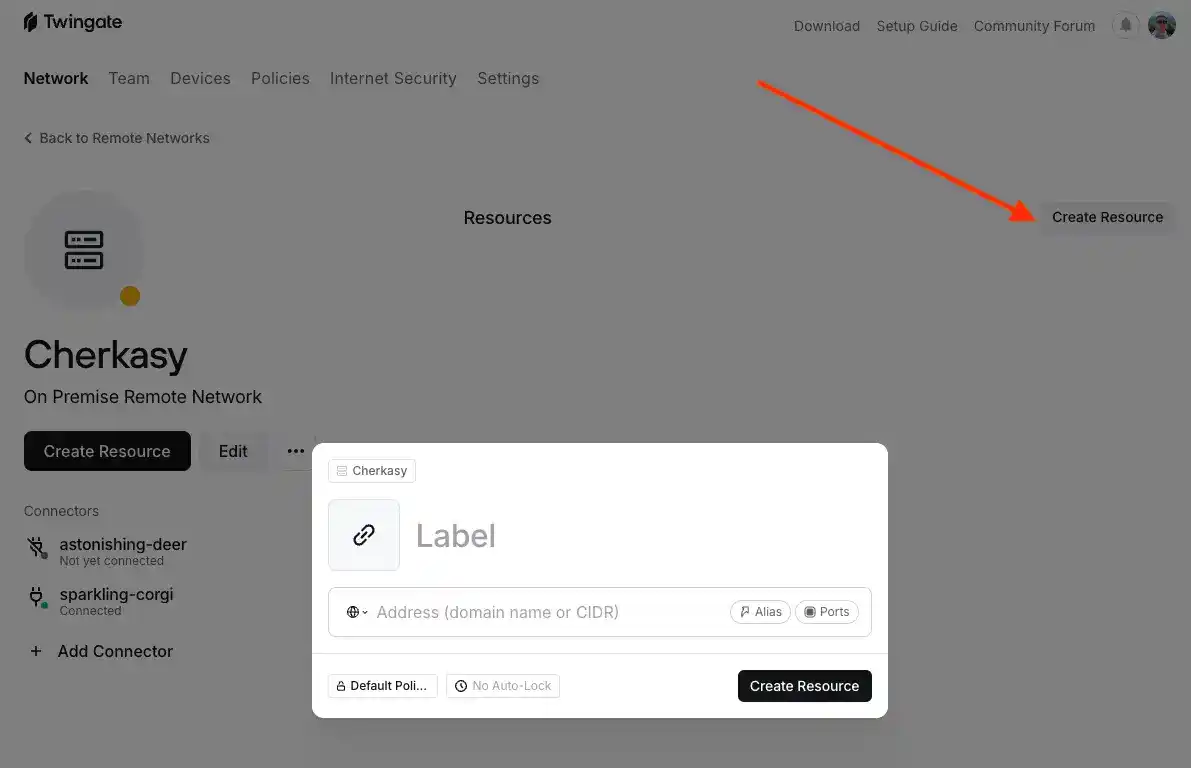
Enter any name and specify the subnet mask for the current network.
For the home network Cherkasy (A), it will be 192.168.10.0/24 with the name che-net, and for the parents' network Sagunivka (B), it will be 192.168.1.0/24 with the name sag-net. It is very important not to mix them up.
All these settings should be interpreted as follows: In the Cherkasy (A) location, there is a connector that provides access to the network with the subnet mask 192.168.10.0/24. And something similar should be done for Sagunivka (B).
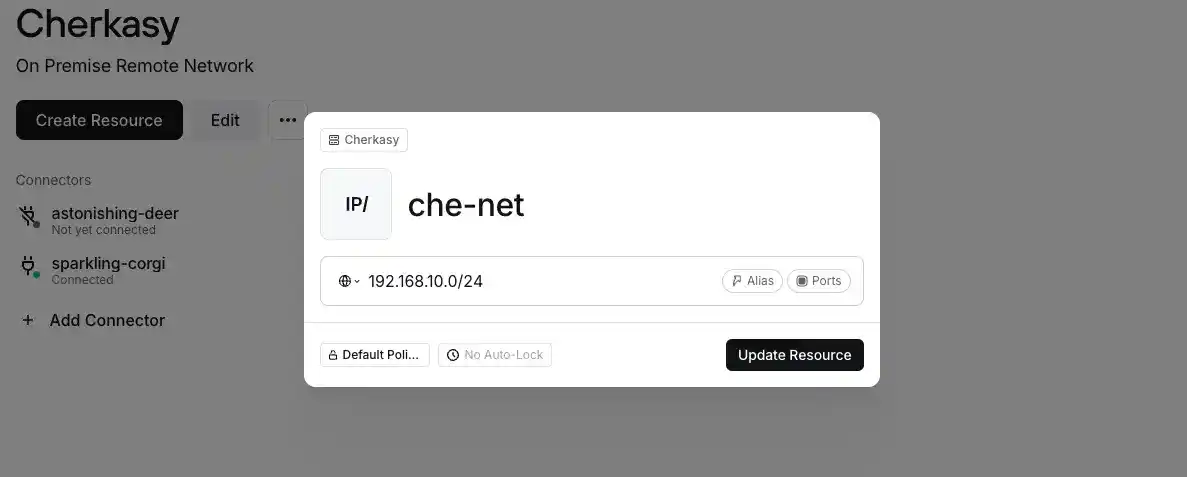
After saving this configuration, your network should look something like this.
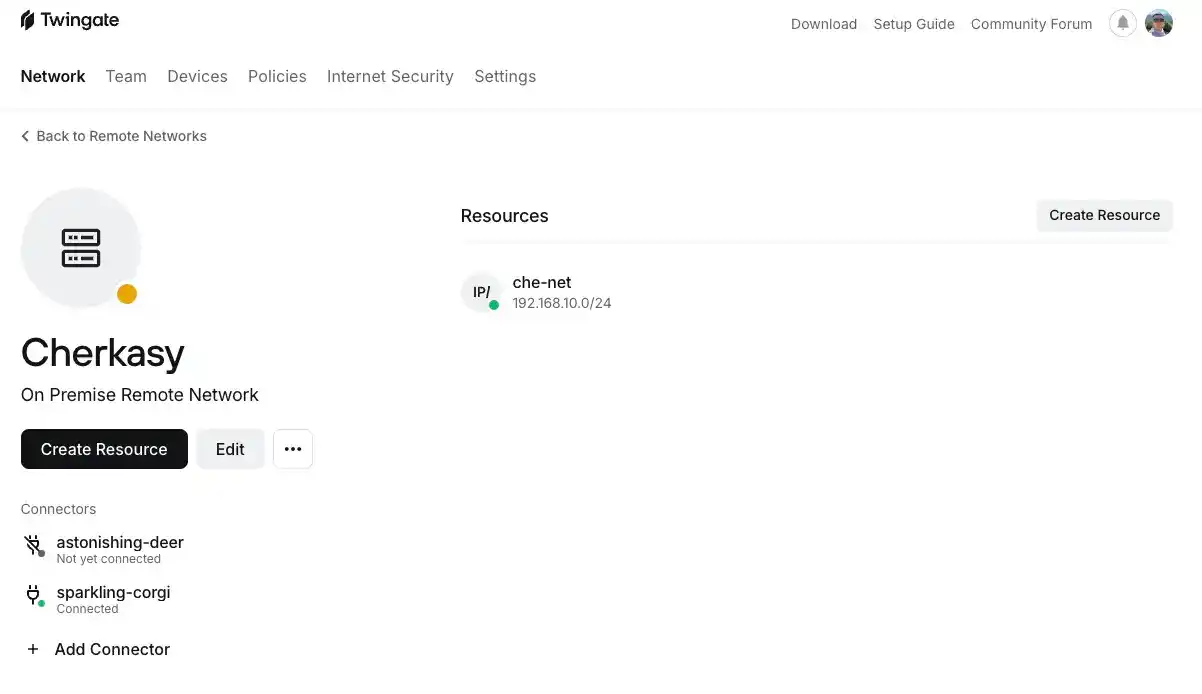
And this is what the other network should look like.
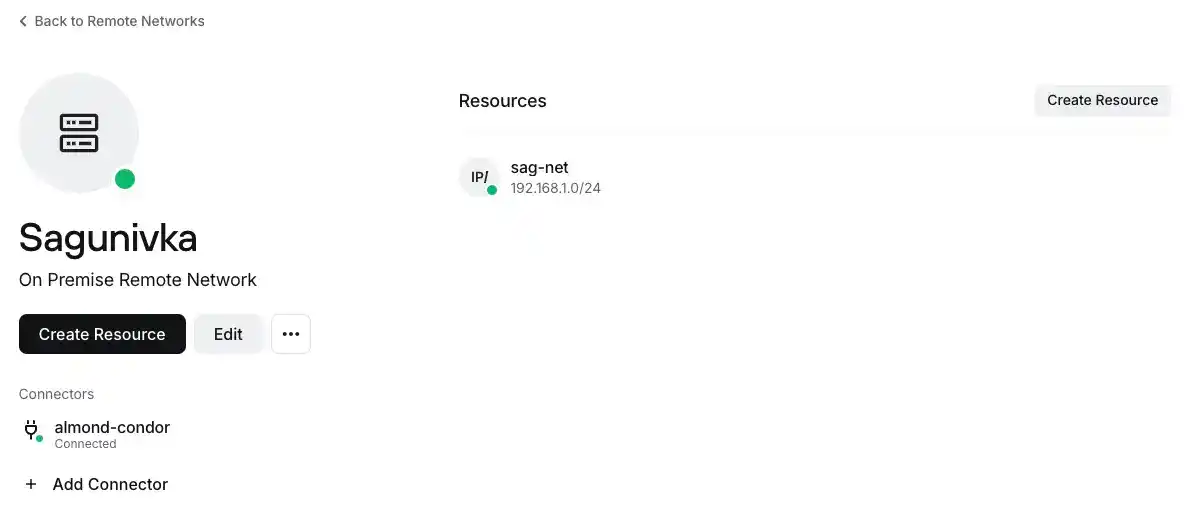
I hope the images make the setup easier for you.
Step 4. Creating Services
Now let's move on to another preparatory task. Go to Team -> Services and create two new services for both of our networks, as shown in my example.
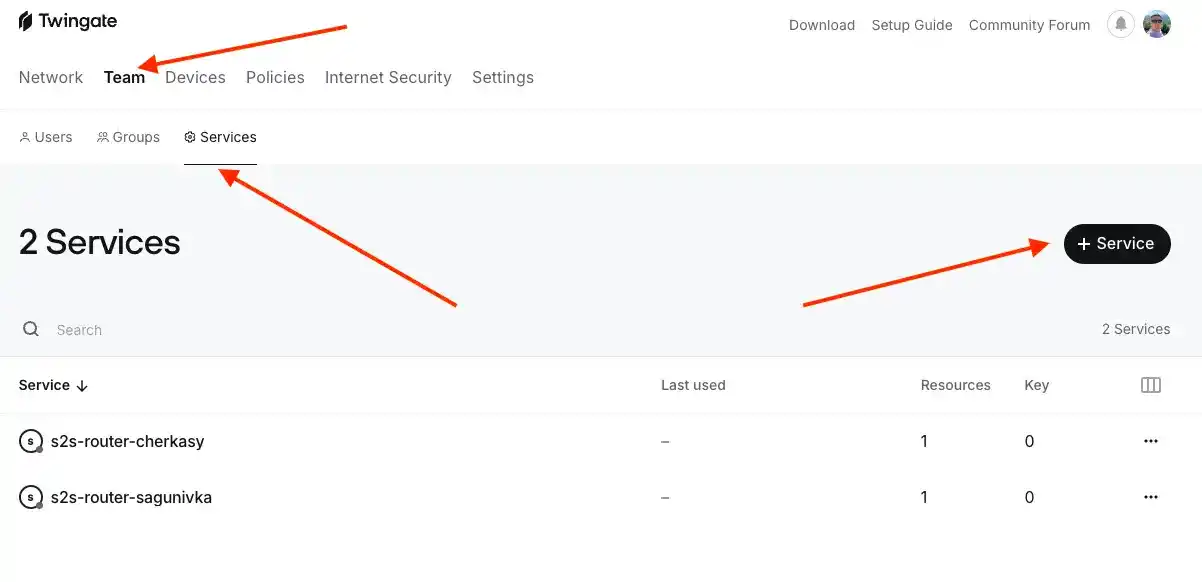
I created two services for Cherkasy (A) and Sagunivka (B). When you open them, they should be empty.
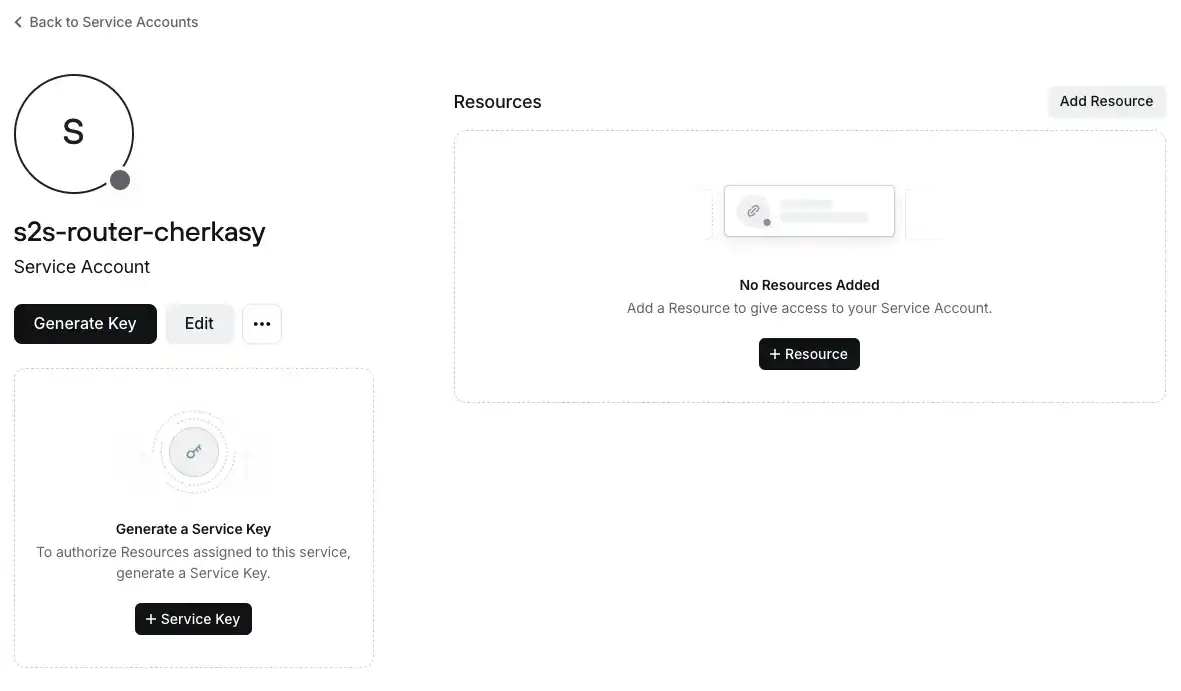
Each service should have:
- Access to resources from the opposite network. That is, Cherkasy (A) should gain access to
sag-net, and Sagunivka (B) should have access toche-net. - An access key.
Add access to the opposite network
Click the "Add Resource" button and select the opposite network. For Cherkasy (A), this will be sag-net.
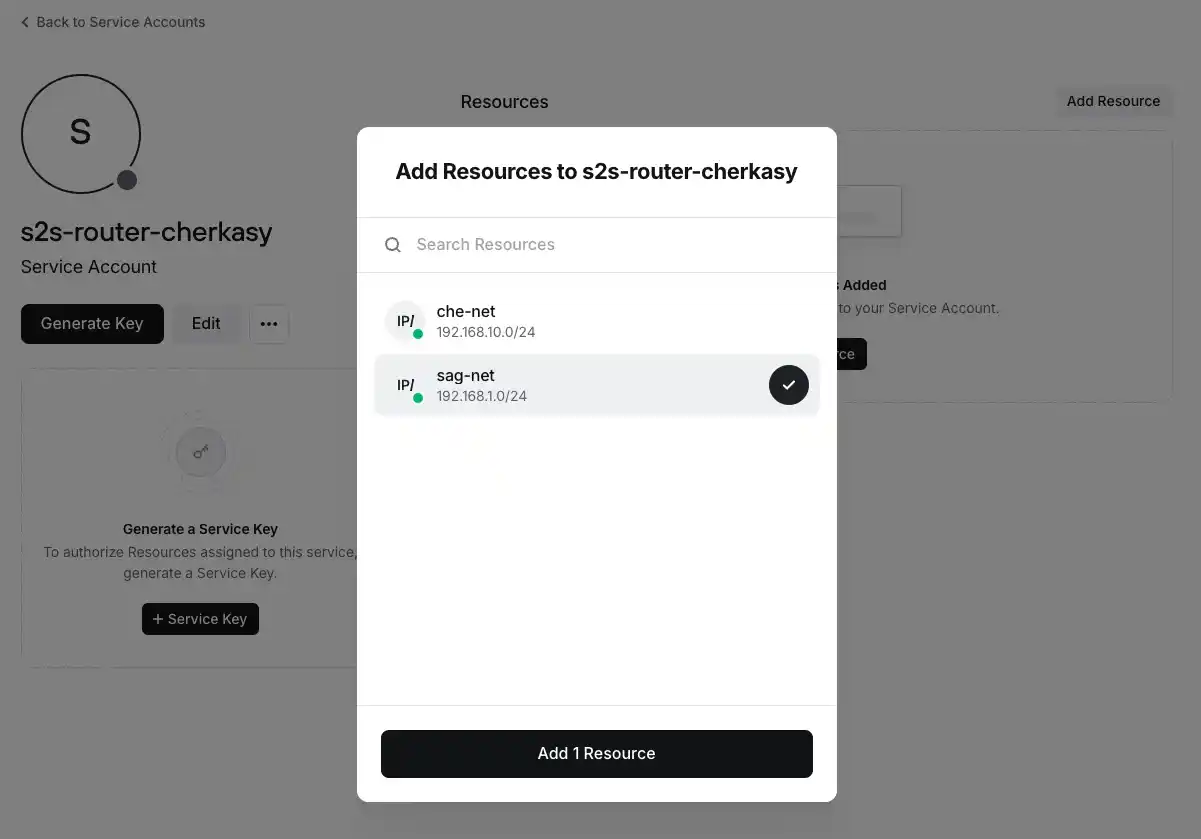
The added network will appear in the list of available resources.
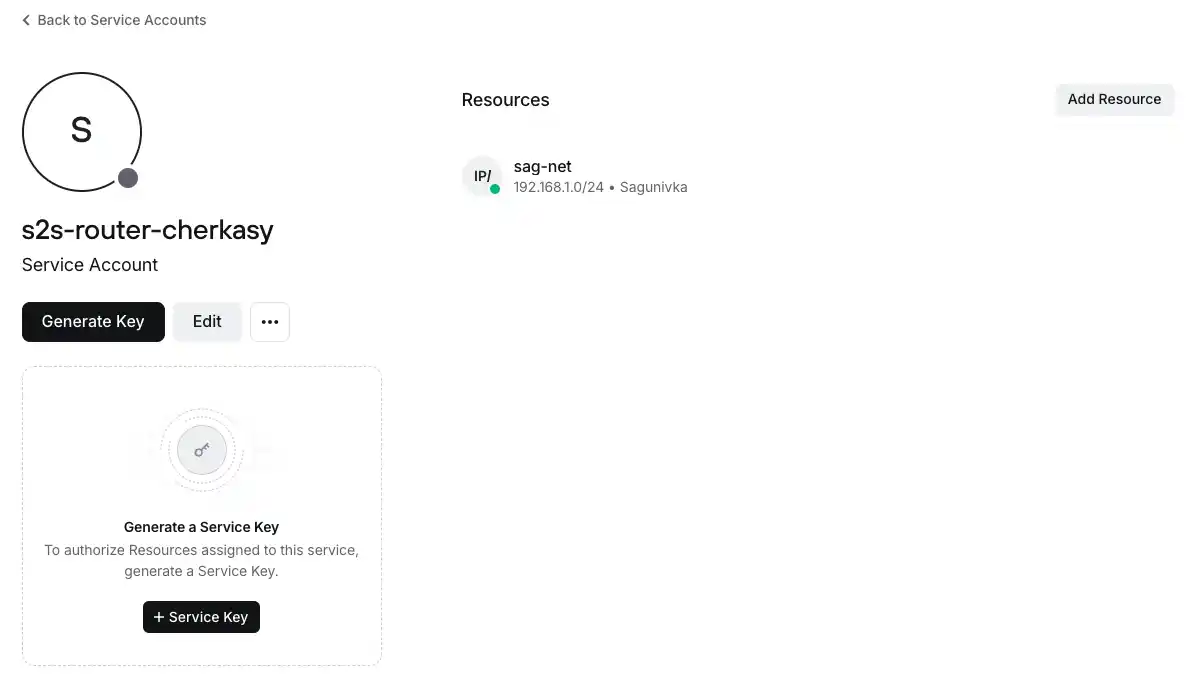
Perform the corresponding actions for the other service as well.
Generate access keys
Click the "Generate Key" button and specify the validity period in days. For convenience at home and knowing that no unauthorized person will have access to these services, I set it to zero (0), which automatically removes the expiration period and makes the key valid indefinitely.
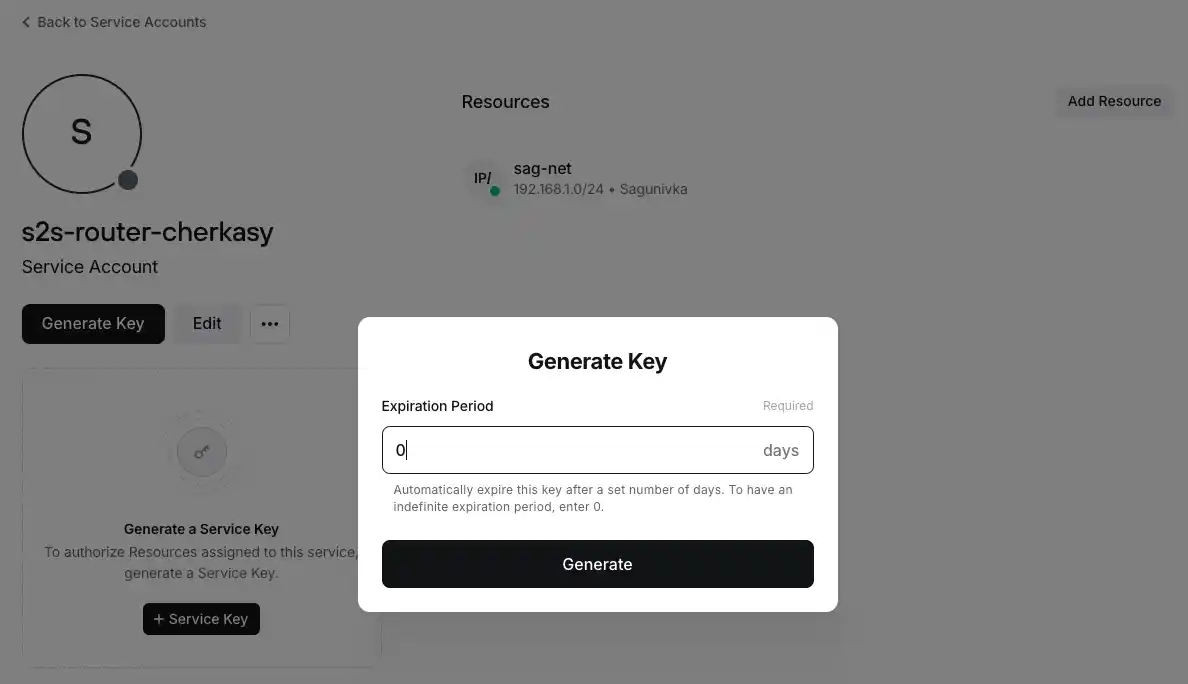
The key will have a name, which you can change, but you must save the generated token. I recommend downloading it in JSON format to your computer, at least until the setup is complete.
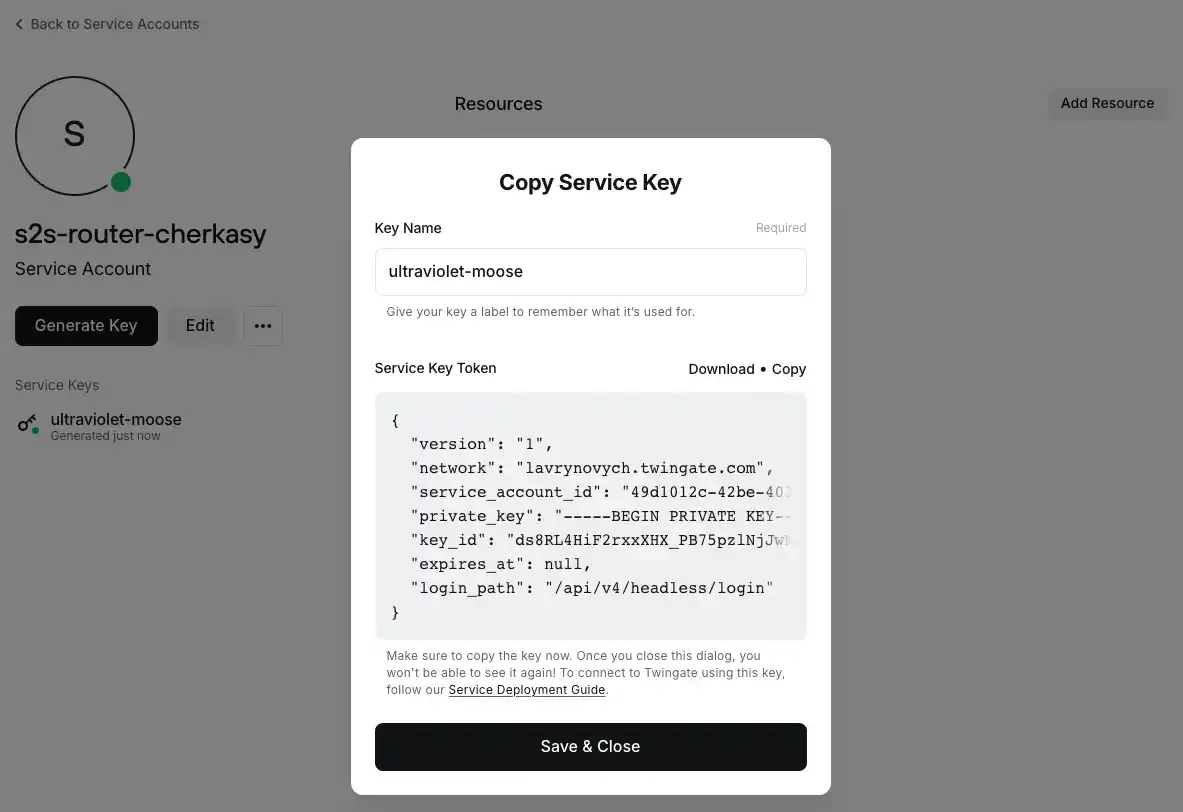
Don't forget to perform the same actions for the other service. Save the second key separately to avoid mixing them up.
With this step, we have completed the preparatory actions for setting up the Twingate clients.
Step 5: Deploy Clients
At this stage, we have networks, working connectors, services, network access, and generated keys. Now it's time to use those keys and finalize our complex setup. We will prepare the environment for installing the client, configure it in headless mode, and ensure that all traffic can flow to the opposite network.
We remember that the connector allows traffic inside, and the client will release it. So, let’s get started.
The client installation will be shown for the parents' network, Sagunivka (B), as I’ve already configured my home network in advance while testing this approach. But don’t forget to perform all steps for the other network as well.
LXC - Ubuntu 20.04
Now let's work directly with Proxmox VE and create a new LXC container with Ubuntu 20.04.
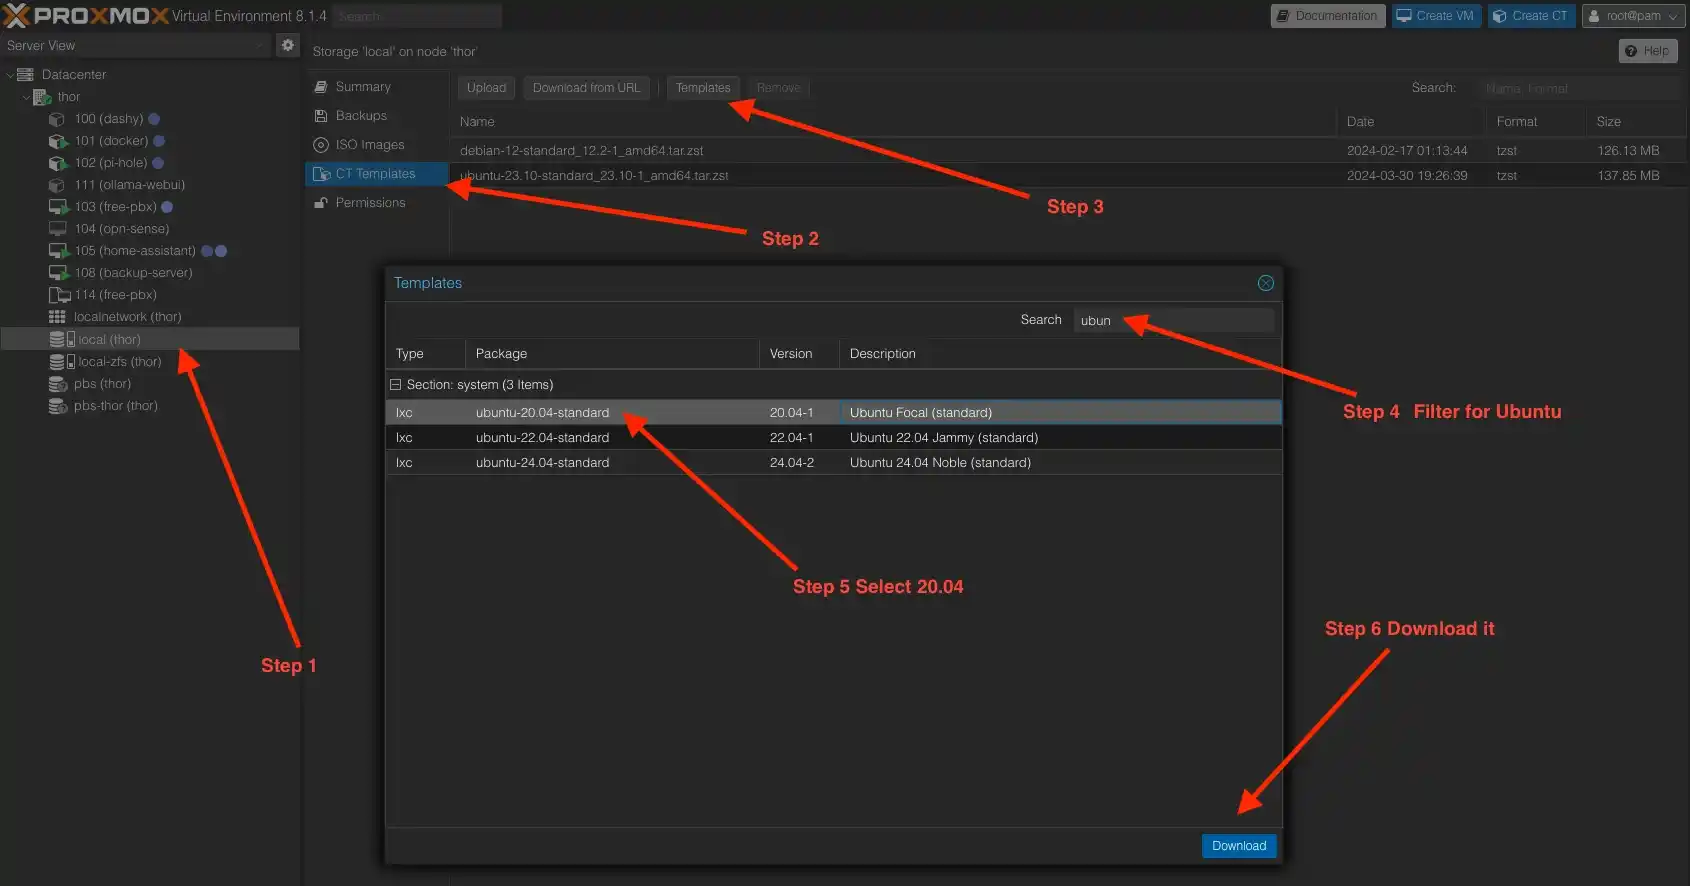
Download the Ubuntu template
If you haven't run Ubuntu 20.04 before, you'll need to download the template separately. It's not difficult and happens very quickly.
Creating the container
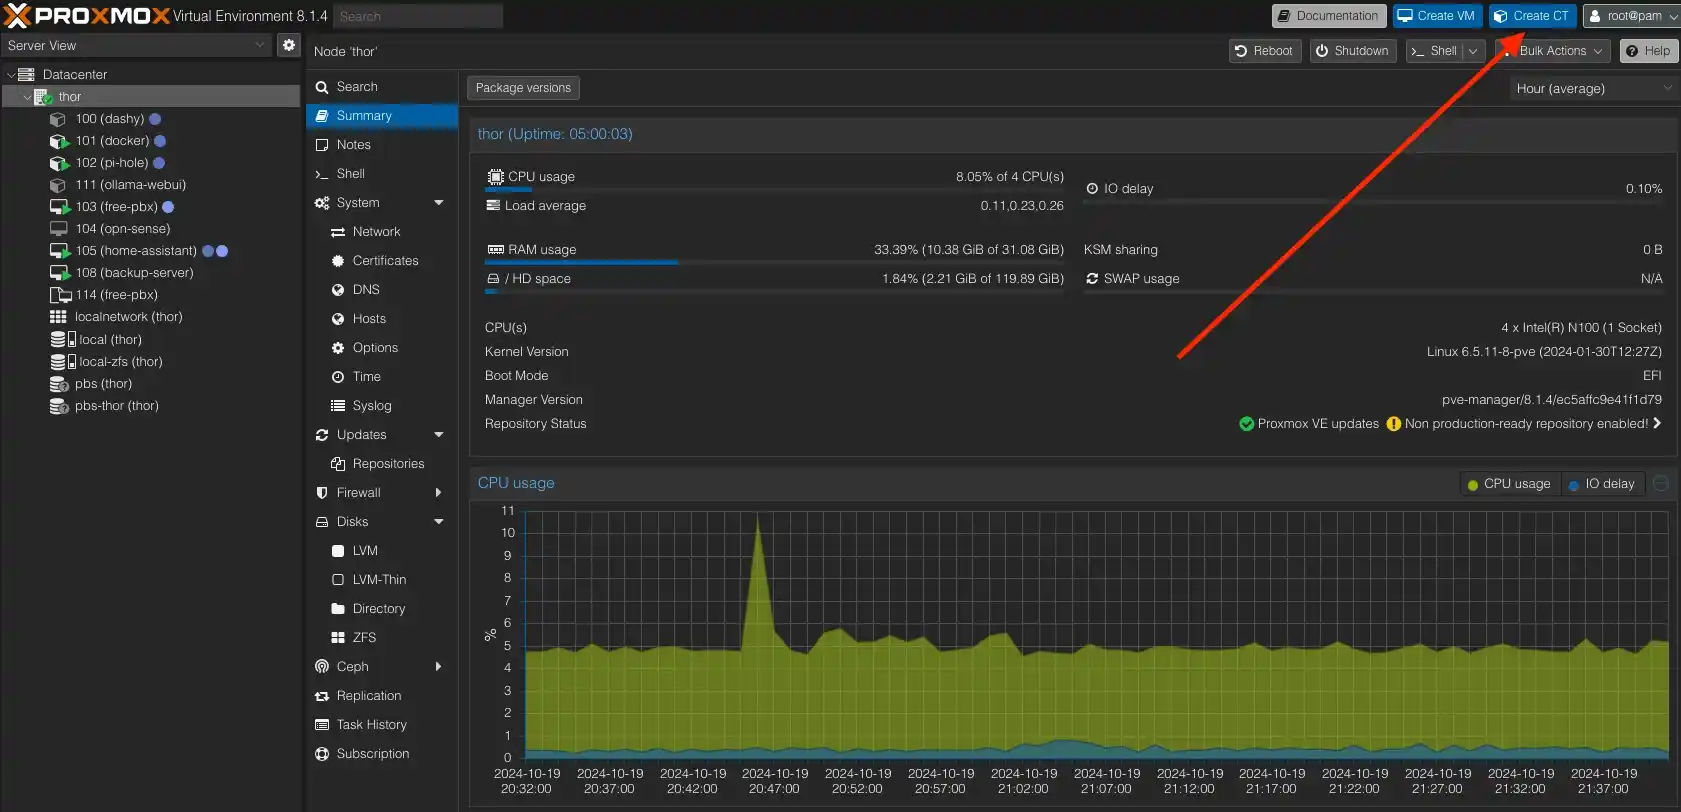
Although it's unnecessary for experienced Proxmox VE users, for completeness, I'll walk through all the steps in detail. Let's start by clicking the "Create Container" button, which is located in the top right corner.
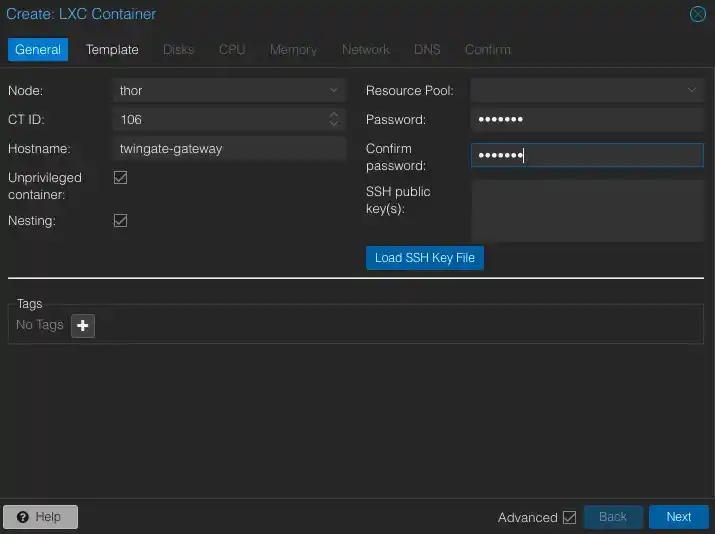
In the dialog, enter the Hostname and the password that you'll need to use for logging into the console later.
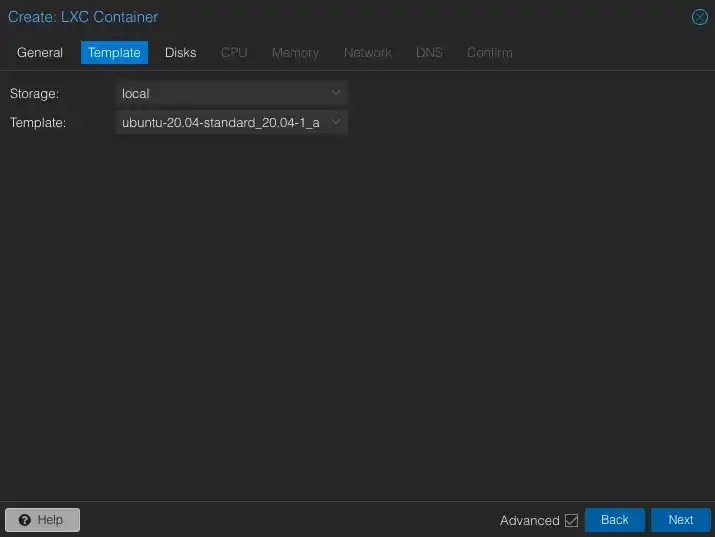
Select the template that we recently downloaded, which is Ubuntu 20.04.
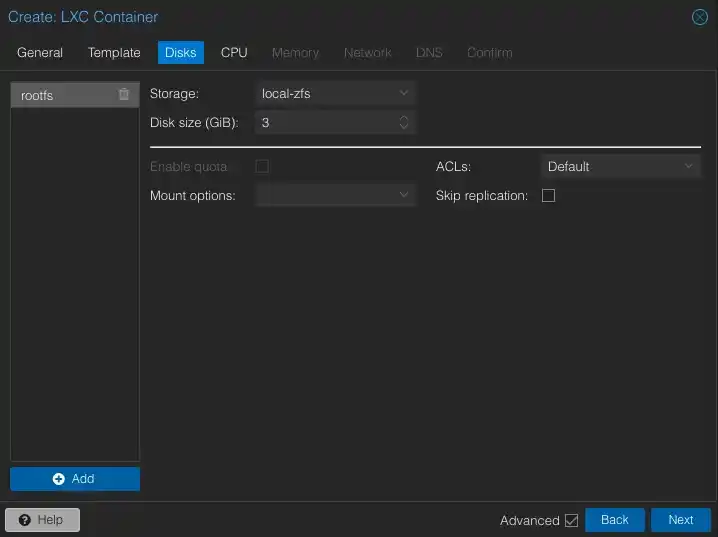
3 GiB of disk space should be enough. 8 GiB would be too much.
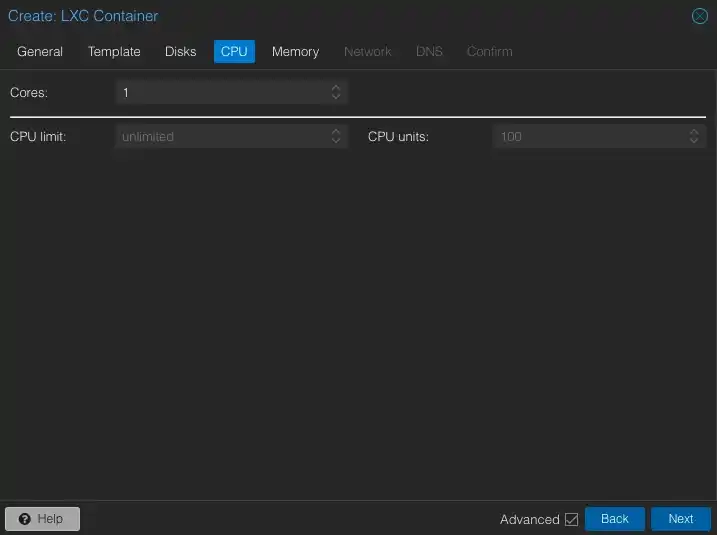
One CPU core will always be sufficient.
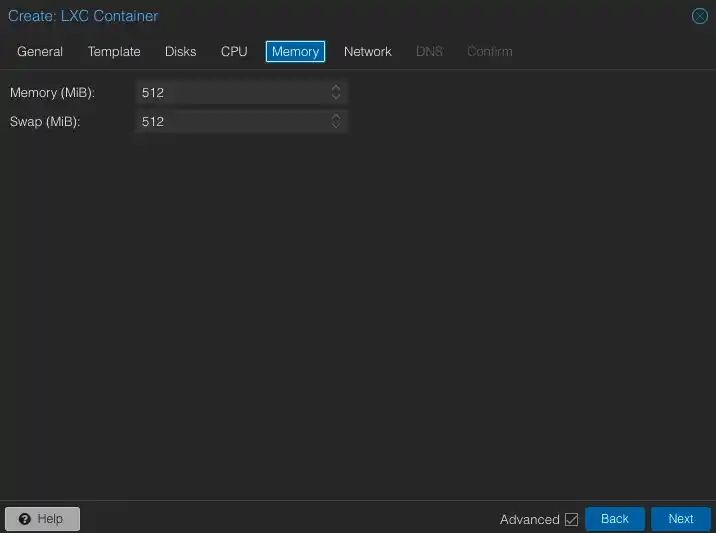
The memory consumption is very low, so we leave it at 512 MB as it is.
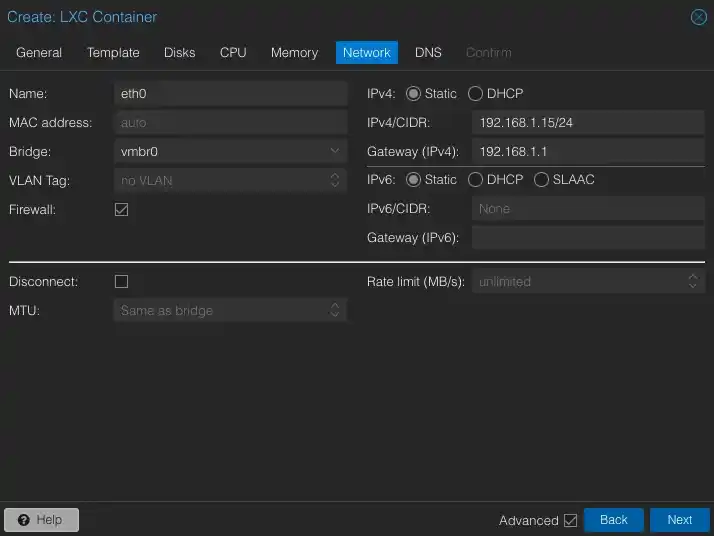
In the network settings, you need to assign a static IP address.
Since we're setting this up for the Sagunivka (B) network with the 192.168.1.0/24 subnet, I chose 192.168.1.15 as the assigned address for our client. It should be entered in CIDR format, so add /24 at the end.
Specify the gateway (essentially your router) for the network you're configuring. In the Sagunivka (B) network, this will be 192.168.1.1.
Skip the DNS step and, on the final screen, review all parameters. Additionally, enable the "Start after created" option so that the container starts automatically without the need to start it manually.
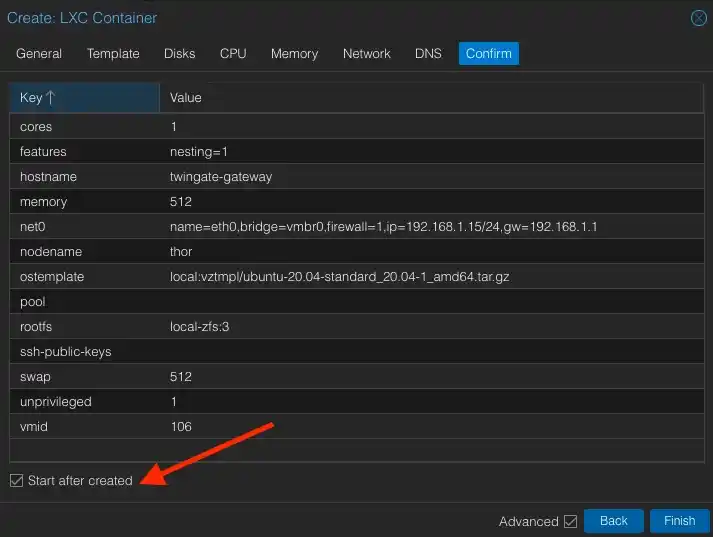
And finally we have a clean container with Ubuntu 20.04
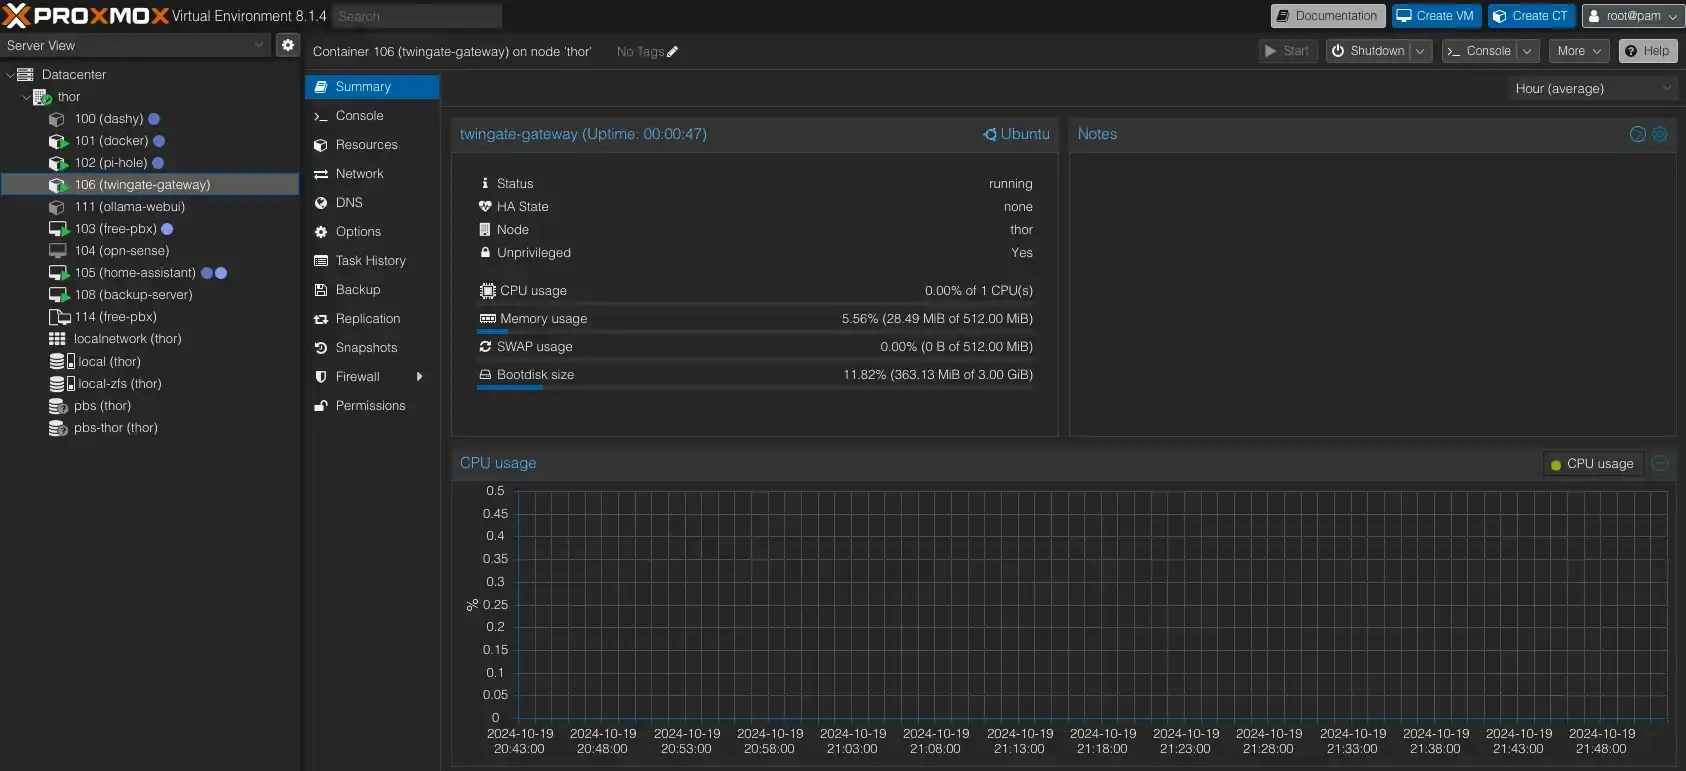
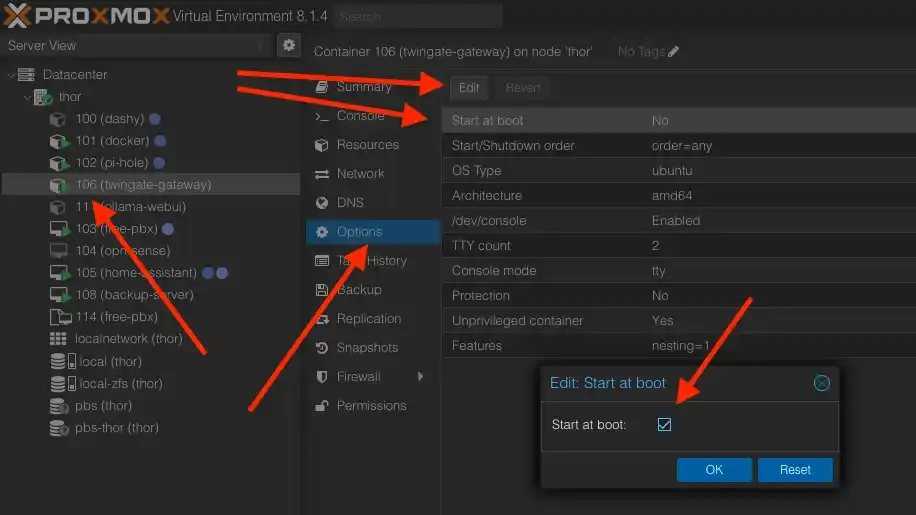
Enable auto-start
It is very important to enable the auto-start feature for the container so that after any disruptions, it automatically starts without requiring your attention.
Go to Options, select the Start at boot parameter, and edit it to enable auto-start.
Enable tunnel support in Proxmox for our container
By default, containers are restricted from using tunnels. Now, let's enable this feature. First, open the Shell of your Proxmox VE server.
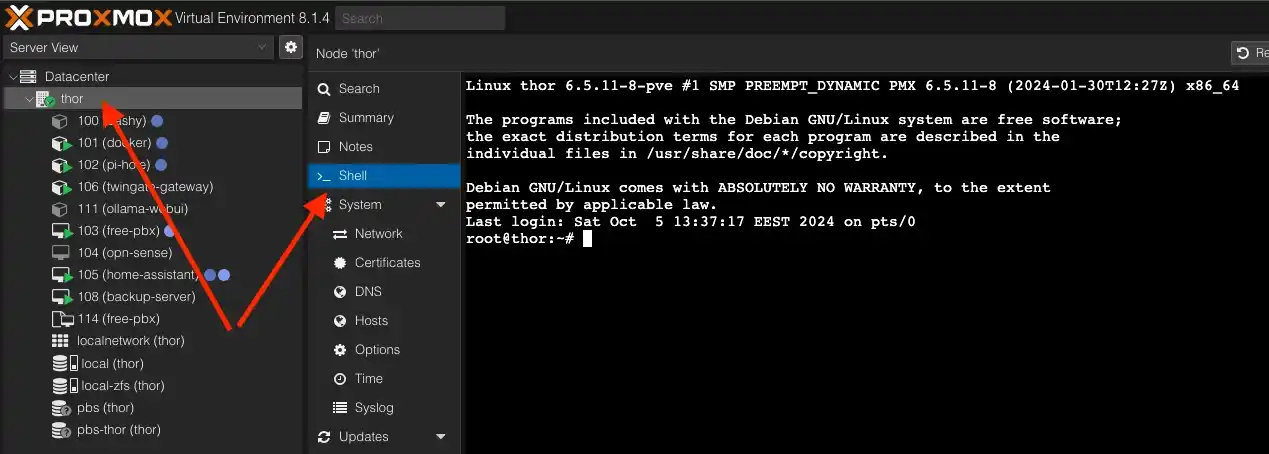
Now, you need to take the ID of your container. The container we named twingate-gateway in the list under number 106 – this is its identifier.
Run the following command for the file 106.conf:
nano /etc/pve/lxc/106.conf The nano editor will open. Add the following lines at the end of the file.
lxc.cgroup2.devices.allow: c 10:200 rwm
lxc.mount.entry: /dev/net dev/net none bind,create=dir
And save the changes using the Ctrl + X combination and the Y key to confirm the action. I found this solution here: https://forum.proxmox.com/threads/how-to-enable-tun-tap-in-a-lxc-container.25339/post-576172
Update the system and install curl
Now, let's log into the console of our container for the first time. I remind you to use root as the login, and the password will be the one you set when creating the container.
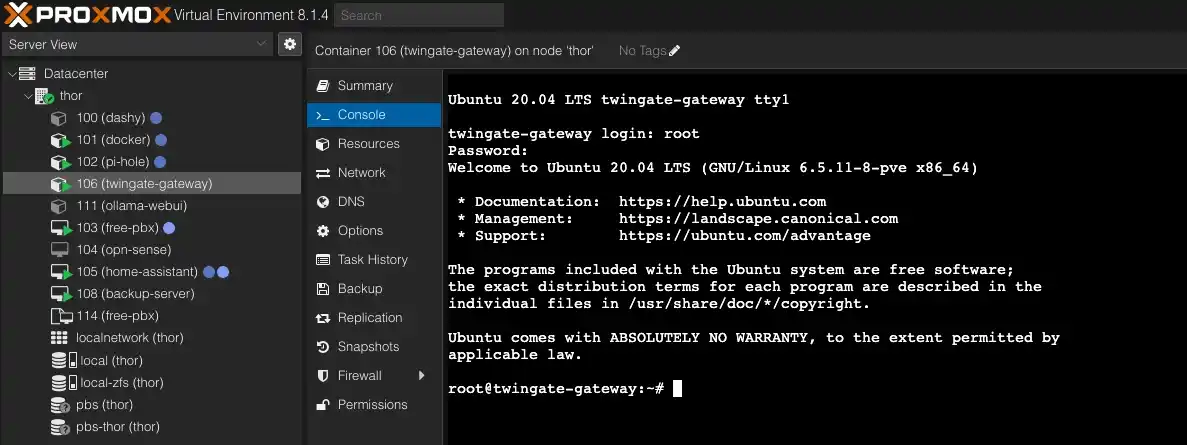
Update all packages using this command and also install curl.
sudo apt update && sudo apt install curl -yInstall the client
There is official documentation on how to install the Twingate client in headless mode. I recommend checking it out if any issues arise at this stage: https://www.twingate.com/docs/linux-headless or https://www.twingate.com/docs/linux.
To download the client, run this command:
curl -s https://binaries.twingate.com/client/linux/install.sh | sudo bashCreate a file with the key
Now, using the nano command, we will create a new file named service_key.json and copy the contents of the key, which was downloaded during the preparation stage of the corresponding service. In our case, we will need the key from s2s-router-sagunivka.
Execute the command
nano service_key.json
And copy the entire content of the downloaded key file.

Save the changes using the combination Ctrl + X and the Y key to confirm the action.
Configure the Twingate client
The following command tells the Twingate client to run in headless mode and use the key file we just created.
sudo twingate setup --headless service_key.jsonAnd after that, we start the client.
twingate startAfter executing the commands, we should see the following result.
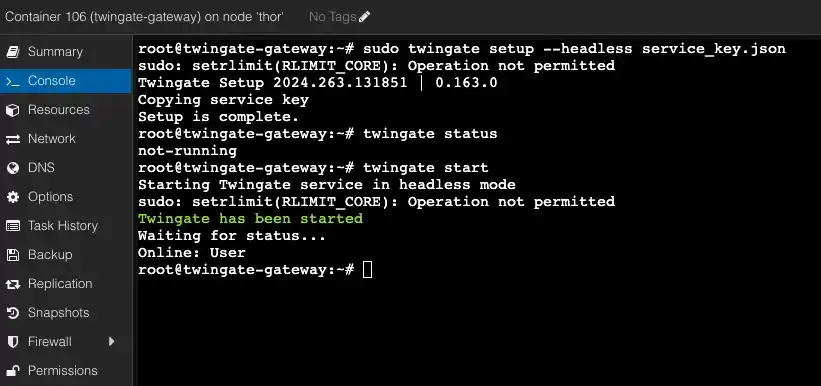
Enable IP forwarding
To allow traffic to pass through our client, we need to do one more thing. Specifically, we need to enable IP forwarding. Edit the sysctl.conf file.
sudo nano /etc/sysctl.confScroll down and uncomment the line with net.ipv4.ip_forward=1.
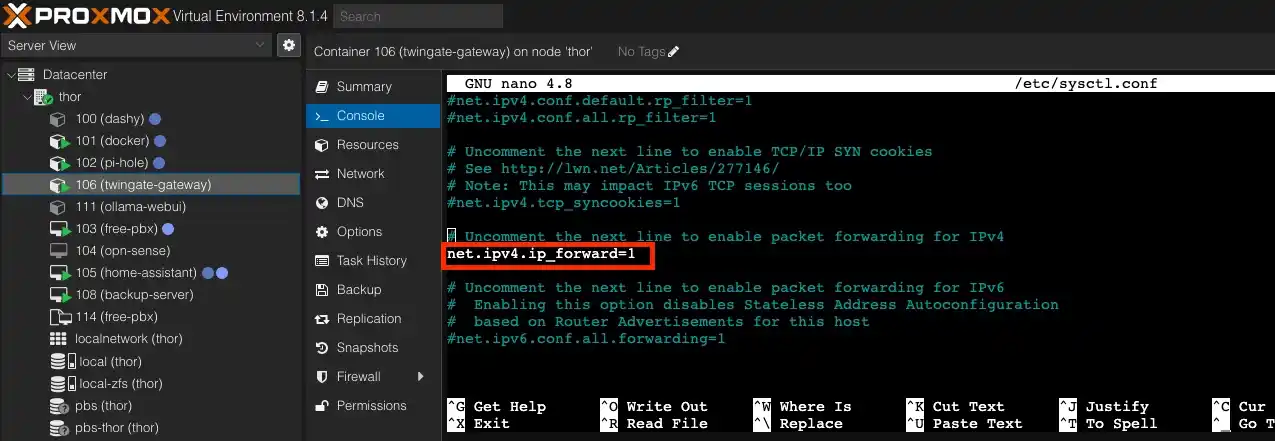
And again, to save the changes in the nano editor, press Ctrl + X and Y to confirm.
To immediately apply the changes at the system level, run this command:
sudo sysctl -pIptables Configuration
Next, we need to make changes to iptables.
First, add a rule to allow traffic from the internal interface. Note that you will likely need to replace the interface names eth0 and sdwan0 with your own before running the commands below.
eth0is the internal private network interface of your containersdwan0is the virtual network interface created by the Twingate client
To find out the names of your interfaces, install net-tools.
apt install net-toolsThen, run the command ifconfig.
ifconfigIn response, you will receive a list of your interfaces, where you can find all the names. I hope they either match or you can easily identify the correct names.
Now, let's add a new rule.
sudo iptables -A FORWARD -i eth0 -o sdwan0 -j ACCEPTAlso, add a rule that ensures return traffic, which initially left from within the same network, can pass back.
sudo iptables -A FORWARD -i sdwan0 -o eth0 -m state --state RELATED,ESTABLISHED -j ACCEPTNext, add a rule for any traffic in the NAT table to forget the source IP address and use the IP address of the Twingate client’s network interface (in this case, sdwan0). This ensures NAT for traffic where the destination IP address matches the address of the Twingate resource.
sudo iptables -t nat -A POSTROUTING -o sdwan0 -j MASQUERADECheck if all rules have been added correctly.
iptables -STo ensure that these rules persist after restarting the container with the client, we can additionally install the iptables-persistent package:
sudo apt install iptables-persistent -ySelect YES in both dialog windows.
Auto-start of the client
In order for our client to also start automatically like our container, we need to add it to the system's auto-start. Run the command
crontab -eAnd add the following line at the end of the file
@reboot twingate start Save the changes by pressing Ctrl + X and the Y key to confirm the action.
Step 6. Setting up traffic forwarding on the router
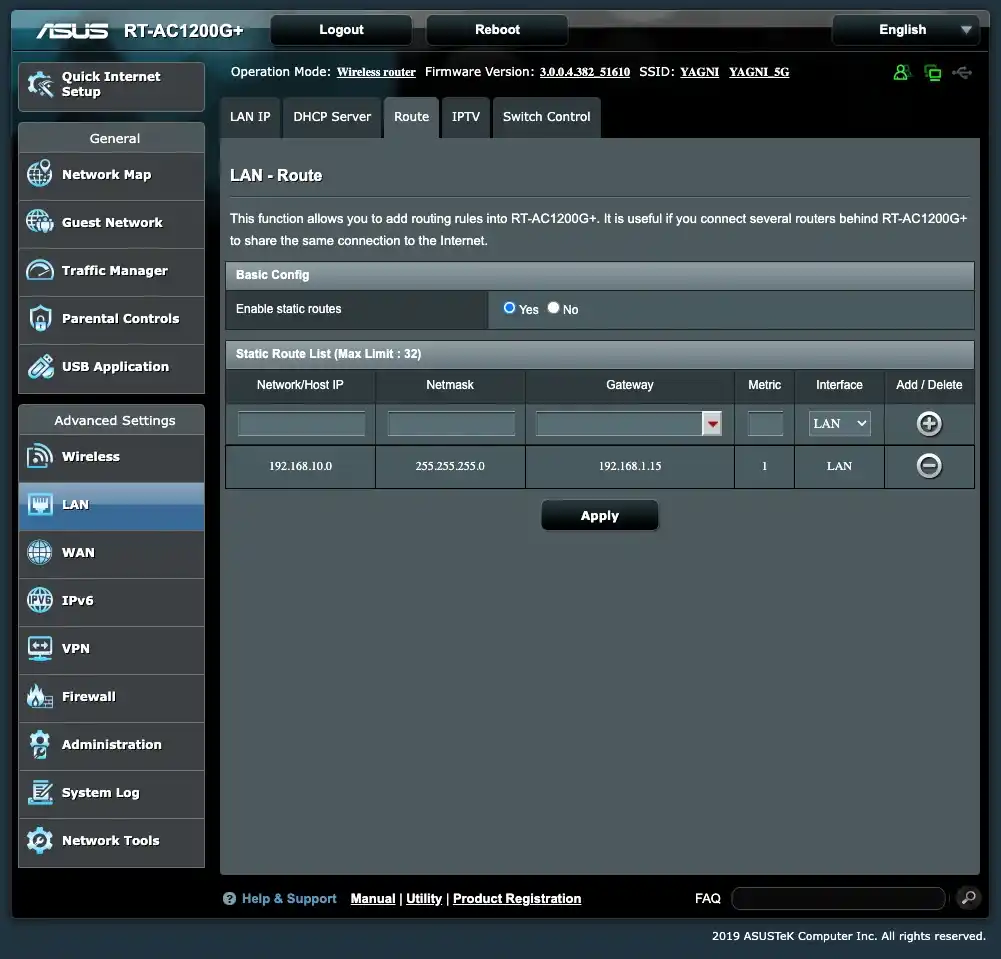
You need to perform these actions on the routers of both networks. Your router settings may visually differ from mine because I am using an Asus RT-AC1200G+.
I added static routes on both routers.
Here are the router settings for the Cherkasy (A) network, which is located at 192.168.10.1. Go to the LAN -> Routes settings, enable static routes, and add one as in my example.
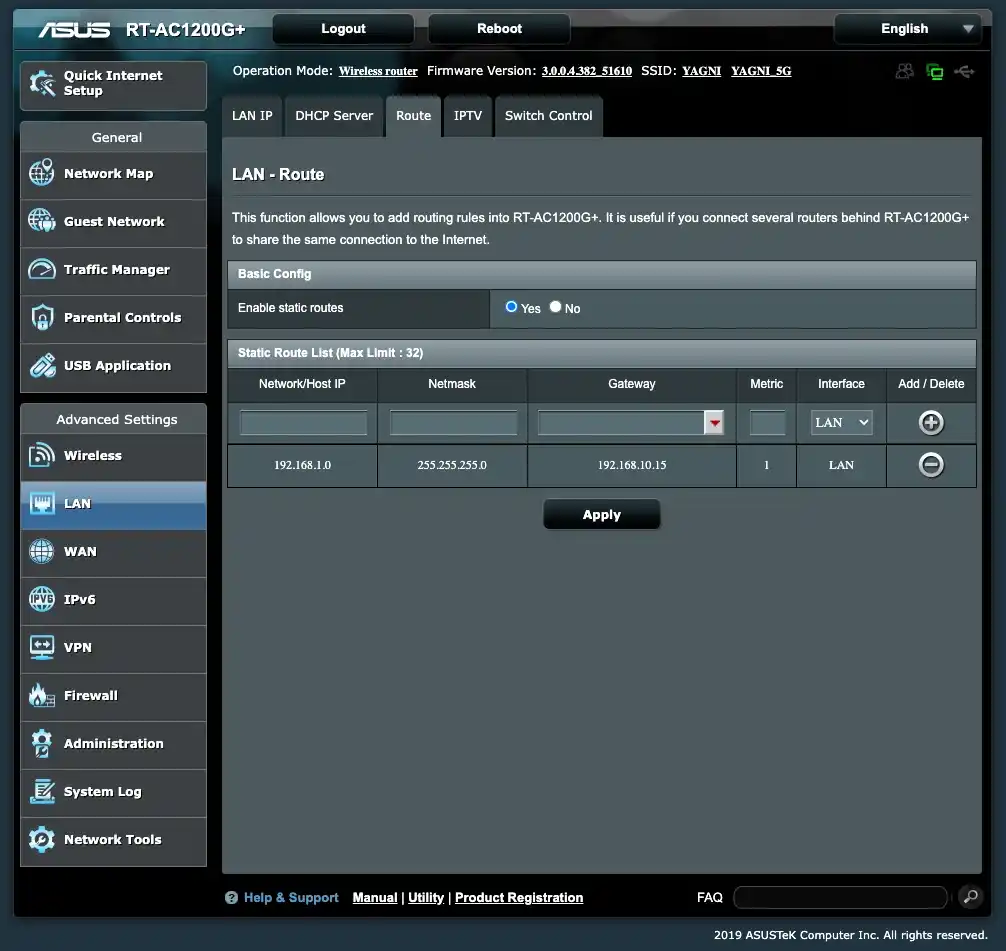
Here, we specify that we are redirecting traffic destined for the 192.168.1.0 network with the subnet mask 255.255.255.0 through the gateway 192.168.10.15, which is our client in this network.
And this is the router from Sagunivka (B) with the corresponding settings.
Connection check between networks
For clarity, refer to the diagram of the updated network from the conceptual section
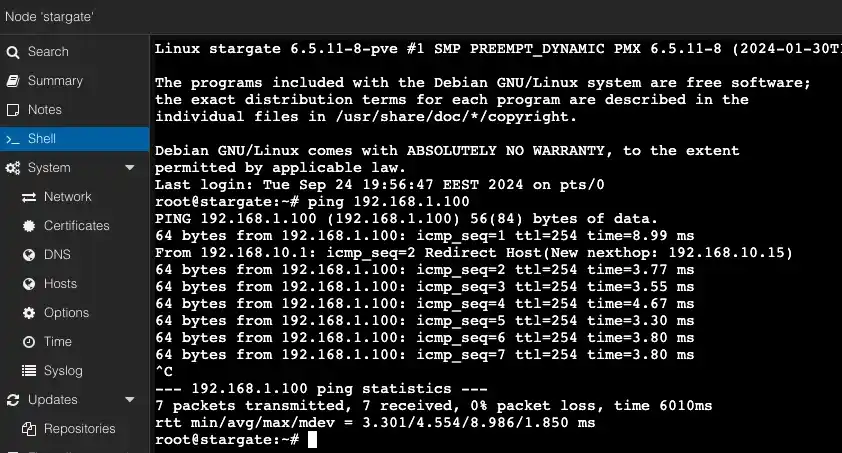
A -> B
First, from the home network Cherkasy (A) 192.168.10.0/24, I will run a ping command from the Proxmox VE server at 192.168.10.100 to another server at 192.168.1.100 from the parents' network Sagunivka (B) 192.168.1.0/24.
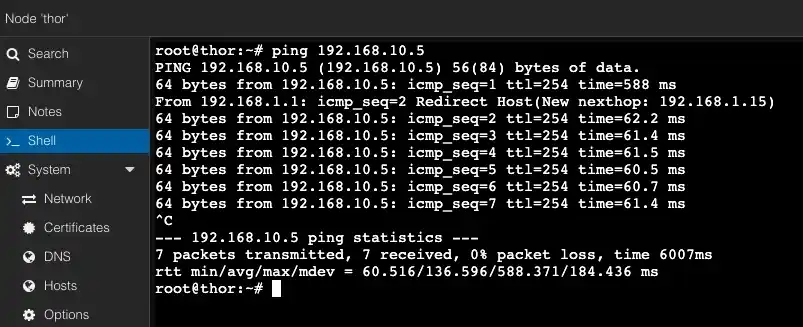
B -> A
And now let's check in the opposite direction. From the Proxmox VE server with the address 192.168.1.100 in the parents' network Sagunivka (B) 192.168.1.0/24, I will run a ping command to my LXC container with Docker at 192.168.10.5, which is located in the home network Cherkasy (A) 192.168.10.0/24.
If everything worked as expected for you, I would like to sincerely congratulate you! We've made it.
Final Notes and Thoughts
There is a lot to mention in the conclusions because a lot of work was done. But the first thing I want to focus on is that Site-to-Site VPN, whether with Twingate or any other solution, is not limited to just two networks. You can add new networks by following the same steps. The only difference will be that on the routers, you need to add routes to each new network in each of the old ones, and you also need to add these new networks to the access list of each of the old Twingate services.
If you automate the deployment of connectors and clients, which is possible by creating templates in Proxmox VE, adding new networks can take less than half an hour.
As for the complexity of the setup, I would more likely refer to understanding the whole process as the real challenge. Because when you visualize each individual network and grasp the problem you need to solve, the steps themselves aren't as difficult, especially when they're so clearly structured.
Of course, it can be tedious to repeat most of the commands twice, and this is where the biggest trap lies—losing focus and confusing which network you're working on and what you're doing.
Let's go through the completed tasks for each network:
Home network Cherkasy (A) 192.168.10.0/24:
- Added a connector via Docker, located at address 192.168.10.5
- Added a headless client with the address 192.168.10.15
- Updated routing tables on the router with address 192.168.10.1
Parents' network Sagunivka (B) 192.168.1.0/24:
- Added a connector via Docker, located at address 192.168.1.5
- Added a headless client with the address 192.168.1.15
- Updated routing tables on the router with address 192.168.1.1
Smoothly transitioning from theory to gathering information into a concept, and further step-by-step implementation of all plans into practice, we successfully combined two networks in a bidirectional mode. Shared usage of services and resources has become more convenient, which was the primary goal.
I admit that I gained a lot of valuable experience and refreshed my knowledge in practice.
As for what could be improved, it would be deploying both the connector and the client in the same LXC container.
To increase the stability of your network, I would recommend deploying a backup connector and client, if you have additional hardware. The resources they consume are minimal. For example, I have Docker running on a Synology NAS — a good place for a second connector. Whether the second client would work as smoothly, I haven't checked. But for it, you will need to add an additional route on the router.
For my own future development, I plan to configure a similar Site-to-Site VPN version based on WireGuard VPN. As for today, that’s all.
The result we achieved is not just "configuration for the sake of it" but a truly necessary thing for implementing my future ideas and plans. Site-to-Site VPN opens up opportunities for me to set up shared services and distribute them between networks and the currently available hardware.
P.S. I’m a bit surprised that everything worked out on the first try. It seems I struggled more before than while actually doing it.
You also can be interested in


