Self-Hosting Your Blog: Hardware and Containers (Part 1) - Ghost
This article provides a step-by-step guide on how to launch a Ghost blog at home using a Proxmox VE server installed on a mini server. Let's analyze the prerequisites, find a hardware and begin...


Introduction
In the first part, we will look at the hardware and the preparation of the container. In the second part, we will go through the step-by-step process of installing the blog and connecting the domain name to provide public access to it.
I do not intend to detail every step exhaustively here, as I have gone through them at different times and for various tasks. I will try to connect the most essential steps and guide you where possible, sometimes using external resources.
Prerequisites
Let's start by listing what we will need.
- Hardware
- A home mini-computer: Ideally fanless with low energy consumption, but powerful enough to run both your blog and Proxmox VE.
- USB flash drive
- Virtualization and Containerization
- Proxmox Virtual Environment (Proxmox VE): A virtualization environment based on open technologies such as KVM (Kernel-based Virtual Machine) for kernel-level virtualization and LXC (Linux Containers) for containerization.
- Docker: A popular platform for software containerization.
- ISO image of Ubuntu 23.10
- Ghost Installation Requirements:
- Ubuntu 20.04 or Ubuntu 22.04
- NGINX (minimum of 1.9.5 for SSL)
- A supported version of Node.js
- MySQL 8
- Systemd
- A server with at least 1GB memory
- Domain Name
- Cloudflare Websites, Cloudflare Zero Trust & Tunnels
As you can see, there is quite a bit involved, but it's not as daunting as it seems.
Hardware
On a local marketplace, I found some decent hardware not just for the blog but also for home labbing in general. It was a Fujitsu Futro S920, which I got for 1,400 UAH (approximately $36).
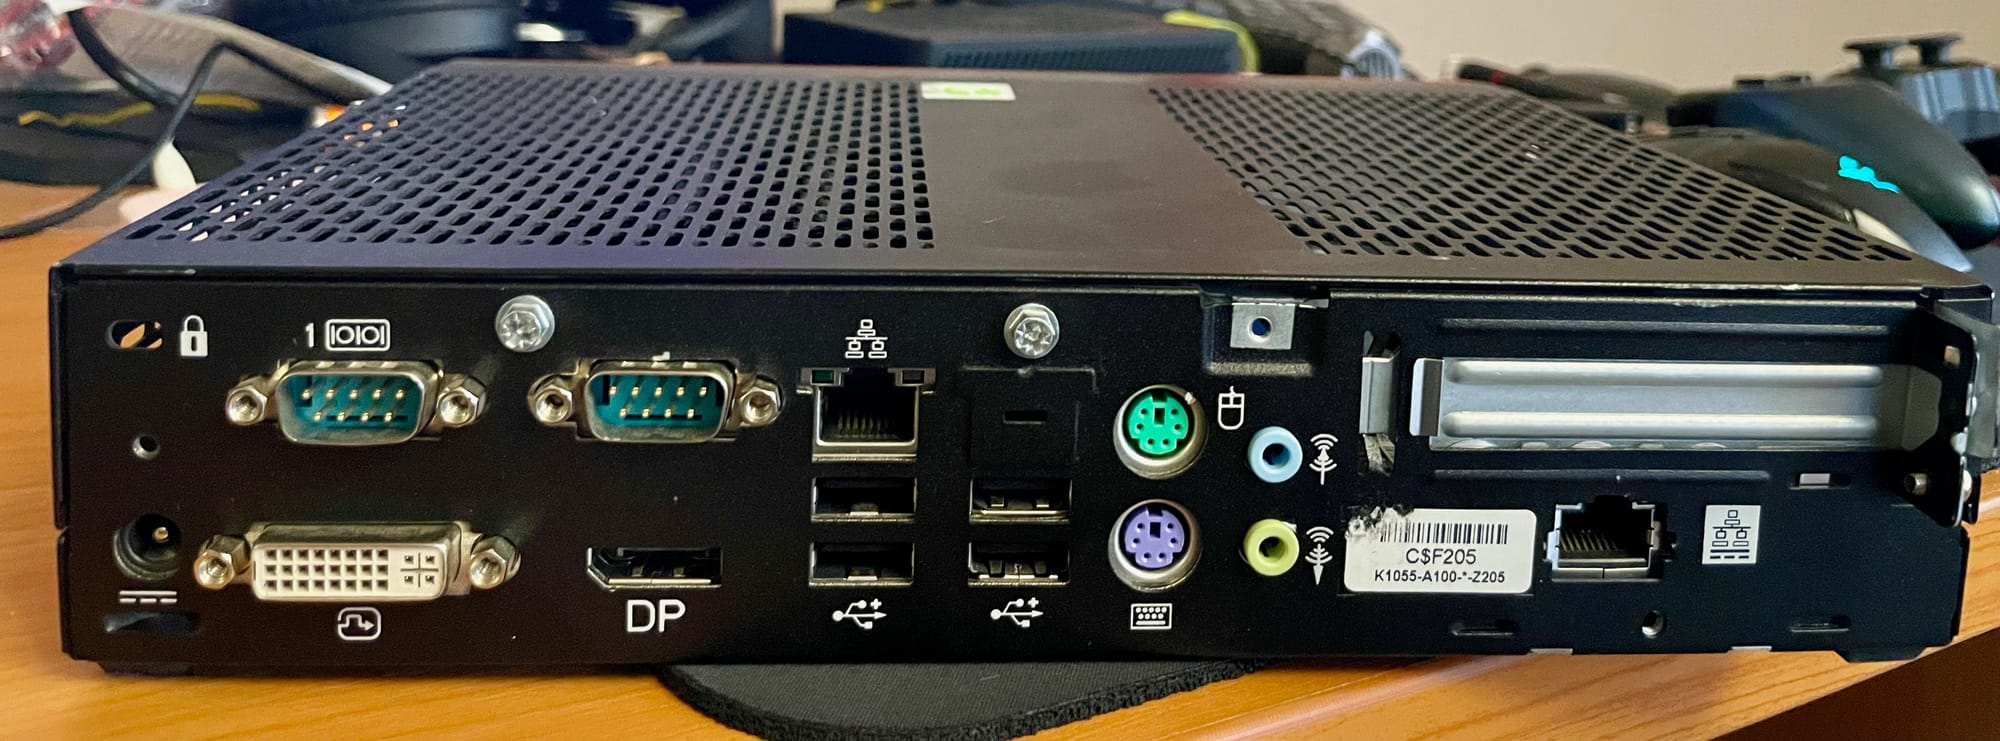
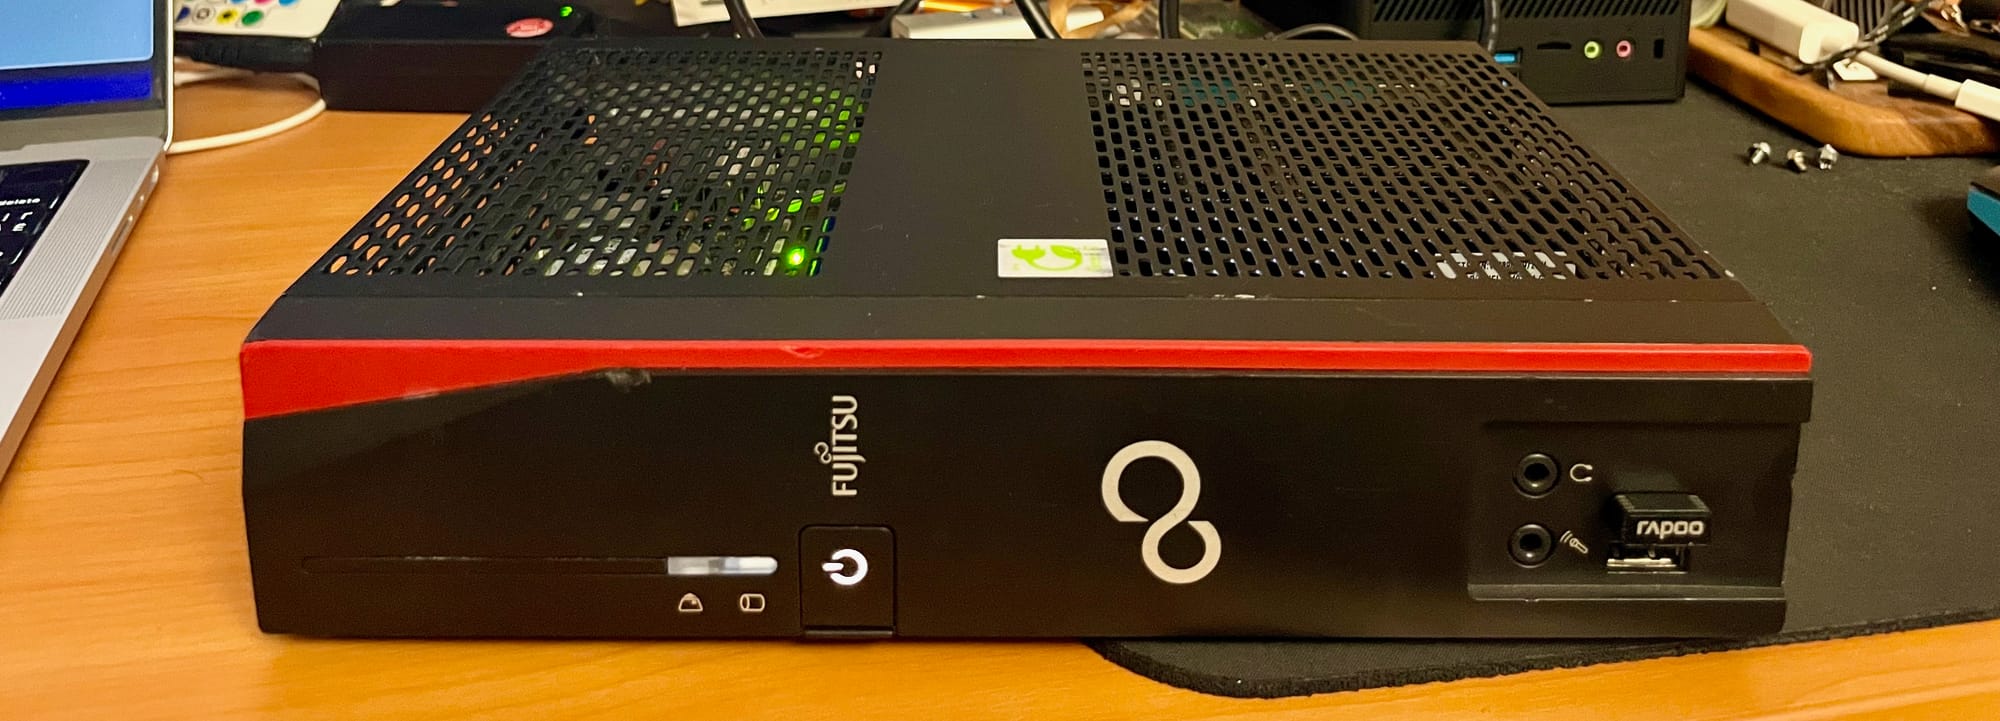
And while it's definitely not my dream hardware, I was pleasantly surprised by its agility. I see that the topic of choosing home mini PCs deserves to be explored in more detail in separate posts.
It came with 4 GB DDR3 1600MHz RAM and an mSATA SSD of a whopping 8 GB. Sounds funny? It wasn't so much for me.
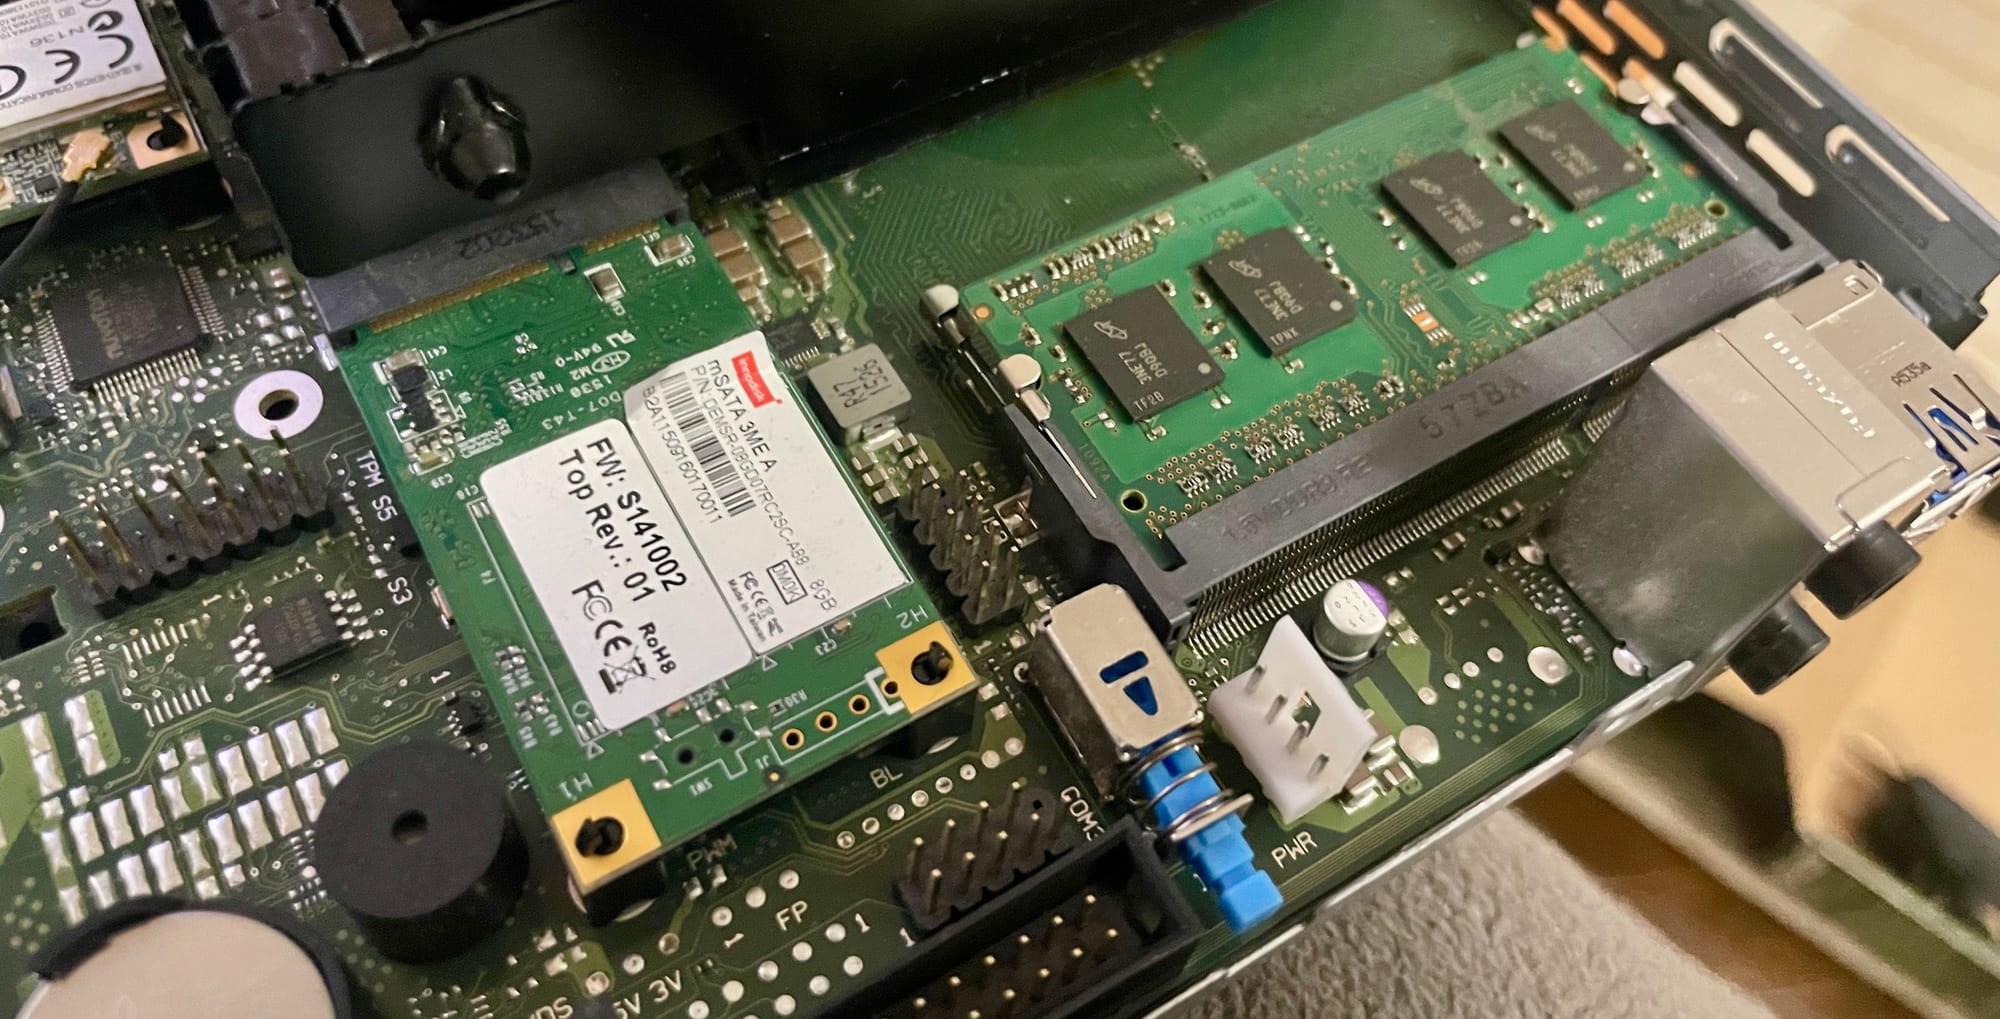
A bonus of such old hardware is that the technology is outdated, and components are reasonably priced, so I upgraded it with:
- 16 GB (2x8) SO-DIMM DDR3 1600 MHz RAM instead of the old 4 GB
Price: 550 UAH (approximately $13.57) - mSATA SSD 512 GB instead of 8 GB
Price: 700 UAH (approximately $17.27)

After dusting it off a bit, I now have a computer that will run 24/7, and the simple upgrade will allow me to run more than just the blog in the future.
Total cost: 2,650 UAH (approximately $65)
For those interested in the details of this device, I recommend checking out this video.
Hardware Tips
- The most important aspect is energy efficiency, especially if we're talking about running just a blog. Pay attention to this, as your server needs to operate 24/7/365 for stable blog performance.
- To maintain stability during power outages, consider how to keep your router and server powered. Energy efficiency plays a significant role here.
- The above points should suggest that using an old PC as a server is impractical due to its energy consumption. In terms of performance per watt, an old home PC will always lose to an older thin client, mini-server, or nettop.
- I recommend starting with old, used hardware. You can always upgrade to a more powerful server if needed.
- I would no longer consider solutions with fewer than four cores, as there are plenty of quad-core mini-servers on the market.
- 8 GB of RAM or more is what I recommend, while 2 GB or 4 GB is only advisable if you know exactly what you're doing.
- Raspberry Pi? Yes, it's a good option, especially if you already have one.
Proxmox VE
If you weren't intimidated by the prerequisites, then tasks like installing an operating system shouldn't be too difficult for you.
Place the mini-computer on your desk. Connect a keyboard, mouse, and monitor. Check that everything is working properly. My old SSD had Windows 8 installed, but it's no longer suitable for our needs.
I want to direct you to another post that provides a very clear and step-by-step guide on how to prepare for and install Proxmox VE.
You need to complete all the steps from the following sections:
- Creating Proxmox USB Boot Media
- Installing Proxmox VE 8.1
- Proxmox Post Install Configuration
- Intel Microcode Update (Optional)
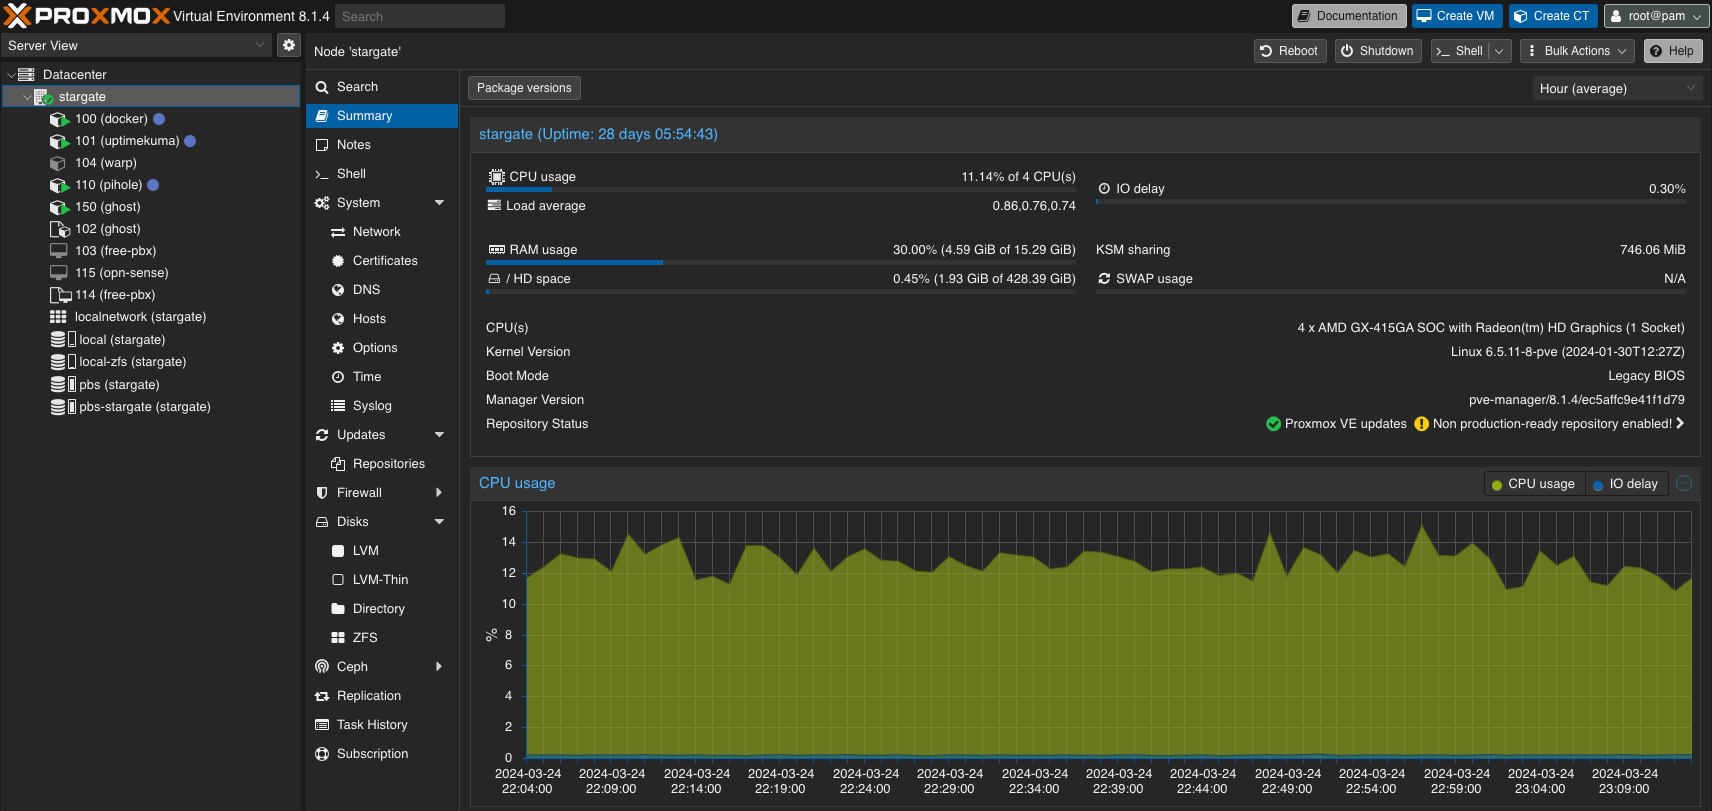
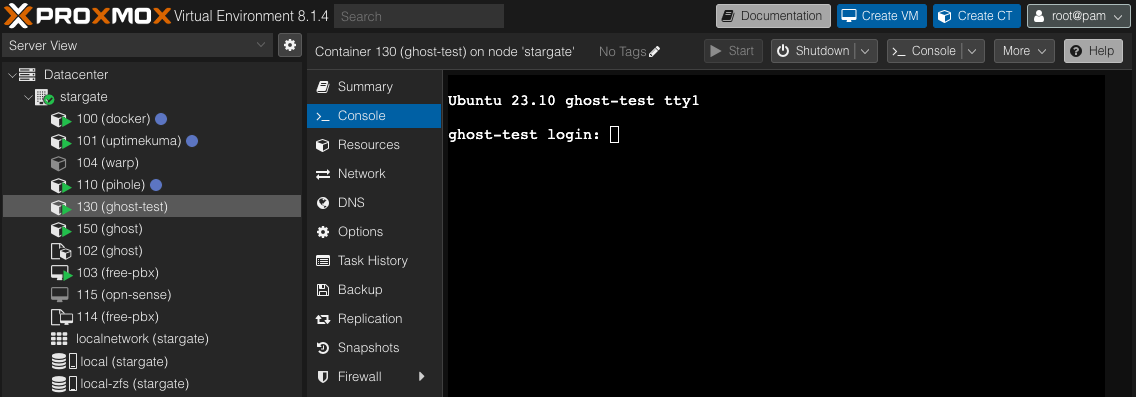
Once you have completed all the steps, you should have access to your server via the Web UI. I named my server Stargate (as I intended to use it as a router). In the screenshot, you can already see the Ghost blog and much more on the left panel, though there's still a lot to do before that.
Preparing the Template
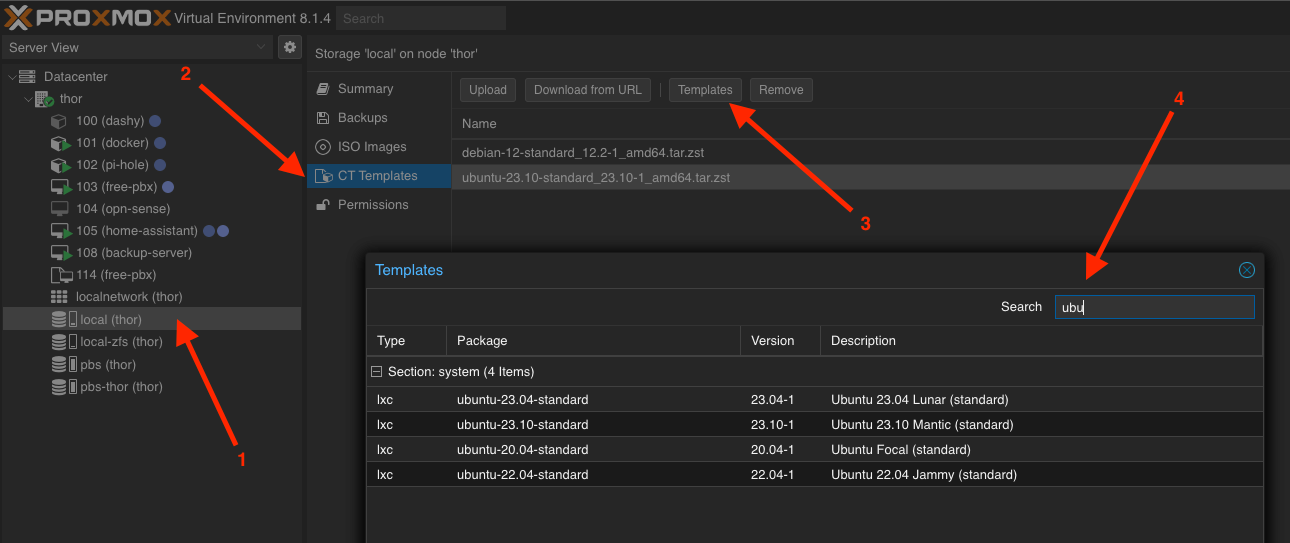
To run a Linux container (LXC) in Proxmox, you'll need to download a prepared template. Follow these steps:
- Open your Storage/disk, which will usually be the only one and named "local."
- Select CT Templates.
- Click the Templates button.
- In the search field, enter "ubuntu."
- Choose the desired version (I selected 23.10) and download it.
Creating a New Container
Now that we have the template to create a new container with Ubuntu 23.10, click the Create CT button in the top-right corner and fill in the necessary details. I’ll guide you through the steps:
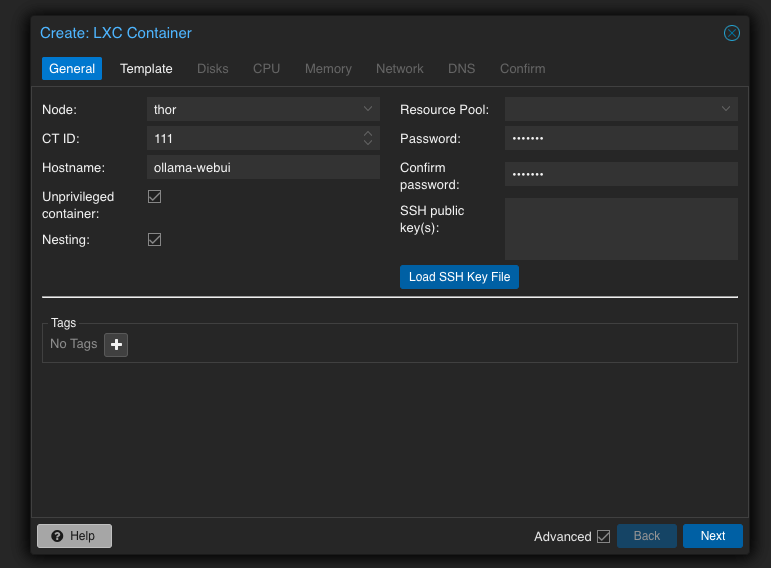
Step 1: General Information
- Set a Hostname (any name you prefer).
- Enter a Password that will be needed for logging in to the console as the root user later.
Step 2: Select the Previously Downloaded Template

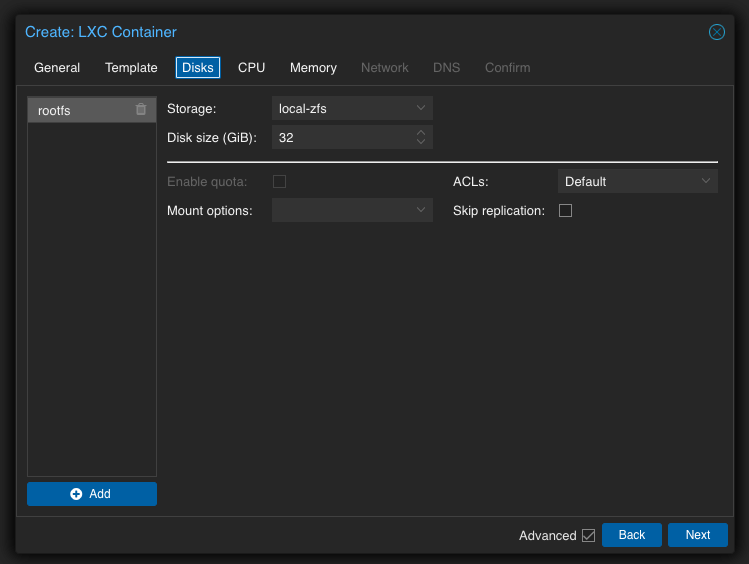
Step 3: Set the Disk Size
I chose 32 GB because I wanted to experiment with different configurations. Depending on your needs, you could reduce this to 16 GB or even 8 GB.
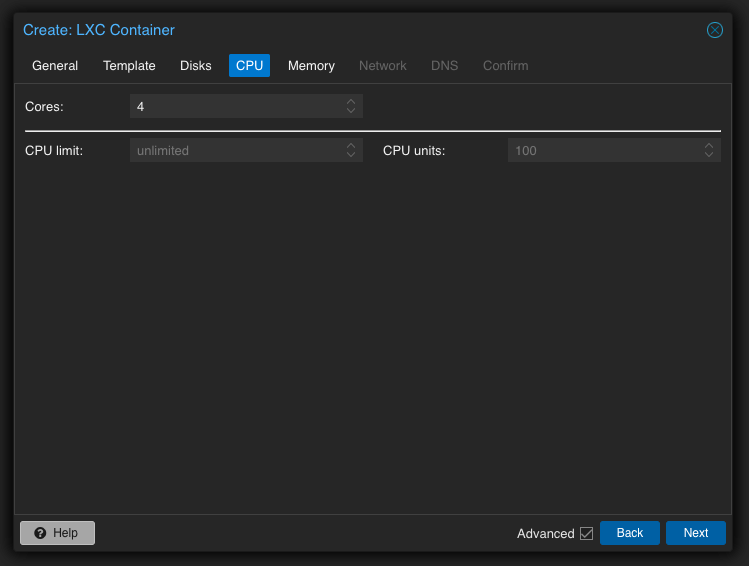
Step 4: CPU
Select the number of CPU cores to be allocated.
If your server is powerful and/or you aim to dedicate all resources to the blog, choose the maximum number of available cores. I have a total of 4, so I selected 2 to leave enough resources for other tasks on my server.
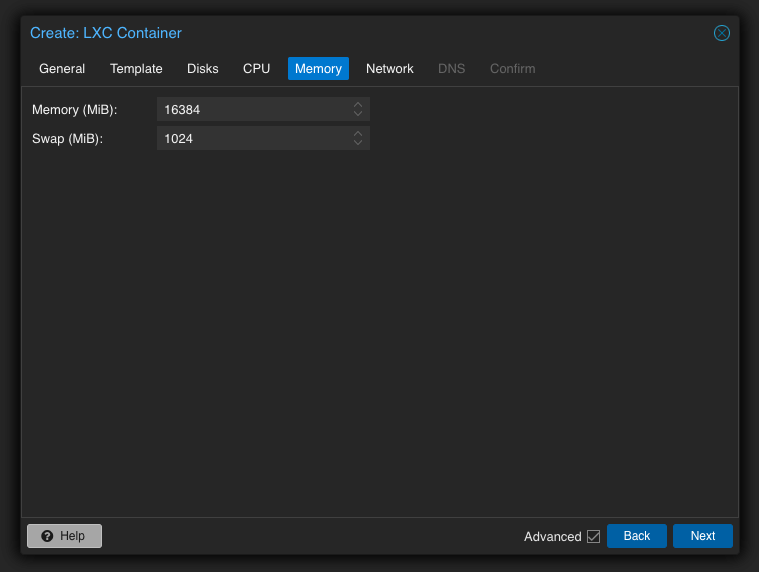
Step 5: Specify Memory
I set it to 2 GB, but in practice, I only saw around 1 GB in use.
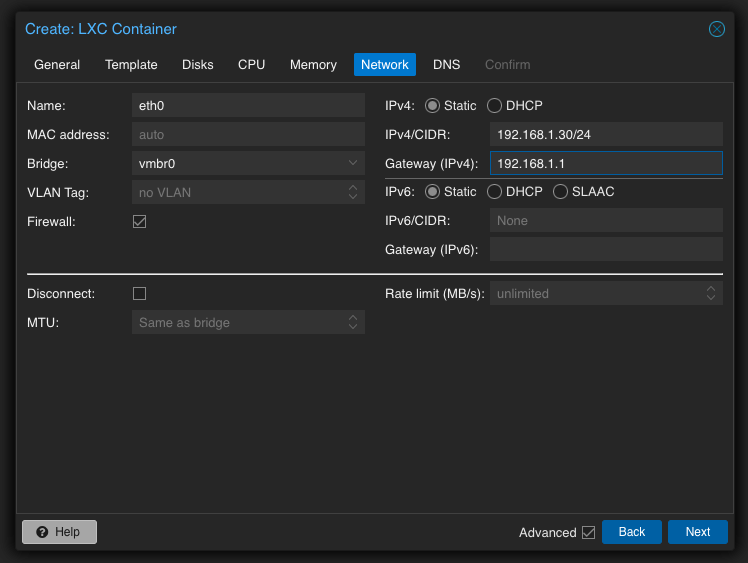
Step 6: Configure Network
For services that I plan to keep for a long time, I usually assign a static IP address, as in this case. Note that the format is specified as IPv4/CIDR, which requires you to specify the network mask using a slash, such as /24 in my case and in most cases. In the Gateway field, enter the address of your router.
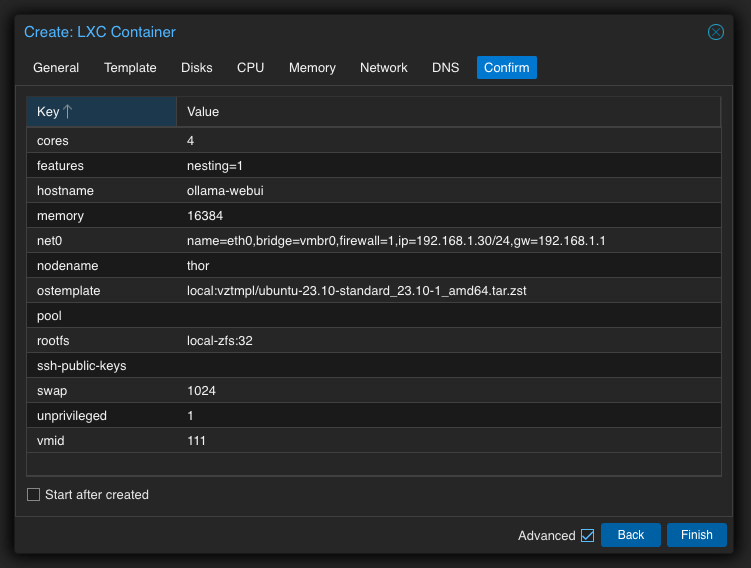
Step 7: Skip DNS, Review, and Confirm
At this step, you can also check the Start after created option to have the container start automatically after creation, or you can start it manually using the Start button. Either way is fine.
Step 8: Start and Connect to the Container
Once the container is created, it will appear on the left panel with the name you specified. Select your container and go to the Console tab.
Since my container is already running, the Start button is inactive, but now you know where it is.
When the console loads, it will prompt you for a login. For containers, this will always be root and the password you set in the first step.
Once you enter the correct information, you will see a result similar to this:
Now you’re ready to move on to the next steps in setting up the blog, which you can learn about in the following section.
Conclusion
In the first part, I want to emphasize that selecting the right hardware for your task is the most important step. Depending on your budget, you could explore more modern solutions, but my example shows that even basic hardware can be sufficient for a personal blog.
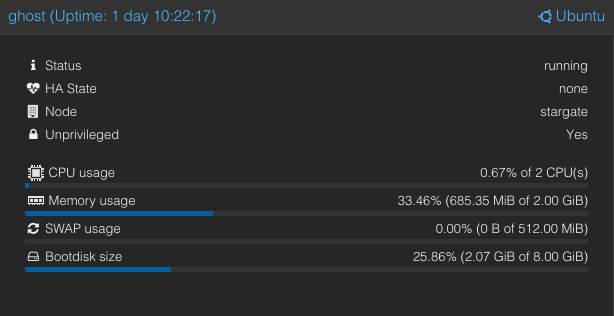
To give you a preview, my server handles many more tasks than just the blog. Below, I provide the current load at the moment. It's easy to see that only the virtual phone system FreePBX is actively using CPU resources.


Note that for the blog, CPU usage is less than 1%, and 1 GB of RAM should be sufficient. Given this, choosing the hardware should be straightforward.
Setting up Proxmox VE, preparing the template, and creating the container are simply monotonous, step-by-step tasks that only take your time and attention. Brew some tea and just go through this as preparation for the next part, where we'll work inside the container and delve deeper into virtualization.
What’s left to do:
- Purchase a domain name
- Install the Ghost blog
- Set up and configure Docker
- Configure Cloudflare Websites and Cloudflare Zero Trust
- Connect the domain name via Cloudflare Tunnel to our server
Read about this in the next part:
 Volodymyr Lavrynovych
If you're interested in Proxmox VE and other services that can be run on this platform, I recommend checking out the publication on Proxmox VE Helper Scripts.
Volodymyr Lavrynovych