Automatic Table of Contents (TOC) for your blog - Ghost


Introduction
As I added more and more posts to my blog, I began to realize just how much I was missing something as simple as a table of contents. The Ghost blogging platform doesn't have a built-in tool for this. However, it does have something else that can easily come to our aid.
Delving deeper into the topic of modifying my blog, I started searching for a solution to be able to add table of contents to my articles.
Why do we need a table of contents at all?
A good question to ask before starting. My answer is that it's for structuring content. Especially if you're describing a process like instructions, etc. And in cases with a large amount of text, a table of contents won't be superfluous. As a content consumer myself, I often strive for the section I came for. Perhaps sometimes this will negatively affect how much time the reader spends on the page, but considering the primary goals - to help people, share experiences, and information - a table of contents will be extremely relevant in any case. So it's decided - a table of contents must be there, period.
Exploring existing solutions
Looking at many posts on this topic across the Ghost platform and beyond, it became clear that people tackle the problem in two ways - manually adding a table of contents with links or automating it.
Manual method
And right away, I can share a post where a table of contents for a publication is created manually, which might be a quick and understandable solution for someone.

Here you'll find another post on the same topic.
 Ayu Adiati
But I don't even want to dwell on these solutions because anyone who has ever written large volumes knows that after everything is written, there are several iterations of editing where even the section titles may change, requiring updates in the table of contents, which again entails manual work, something I consider unnecessary in 2024.
Seriously? Creating the table of contents manually? Then what's the point of all this?
Automated method
Now, this is more interesting. And without going far, the Ghost platform itself already suggests using Tocbot as a recommended solution.

I honestly went through the entire guide, and I started to feel a bit suffocated. Plus, it's not quite the solution I was looking for, both technically and visually. Let me explain.
Analysis of the downsides of integrating Tocbot
Firstly, the article describes a scenario where the table of contents will always be located on the side. It's trendy, but it won't suit all types of blogs. A more classic and understandable approach is to have the table of contents at the beginning of the publication. One of the advantages of this approach is the unlimited space and support for complex structures when needed.
Secondly, your blog will depend on a third-party solution because it uses scripts and styles from cdnjs.cloudflare.com.
<!-- styles -->
<link rel="stylesheet" href="https://cdnjs.cloudflare.com/ajax/libs/tocbot/4.12.3/tocbot.css">

<!-- javascript -->
<script src="https://cdnjs.cloudflare.com/ajax/libs/tocbot/4.12.3/tocbot.min.js"></script>
Well, maybe these are just my nitpicks, but it's possible to do without them.
Thirdly, you'll need to modify the default.hbs and post.hbs files on your server, which is not a trivial task for many authors because not everyone knows and understands where these files are located, and often they don't even have access to their own server.
I hope my opinion is clear here. So what do I propose?
Automatic table of contents generation
Ideas from other authors
As I continued exploring, I came across a method where JavaScript can be used to extract all the headings of various levels in your publication and automatically generate a table of contents with links to sections for quick navigation.
The first thing that caught my eye is this interesting post:
 Ryan Feigenbaum
Later, I stumbled upon a similar approach like this one:


And this post of Dana Hooshmand motivated me to conclude the search I had begun:

All three options discuss how we can automatically read our sections and their links and reproduce (generate) the table of contents in the right place based on existing information.
The biggest advantage of this approach, in my opinion, is that the table of contents will be automatically updated when changes are made to the publication, which prevents errors in titles or links.
The idea of implementation in Ghost
Enough philosophizing - let's get down to business. After looking at the code of other authors, for some reason, I decided that I could "invent my own bicycle". Well, I'm not particularly fond of other people's code, and I wanted to introduce some changes to what I saw in others.
The basic idea is that, having a script for generating the table of contents:
- We can add chunks of HTML to the blog, with scripts and styles.
- We can save this HTML as a template for quick use in the future.
Let's immediately highlight the advantages:
- The code will always be under your control and won't require loading from external resources.
- There's no need to have access to files on the server for installation.
- It can be used anywhere.
- Once created, it can be quickly added to other publications.
- There will be an opportunity to slightly change the style and heading if necessary.
I'll explain in more detail later, but for now, let's move on to the code.
My table of contents generation script
For convenience, I've posted my version on GitHub.
Let's go through some points:
- The entire code is HTML, which includes styles, scripts, and the
<toc></toc>element, which will be filled with the table of contents. - Styles are located at the beginning and are always available for modification, even for each publication separately, if you need to change the margins or colors.
- The table of contents is built on the DOMContentLoaded event - when the entire page is loaded in the browser. This means that once everything is loaded, the parsing of sections and the formation of the table of contents begin.
- It supports 2 levels. This means that there will be nesting when you use headings of different sizes. It will be displayed as a simple tree.
- In the case where you use headings of the same type (either all large or all small), the table of contents will have a flat appearance. To ensure this, there's a variable called isMultilevel, which affects the construction of the tree.
- There is a title generation for the table of contents. The variable caption has two parameters:
- enabled - controls whether to display the table of contents title or not.
- text - contains the actual title of the table of contents.
You can modify these parameters as needed, especially if you use different languages.
I'd be glad to receive your comments and suggestions regarding the improvement of this script.
Currently, only H2 and H3 headings are supported, and adding other levels is possible, but considering the needs, it was decided not to go beyond 2 levels because this is a blog, not scholarly articles of 100+ pages. No need to complicate things.
How to Install
I want to emphasize once again that the following instructions are specifically for the Ghost blogging platform, but with minimal changes in the code or approach, the same script can be used for almost any website.
Step 1: Creating a Snippet
First, copy the entire code provided above, or use this link. Then, as the author of your blog, add an HTML element in any post and paste the full text of the script there.
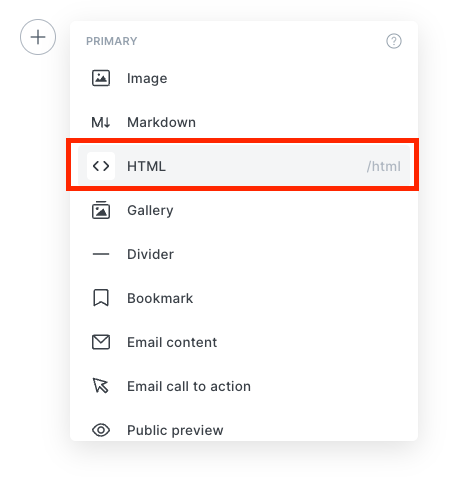
It will look something like this.
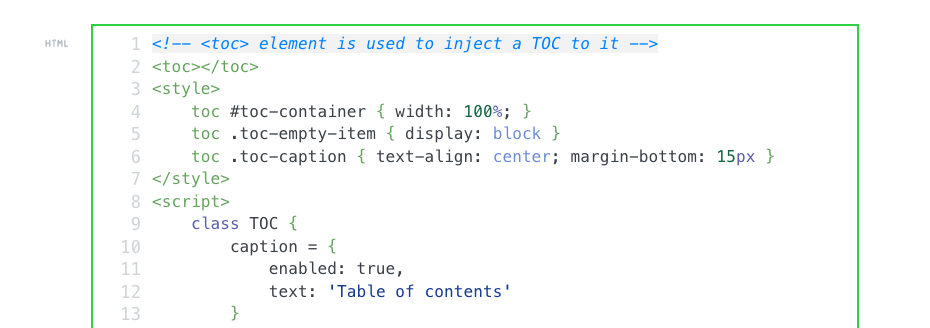
By the way, here you can adjust the styles and the title of the TOC, for example, by replacing "Table of contents" with any text for localization for any language.
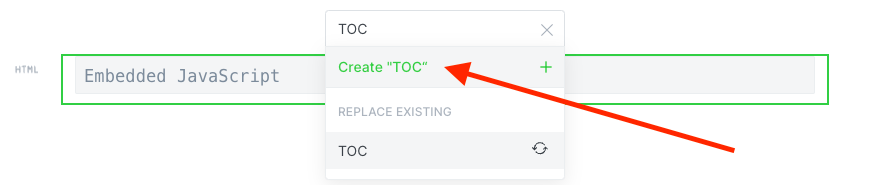
Click outside the HTML element to convert it to Embedded JavaScript, as shown in the picture.

And save it by giving it a short name like TOC (Table of contents).
As you can see, there's also the option to replace or delete it later on. So feel free to take these steps yourself.
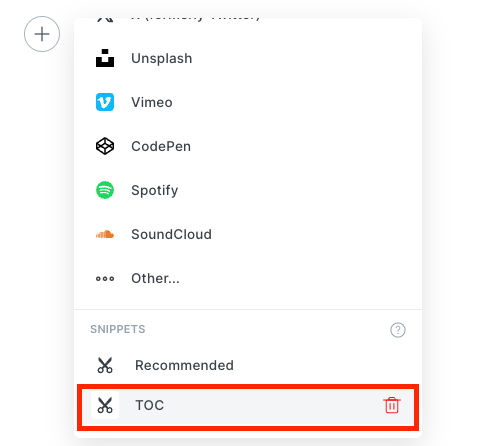
Step 2: Adding
Having a snippet named TOC, all we need to do is open the publication where we need the TOC and insert it just like we added an HTML element, but this time, look for TOC at the very bottom of the list.
All set! Now, after publishing or in preview mode, you'll see the TOC generated based on your content. Just remember to use your snippet each time at the beginning or wherever convenient for you.
The result of executing this script can be seen at the beginning of this article. Or here's an example of another publication with a table of contents with multiple sections:
 Volodymyr Lavrynovych
You can learn more about snippets in Ghost here: https://ghost.org/help/snippets/
Summary
Adding and using my script boils down to just a few clicks, and compared to other solutions, you'll hardly find any differences except for simplicity and accessibility. As mentioned earlier, this approach is independent of third-party resources (servers), doesn't require access to blog files, and can be easily visually customized as desired.
I leave the choice of the most suitable option for you. My thoughts and conclusions have been laid out above. I'm sharing my experience and a couple of hours spent on writing and testing my script.
Recognizing that the script may not suit everyone or may contain errors, I've made it open for you
I hope my solution saves you time and makes your blogs more robust and functional.
Volodymyr Lavrynovych